


.svg)
Please note that 'Variables' are now called 'Fields' in Landbot's platform.
Thanks to the rise of no-code platforms and AI chatbot builders, chatbot development has become easier than ever, making it accessible to a wide range of brands and companies.
Whether you’re a marketer, a customer service team leader, or a tech-savvy business manager, you can create your own website chatbot for a number of use cases that will automate your daily operations.
In this guide, we’ll walk you through how to create a chatbot for your website with Landbot’s bot builder, with some pro tips at the end to take your building even further.
Let’s get to it
What Types of Chatbots Will You Learn To Build In This Article?
Right about now, you might be wondering which type of chatbot you’ll learn to build here with the Landbot chatbot builder. The answer is simple. The tutorial shows you how to build a rule-based website chatbot with some basic conversational app elements.
These types of bots:
- Deliver the most consistent and reliable experiences/results;
- Are quick to create and easy to control;
- Are applicable in a vast majority of business use cases.
Note: If you are set on creating an AI chatbot, you can also do that without coding using Lantbot's AI chatbot features.
How to Make Your Own Chatbot for a Website?
This bot won’t cost you an arm and a leg, nor does it call for hiring a developer to get it done. The Landbot chatbot builder makes creating a bot easy, visually appealing, and (without a hint of exaggeration or bias) fun!
1. Set Up Your Landbot Account (Fast & Free) & Get Started
Before anything else, you need to create an account with Landbot. The signup is free and doesn't require credit card information.
Once that is done and you’re inside the builder, click on “Build a chatbot” in the upper right corner and select the type of bot you want. For this tutorial, I chose to create a website chatbot, although the builder is the same no matter what option you choose.
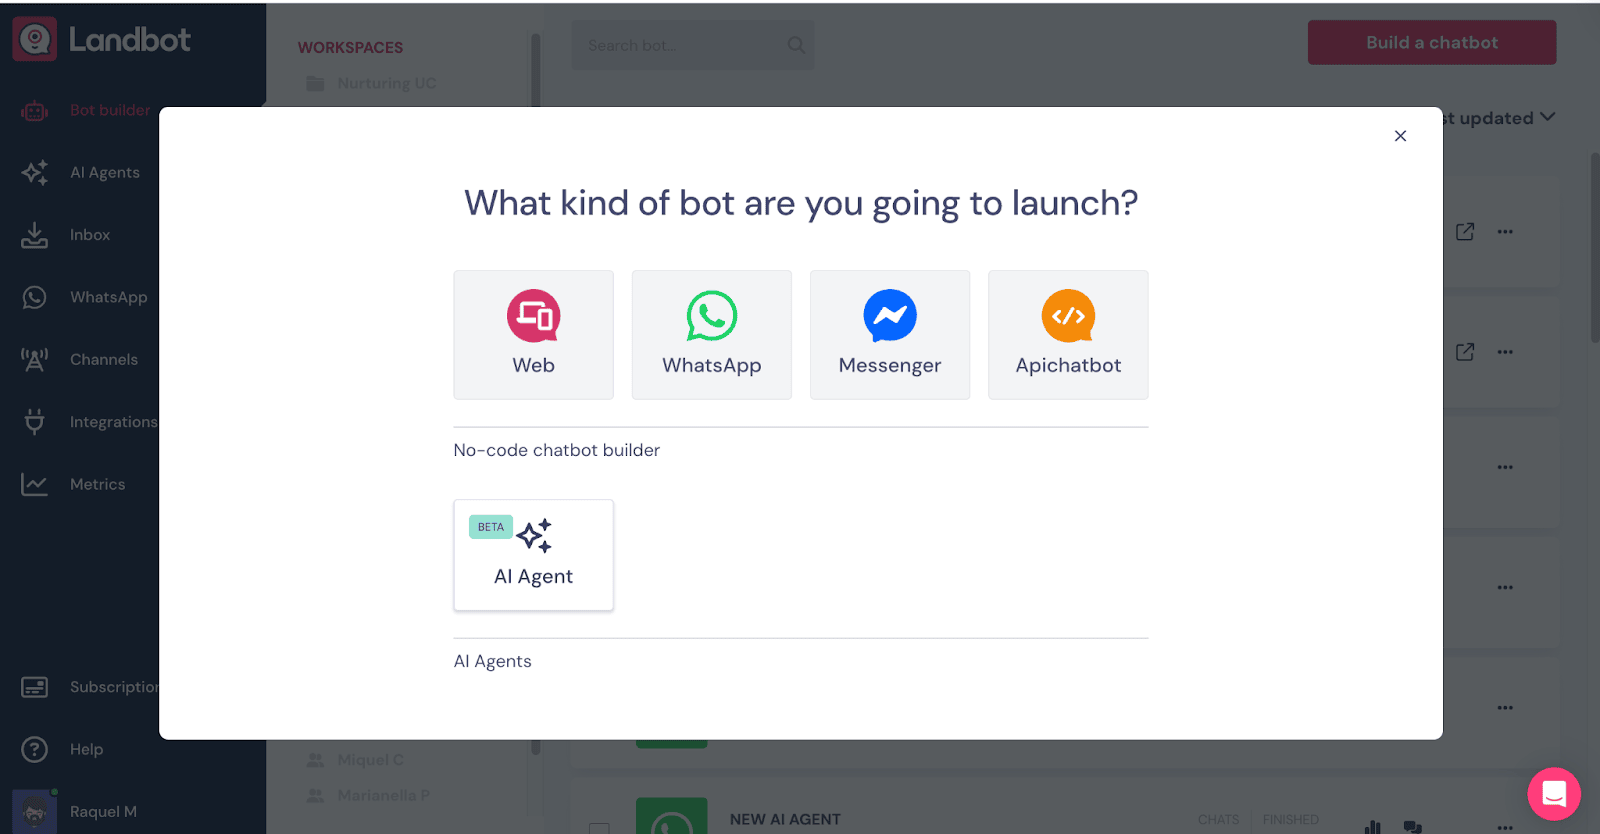
After the channel selection, you’ll choose between the “Build it for me” feature, starting from scratch, and using a template. Let’s go with “Start from scratch”.

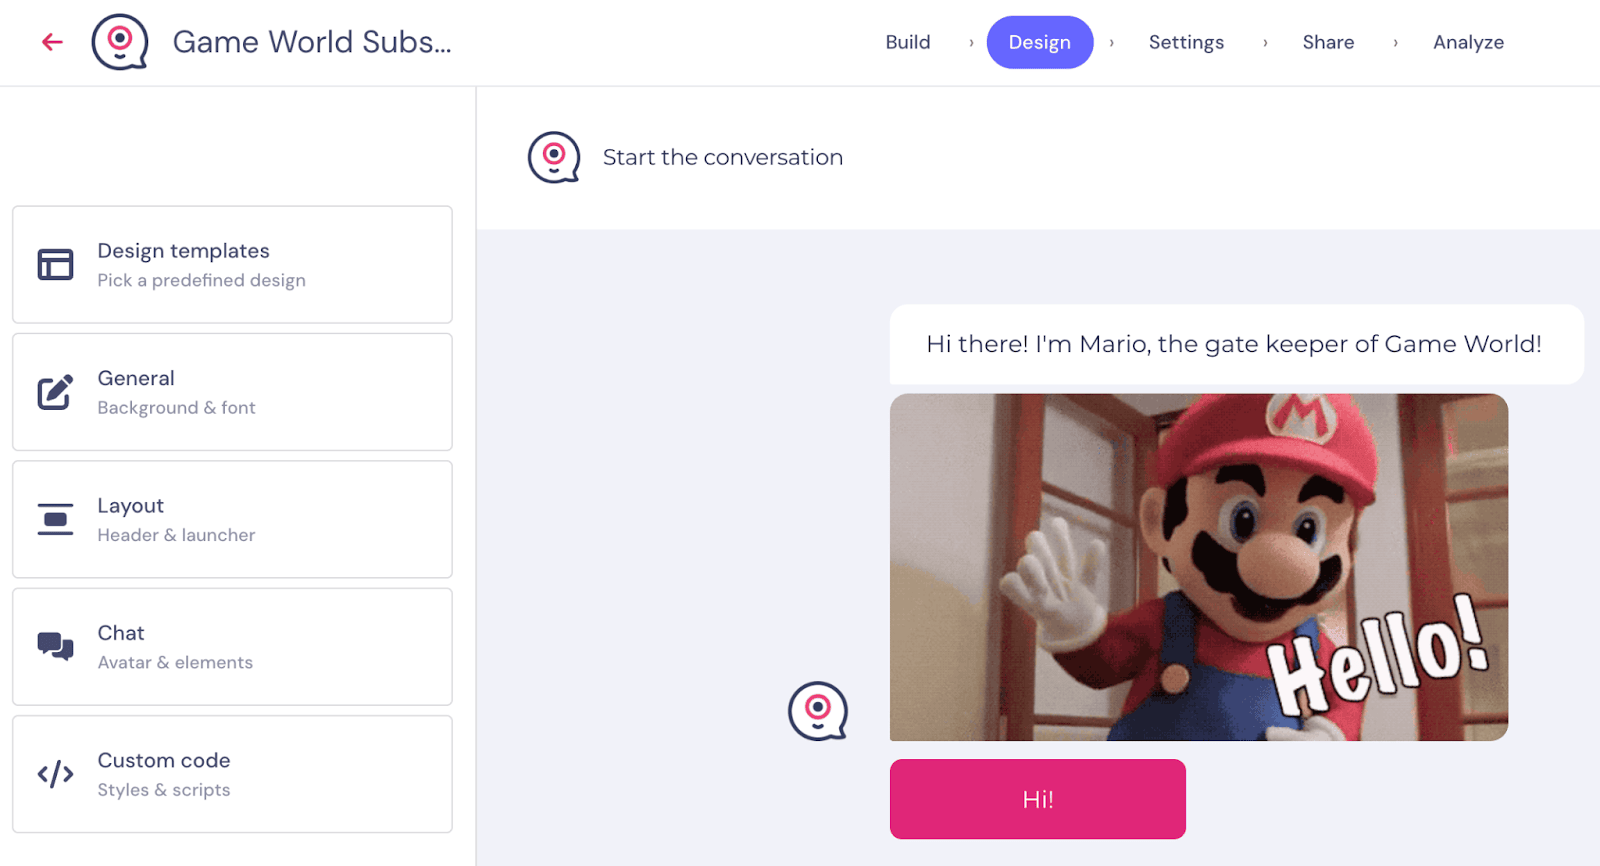
2. Define the Welcome Message
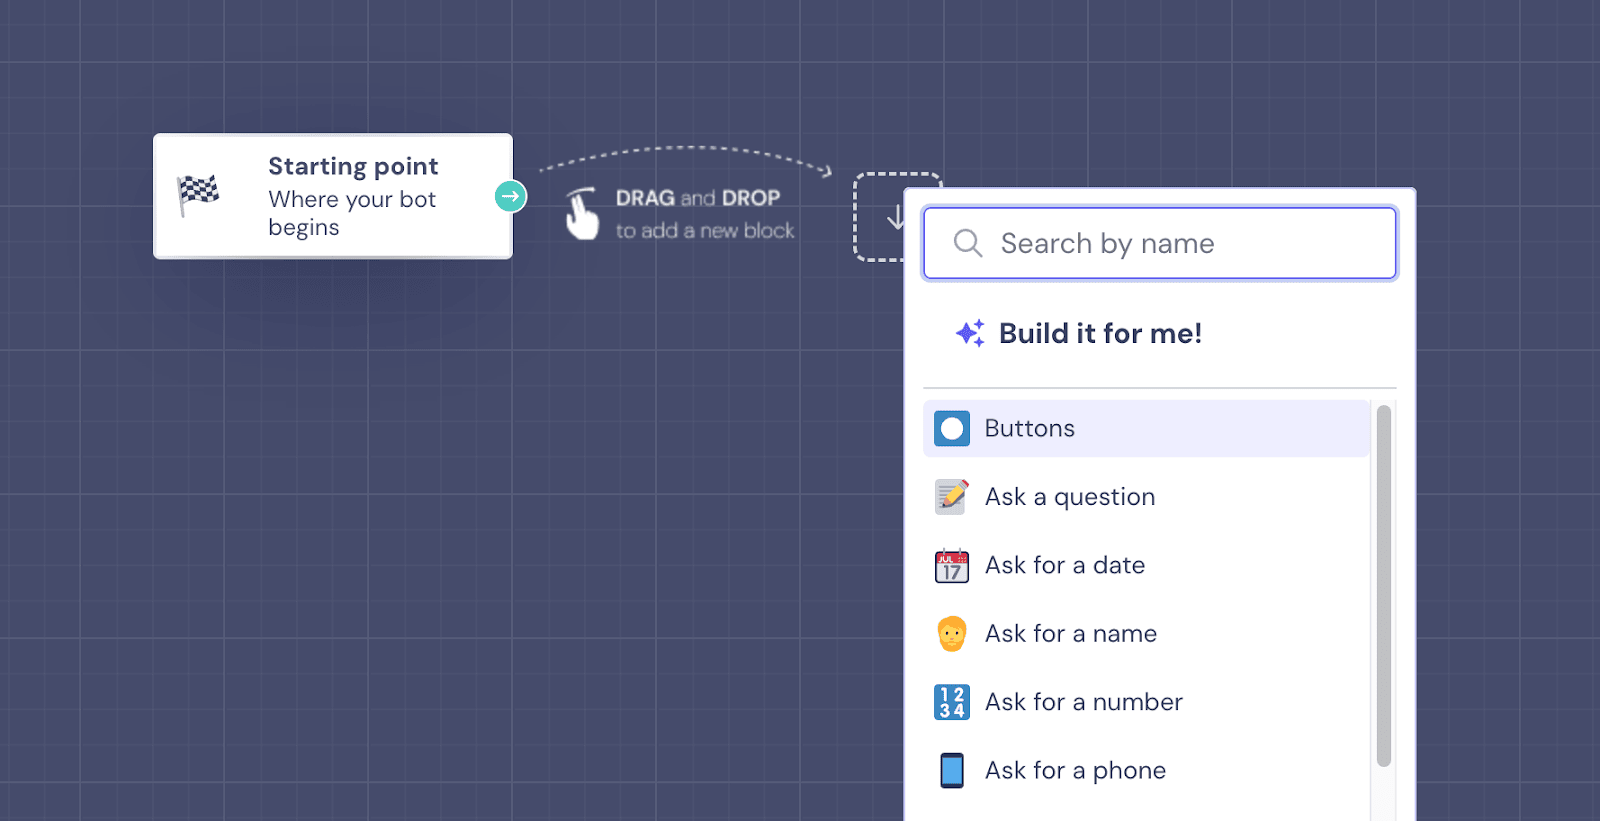
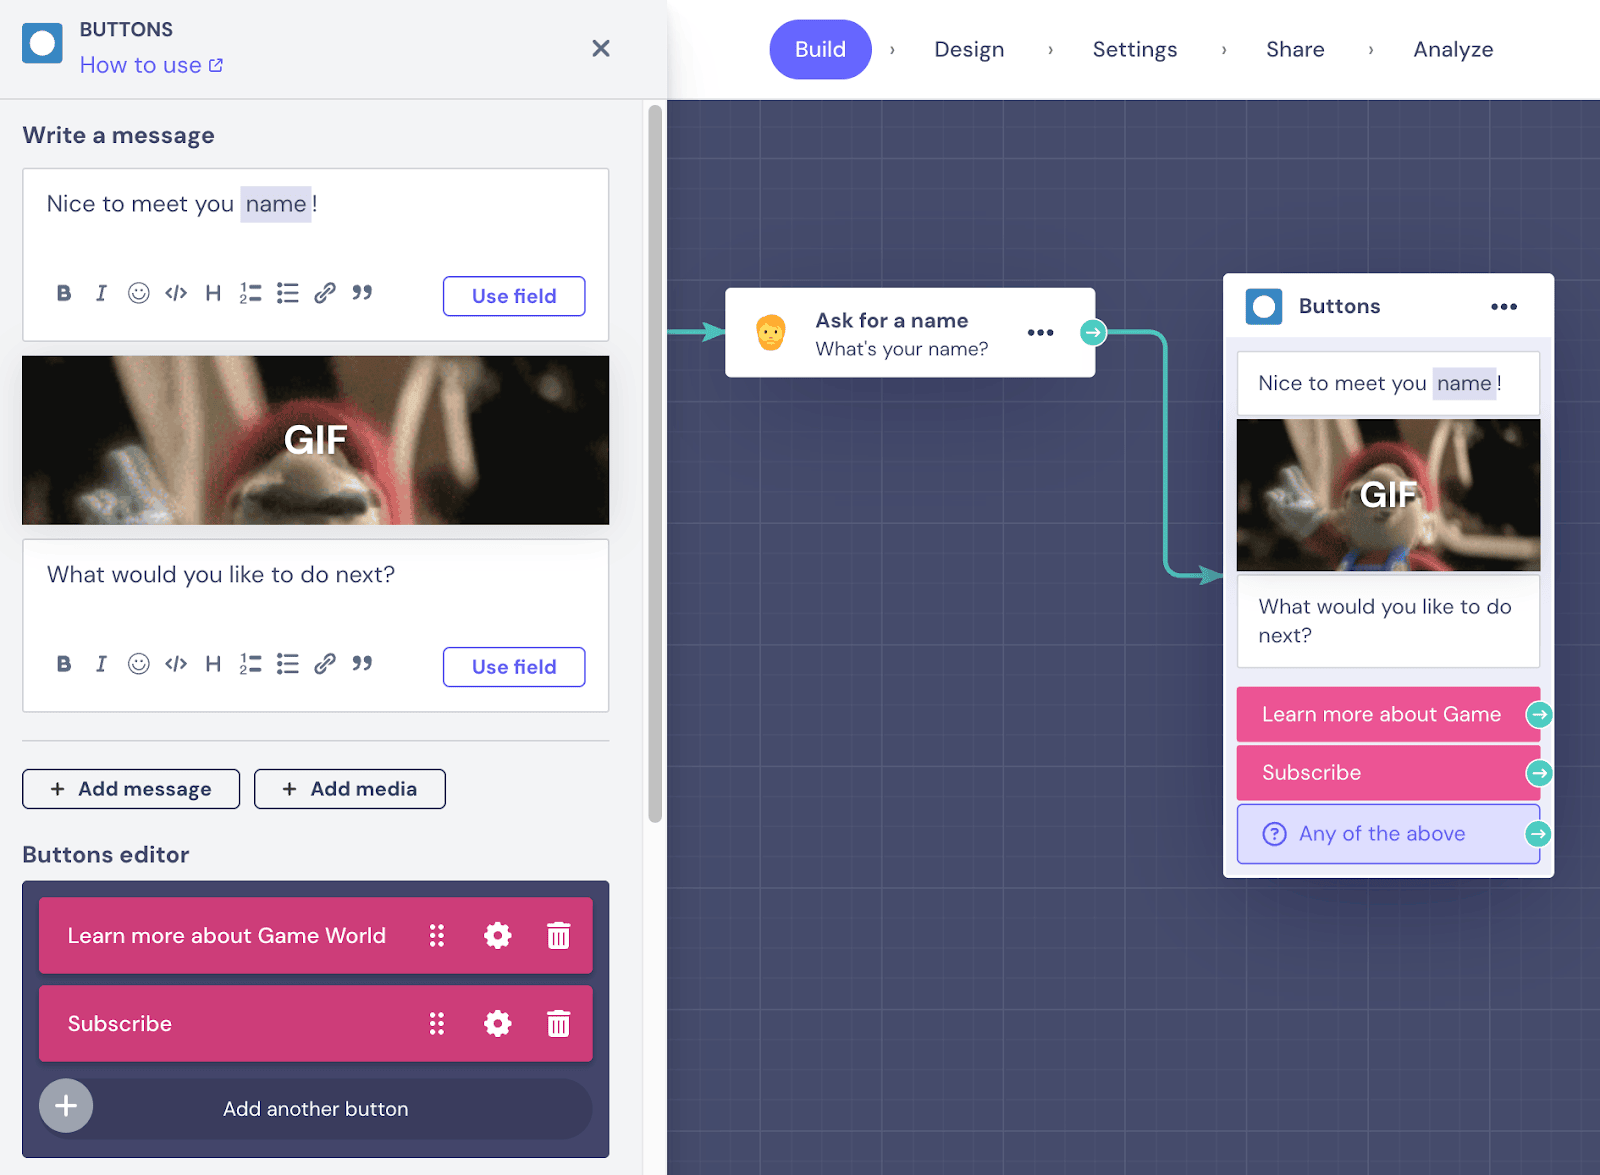
The first message to personalize is the welcome message. For this, you can pick from different blocks like “Ask a question”, “Ask for a name”, or even the “Buttons” block.
In this bot-building exercise, we will create a subscription bot for a fictional online gaming magazine called “GameWorld.” To get started, drag an arrow from the “starting point” block and select “Buttons”:
Next, type in your welcome message, add any media you want (a GIF, image, or video), and edit the button.
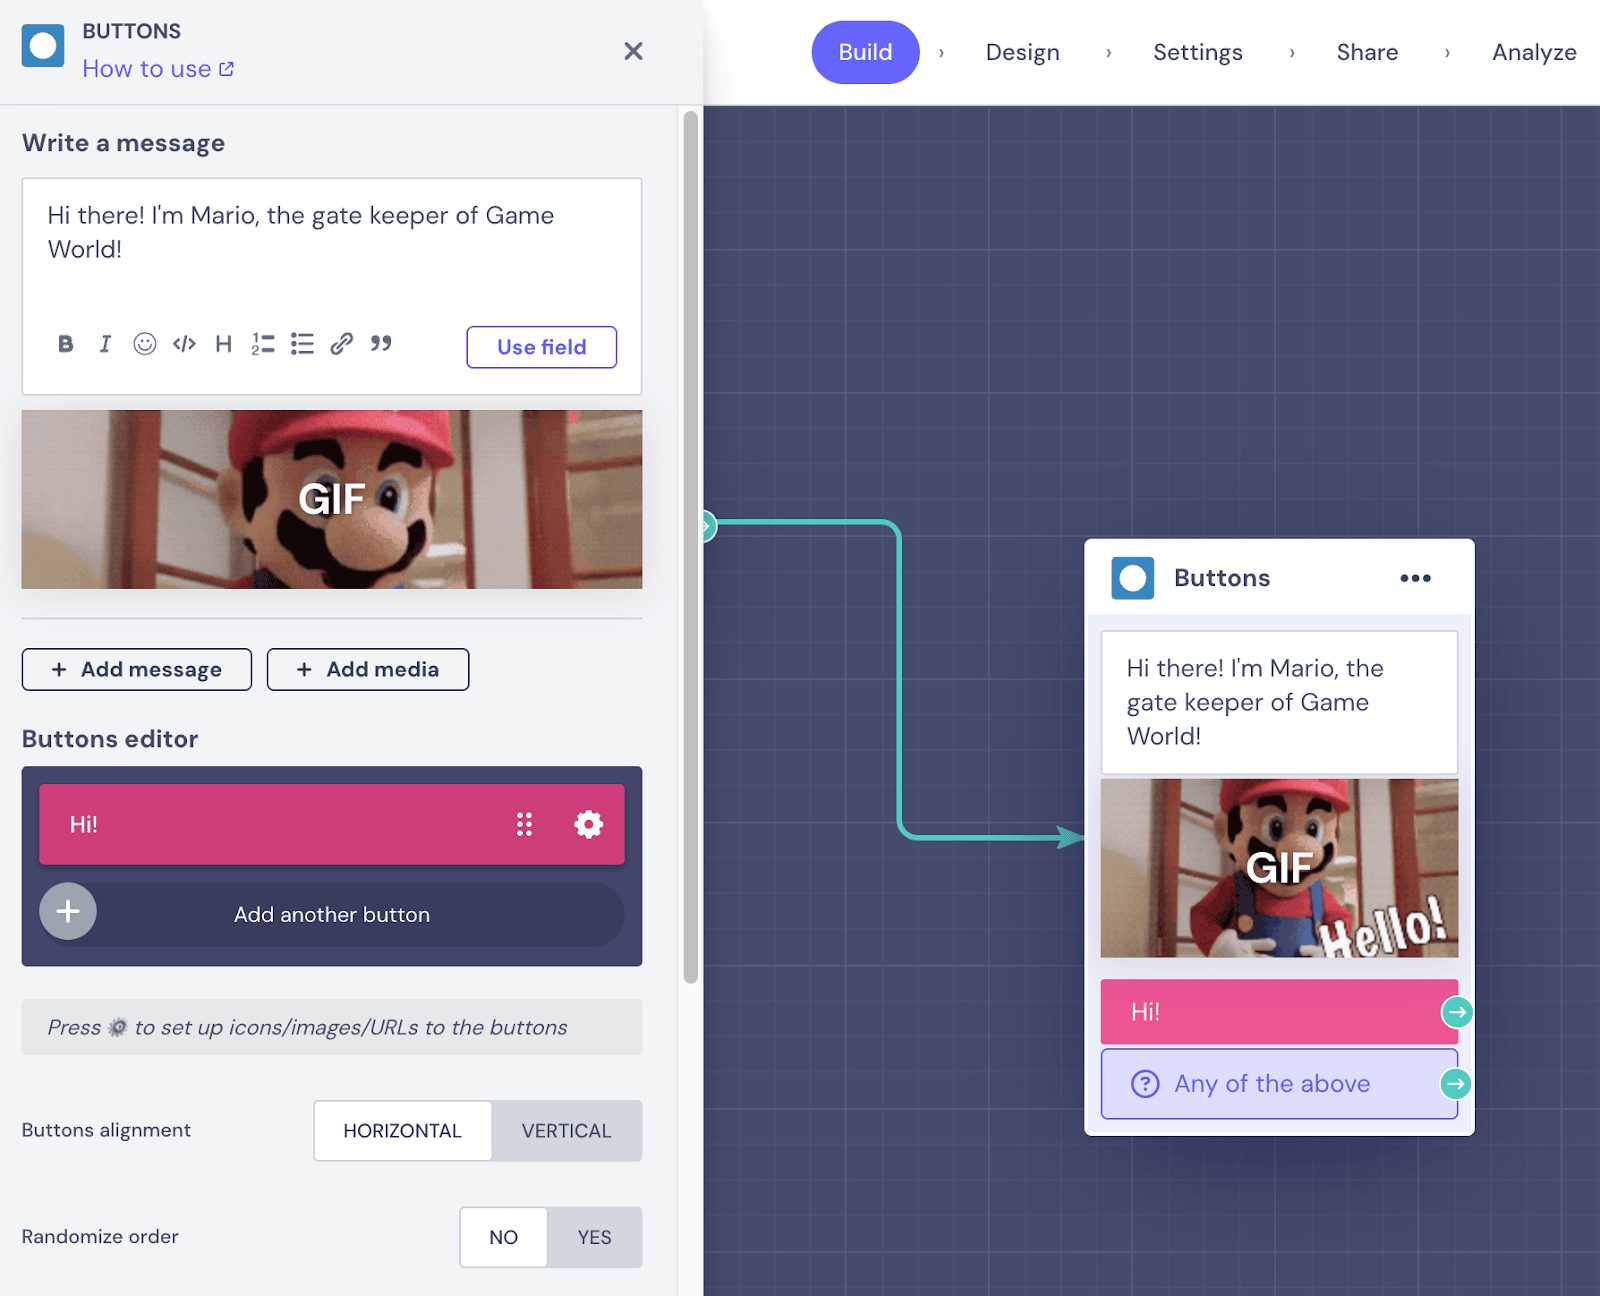
My bot introduces itself, and the user can begin the chatbot conversation by clicking the “Hi” button. Given that this is a welcome sequence, keeping it simple with a single answer helps kick-start the engagement.
3. Ask a Question (Name)
As you may have noticed, our bot builder offers a wide variety of question types. This is to make the bot setup faster since they come pre-formatted for the data they are supposed to collect. (e.g. the “Ask for a number” block will only accept digits).
The key to any basic interactive chatbot is real-time personalization. It would be a pity not to take advantage of that straight from the start, for instance, by asking the user's name. So, to add the Name block to the bot flow, drag an arrow from the “Hi” button and pick the “Ask for a name” block.
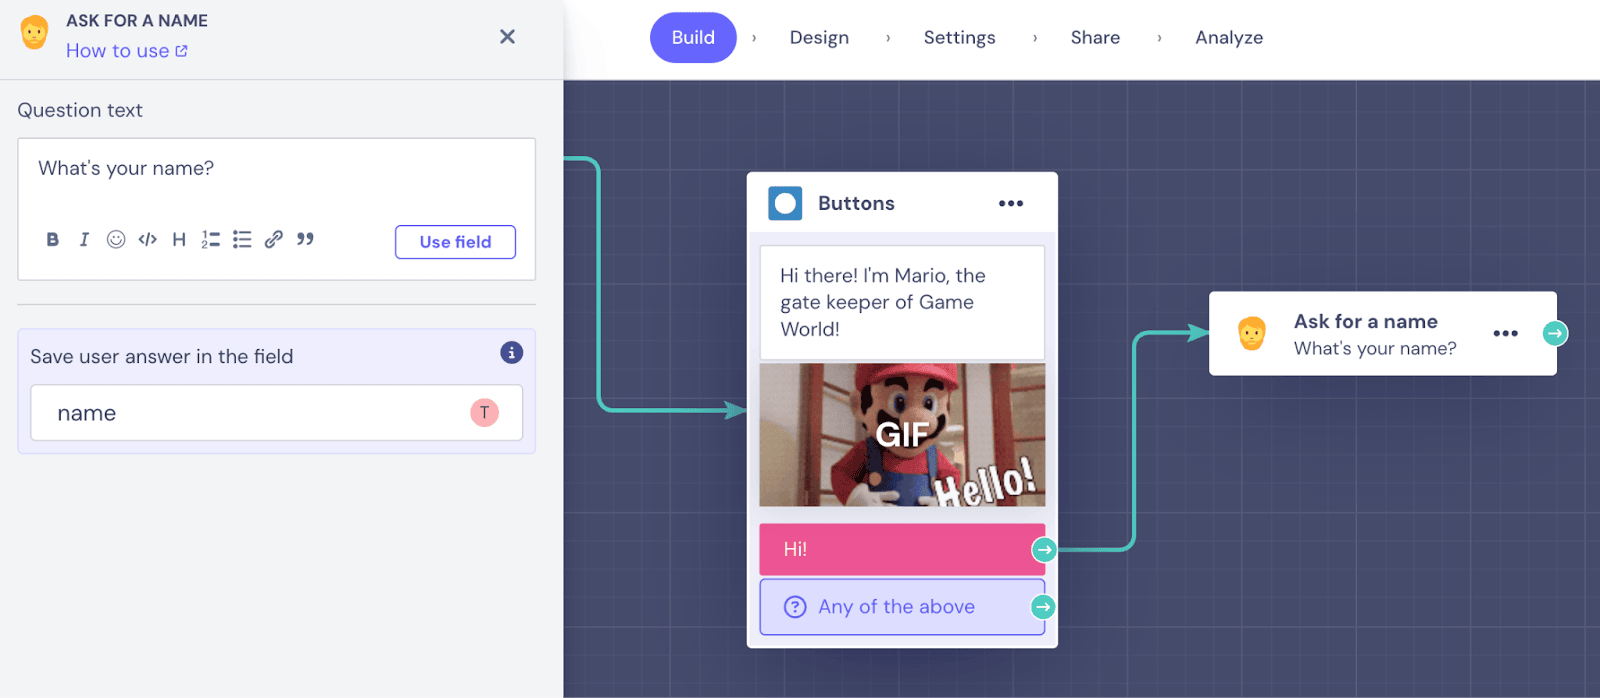
In the side panel, you can personalize the default question text “What’s your name?” with something that more suits the tone of your bot/brand.
The advantage of using the name block is that it comes with the pre-set @name Field, so you don’t have to lose valuable seconds setting up your own. By saving the user’s name under the @name Field, you can personalize the interaction, as we’ll see in the next step.
Note: In the Landbot chatbot builder, Fields in the format “@” + “field name” serve to categorize and store data collected by the bot. You can use this data for personalization inside the conversational flow or export it to an external database. You can use default Fields or create your own.
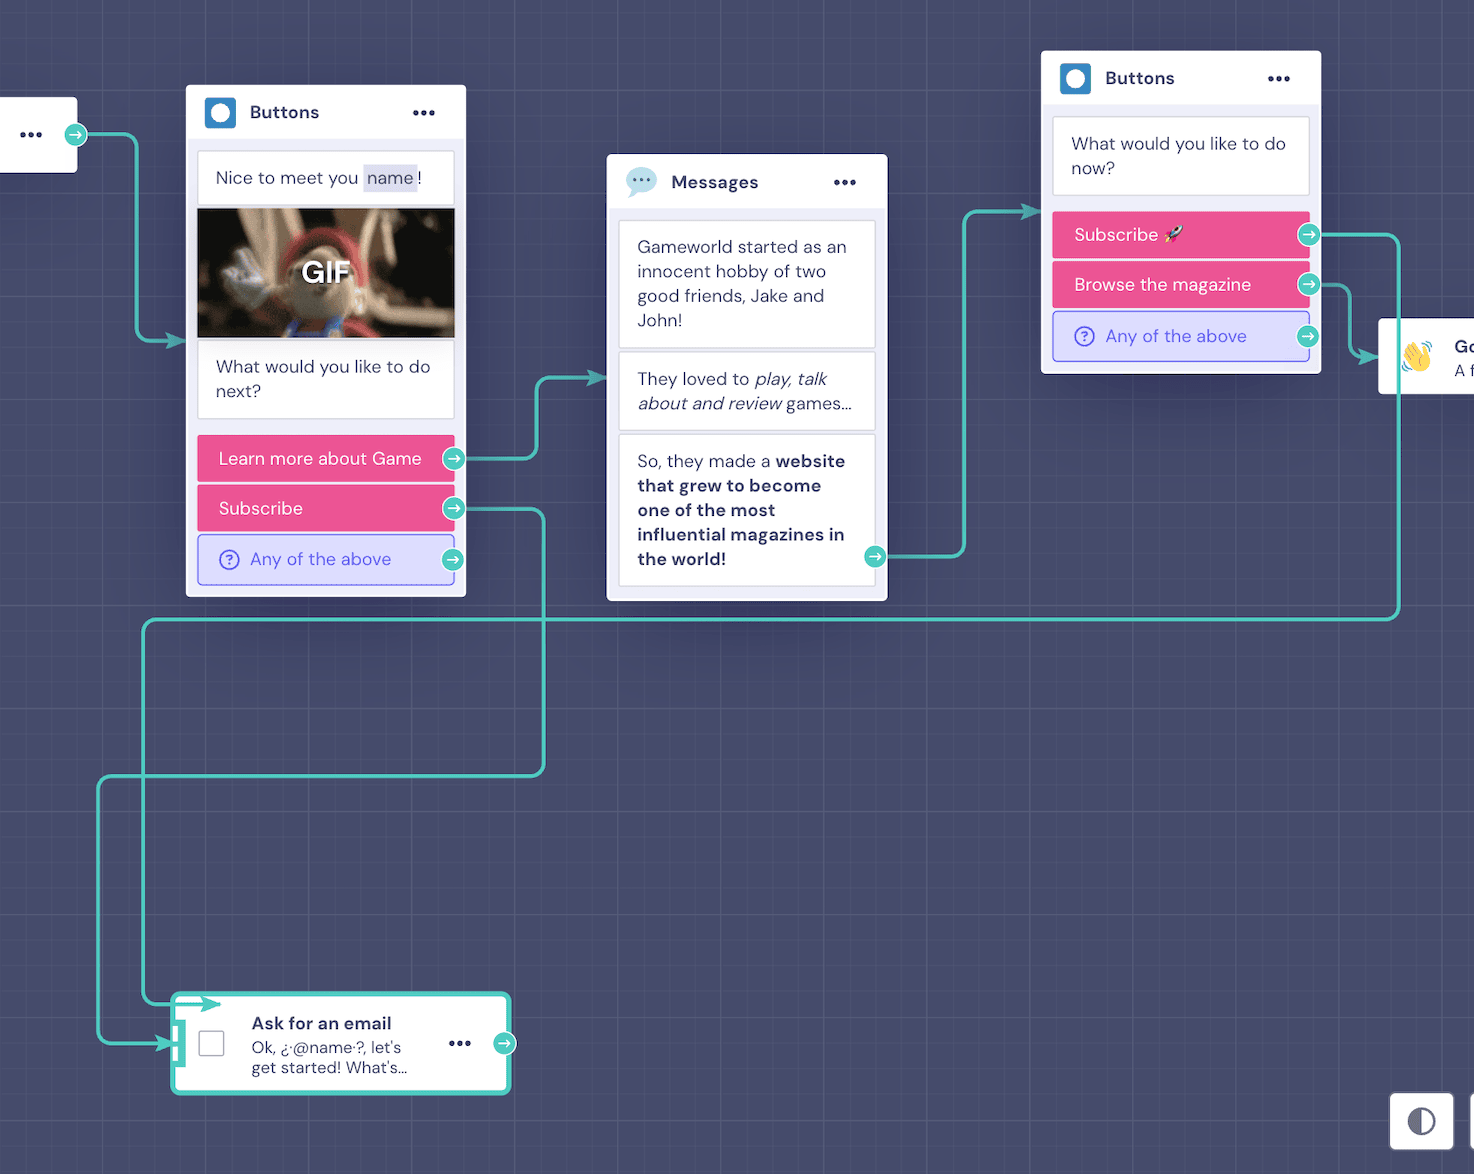
4. Ask Questions (Button Choice)
Our next step will be to set up a first true button choice. Drag an arrow from the name block and choose “Buttons”. You can divide your bot’s speech into various bubbles or add visual media before presenting user responses in the form of a button choice.
The key point is, this time, the buttons will lead our prospect down different paths:
- Learn more about GameWorld or
- Subscribe.
If the user is not ready to subscribe yet, they are free to learn more about the platform and clear any doubts they might have. To divide the flow based on the user’s answer, drag an arrow from “Learn More About GameWorld” button choice, select the “Message” block, and add the information you want the user to learn.
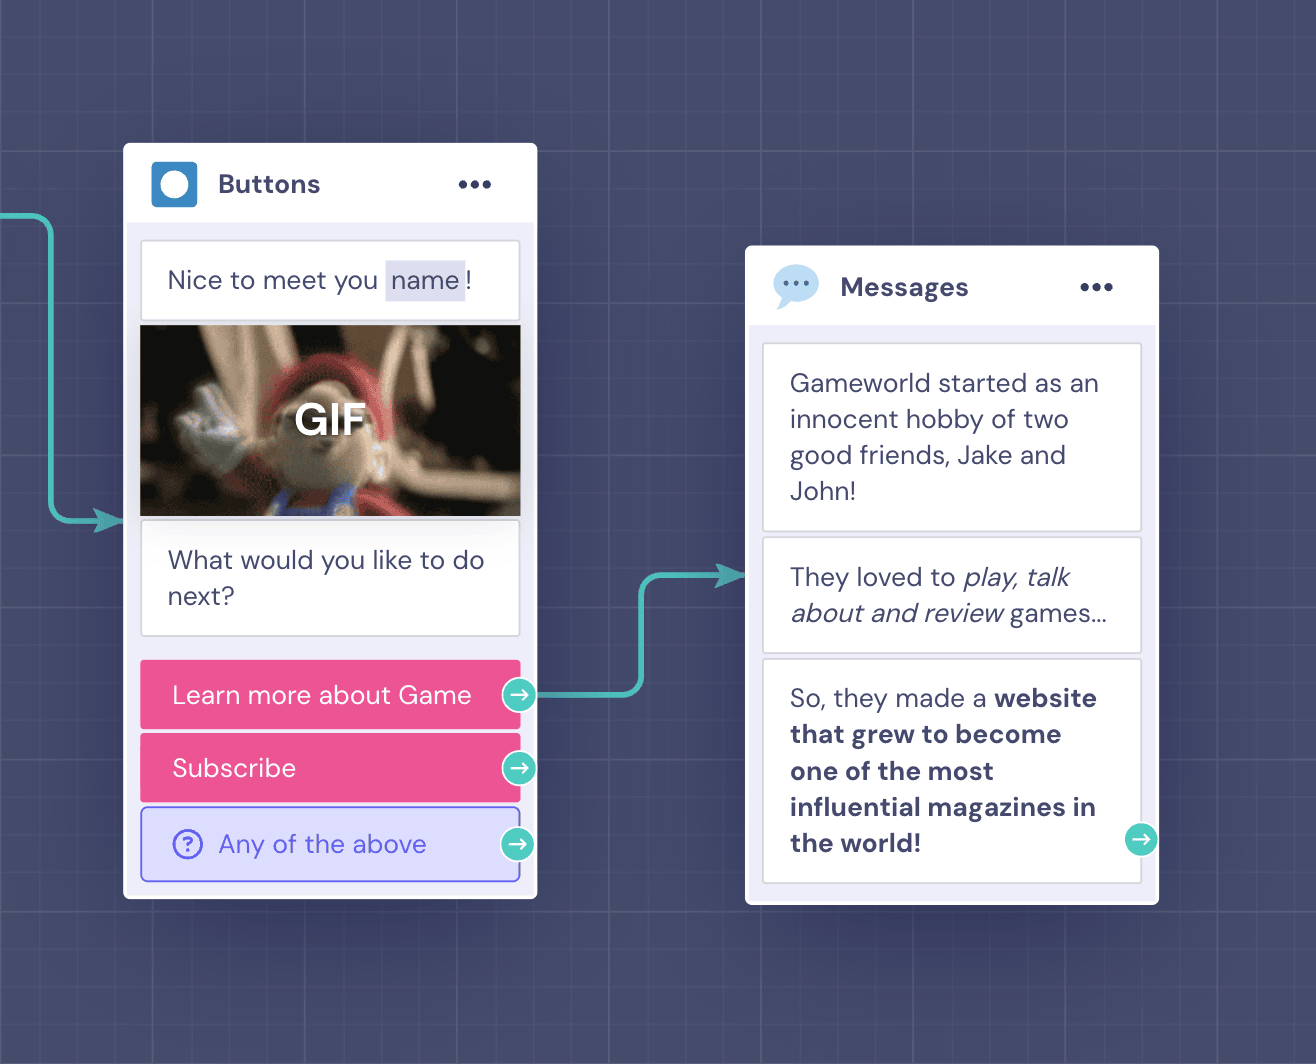
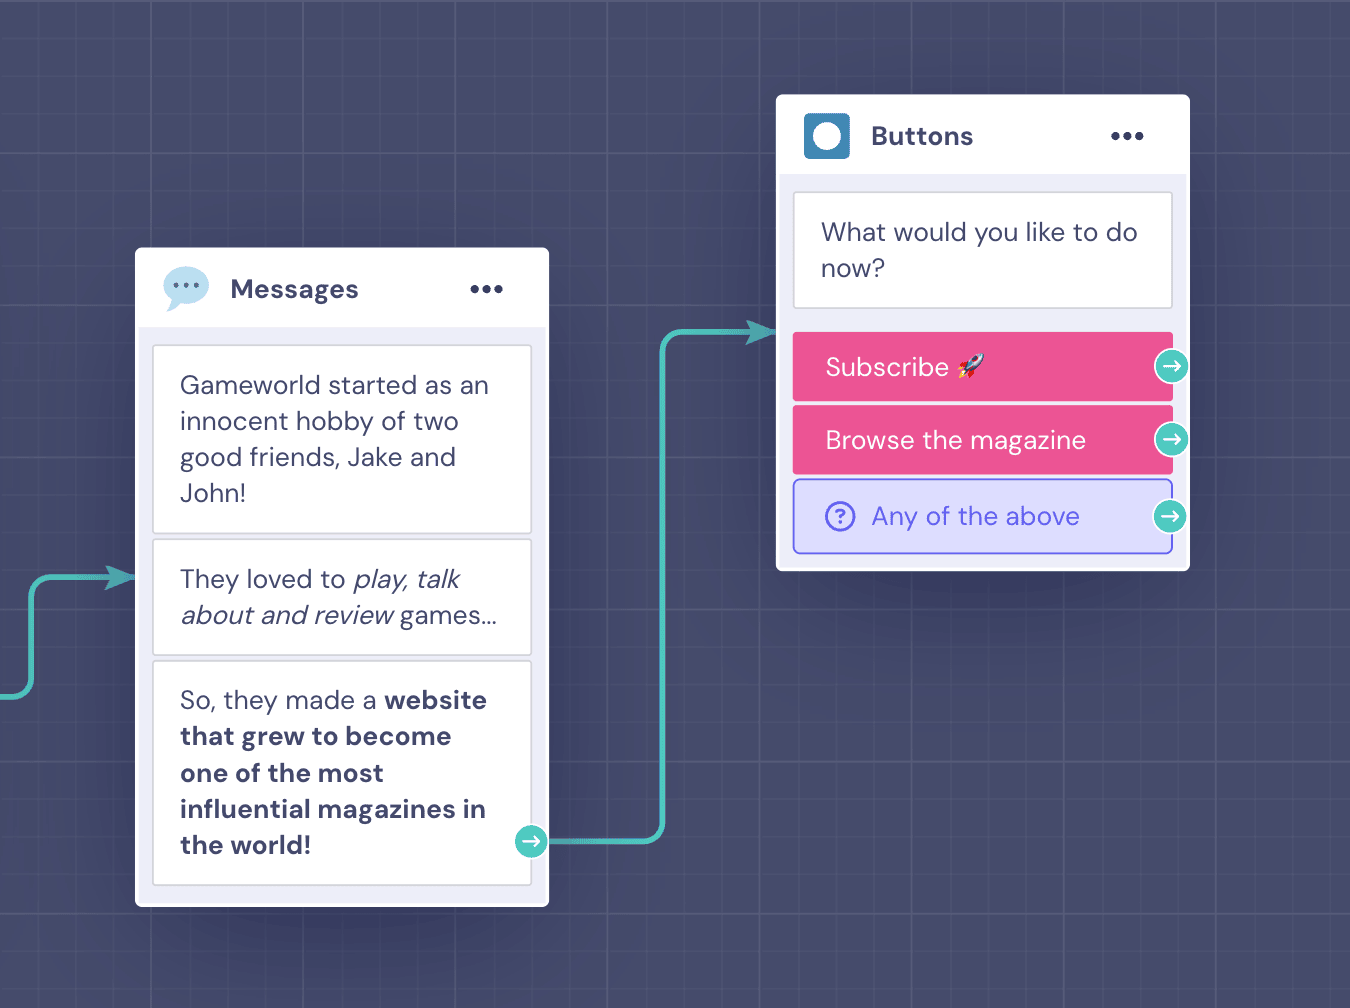
I opted to split the text into three different messages inside the same block to make it more engaging and easier to read.
Still, our main objective is for users to subscribe to our fictional magazine (lead generation), so after this little intro, we wanted the bot to prompt them to do so again. This time, the options offer a subscription or an option to simply proceed to browse the magazine to give them a way out (and not cause any sort of frustration).
If the user chooses to go to the magazine, you can finish the conversation with the “Goodbye message” block.
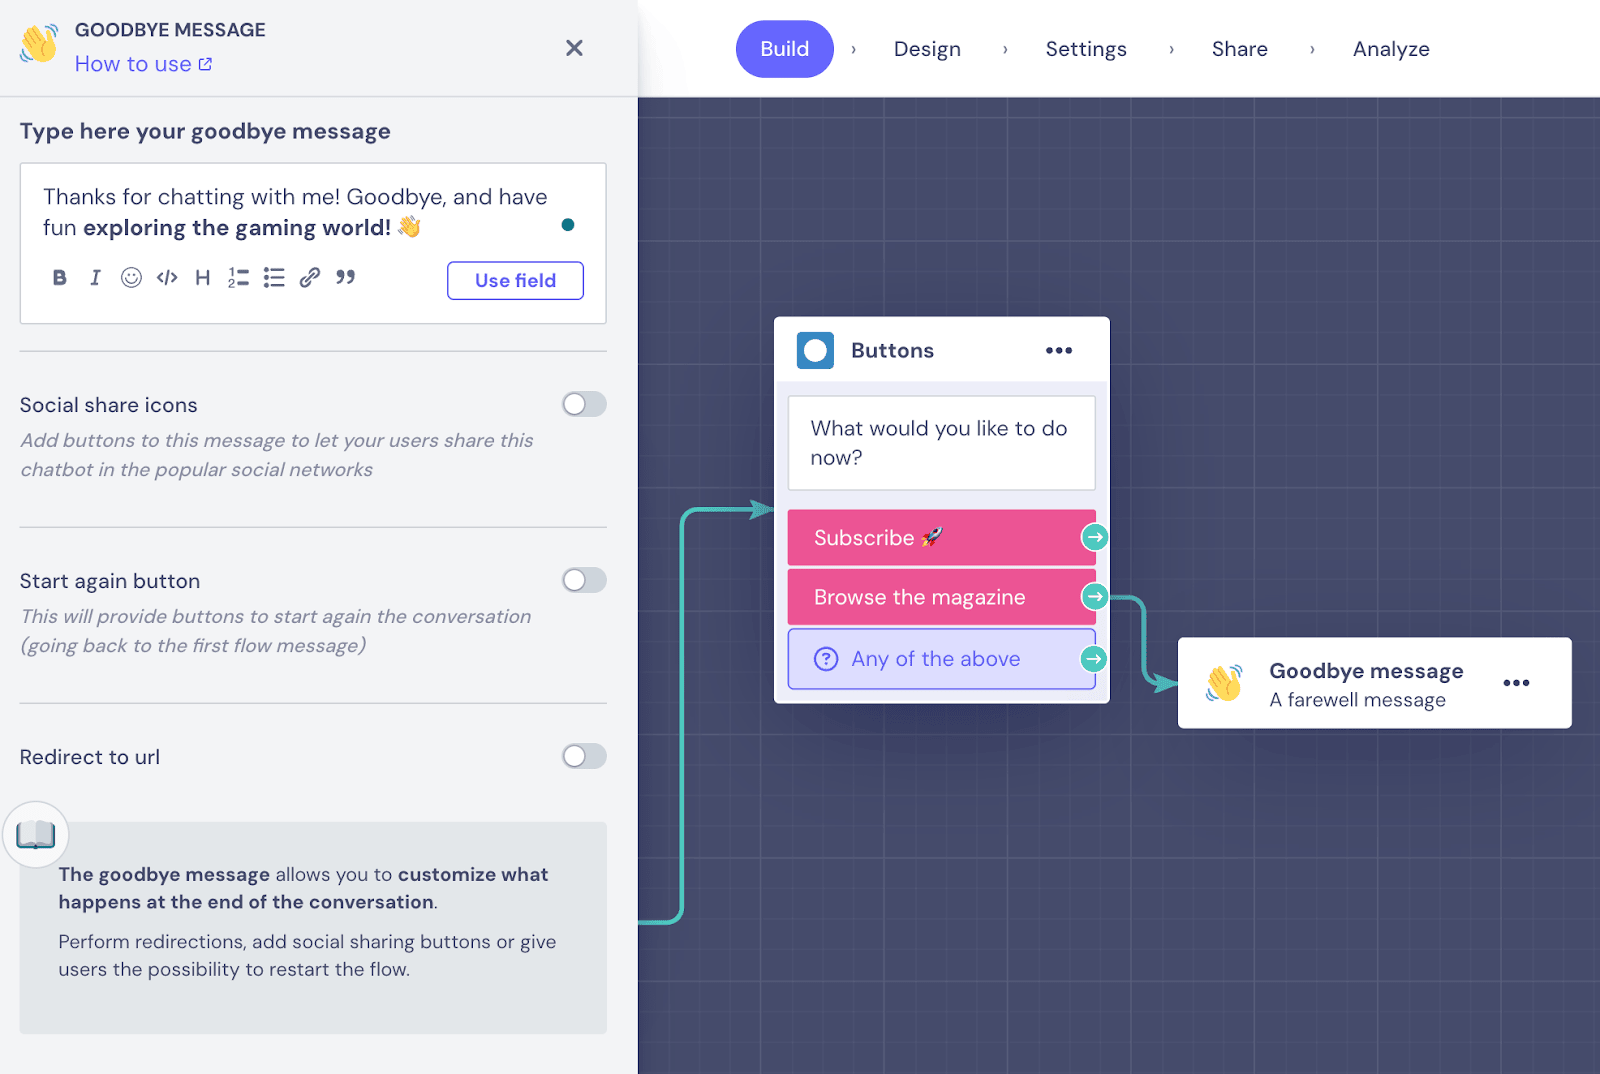
The goodbye block offers quite a few perks. Besides adding a goodbye message, you can:
- Feature social media share buttons;
- Offer an option to restart the conversation;
- Activate an automatic URL redirect & personalize the redirect message.
Thanks to the message, even if the user doesn’t subscribe, they can check out your social media accounts or go straight to your website without having to click anything at all.
5. Ask a Question (Email)
What if they clicked the “Subscribe” button, though? In that case, we will lead them to the subscription flow, where they will be able to provide more contact details and become a lead.
The most important piece of data when getting a subscription is, of course, an email address.
So, our first subscription question will be just that. Go back to our first button choice, draw an arrow from the “Subscribe” option, and select the “Ask for an email” block.
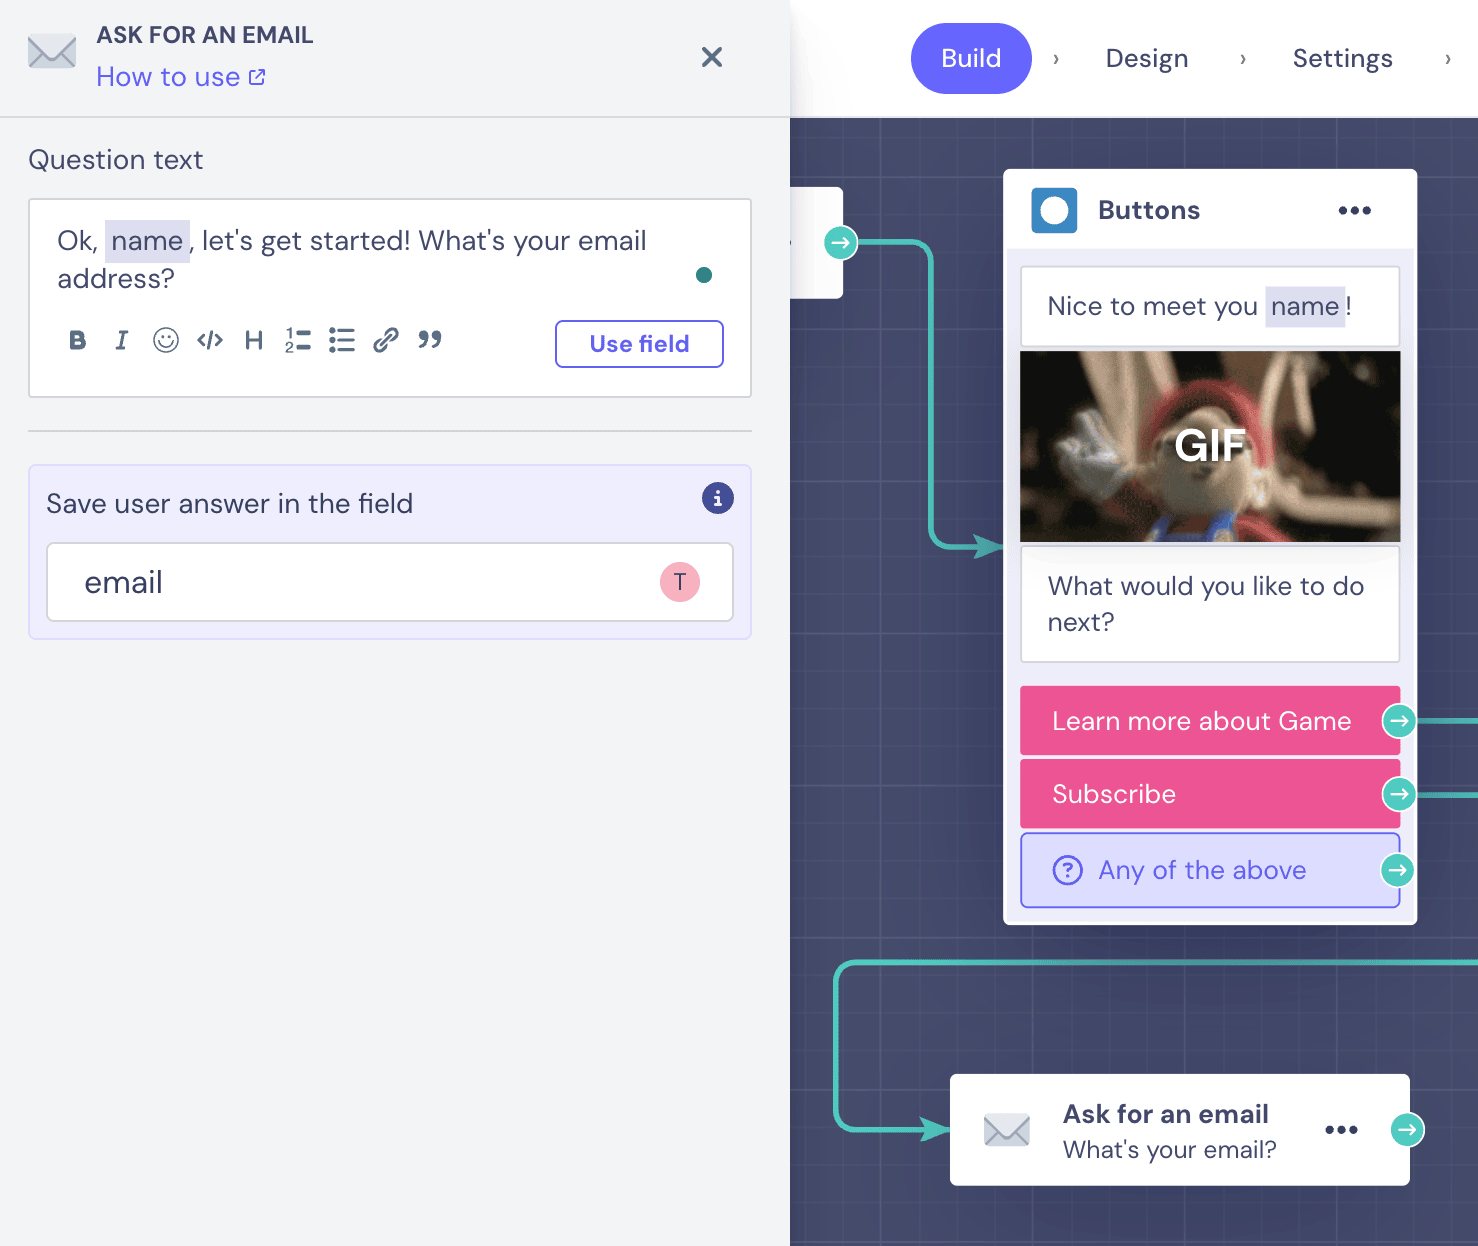
Our designated “Email” question block not only comes with a pre-set @email Field, but it also checks the email format. That means the bot will not accept the user’s answer unless the common format “xxx@xxxx.xx” is met.
After you set up the email block, draw an arrow from the “Subscribe” option in the “Learn more” branch of the conversation. This way, whether the user decides to subscribe immediately or after learning a bit more about the magazine, they will be directed through the same subscription funnel.
7. Export Data to Google Spreadsheets
Another secret of knowing how to create a chatbot that will make your life easier are integrations!
So, now that we have the most important piece of data, we want to integrate Google Sheets into the bot and export it to our database. It’s these types of integrations that make for powerful virtual assistants!
To do so, first, you need to set up a designated spreadsheet in your Google Drive:
Once done, go back to the Landbot chatbot builder, drag an arrow from the email block, and select “Google Spreadsheets” from the menu:
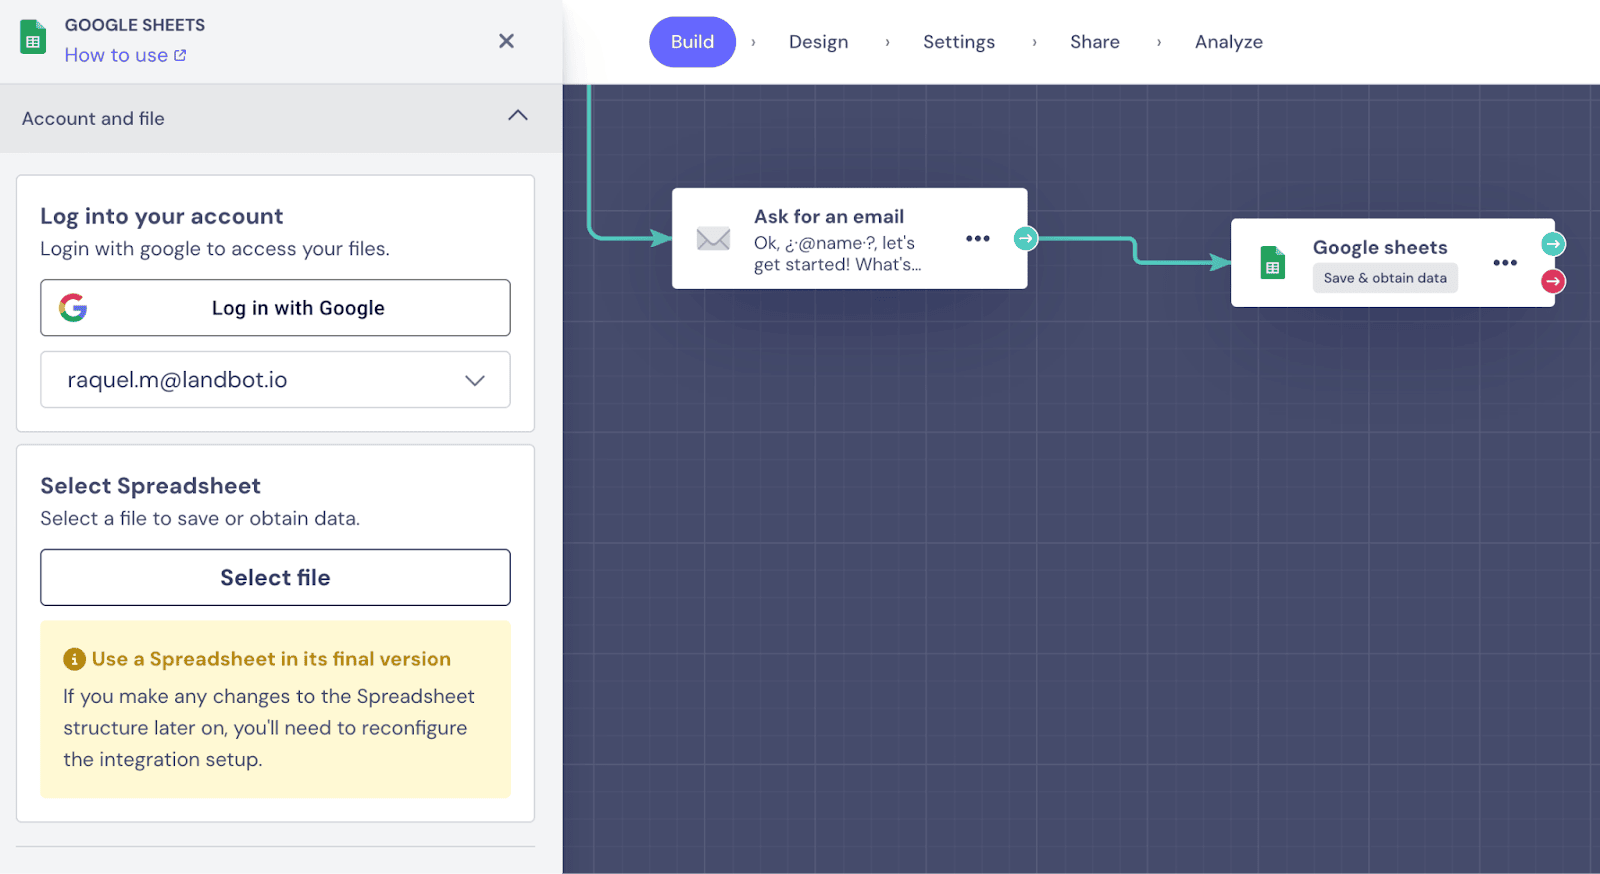
First, you need to log in to your Google account and connect it with Landbot. Next, you need to select the spreadsheet and the sheet within it where you want to send the information. And finally, you have to pick the “Action to perform”:
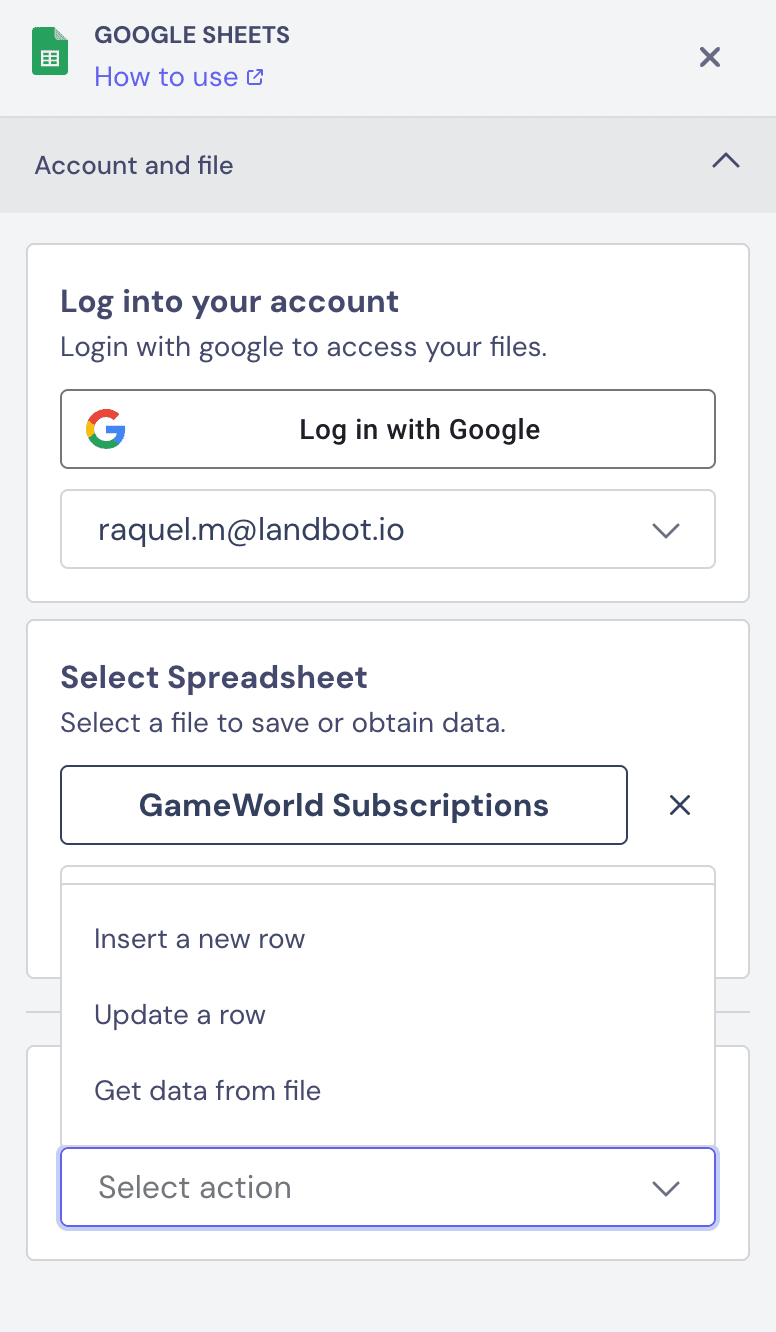
Since, at this point, you will be creating a new row for each new subscriber, select “Insert a new row”. After this, all you need to do is pair the column names with the Fields you want to store in these columns:

Click “Apply” to save your changes and the integration set up is done, a true piece of cake!
If you prefer to integrate with your CRM or your client’s CRM, you can also do that! Here’s an example of how to integrate your website chatbot with HubSpot.
7. Ask a Question (Buttons with Images)
There is more to the buttons block than meets the eye! After we have the user’s email, we want to learn more about their preferences to be able to provide a more personalized subscriber experience.
Below is our next question. However, we want to make the button choice a bit more fun to break up the routine, so instead of simple text, we’ll present the options as images. To do so, go to the “Buttons editor” inside the block, click on the button’s wheel icon, and select “Image” as the “Button Style”:
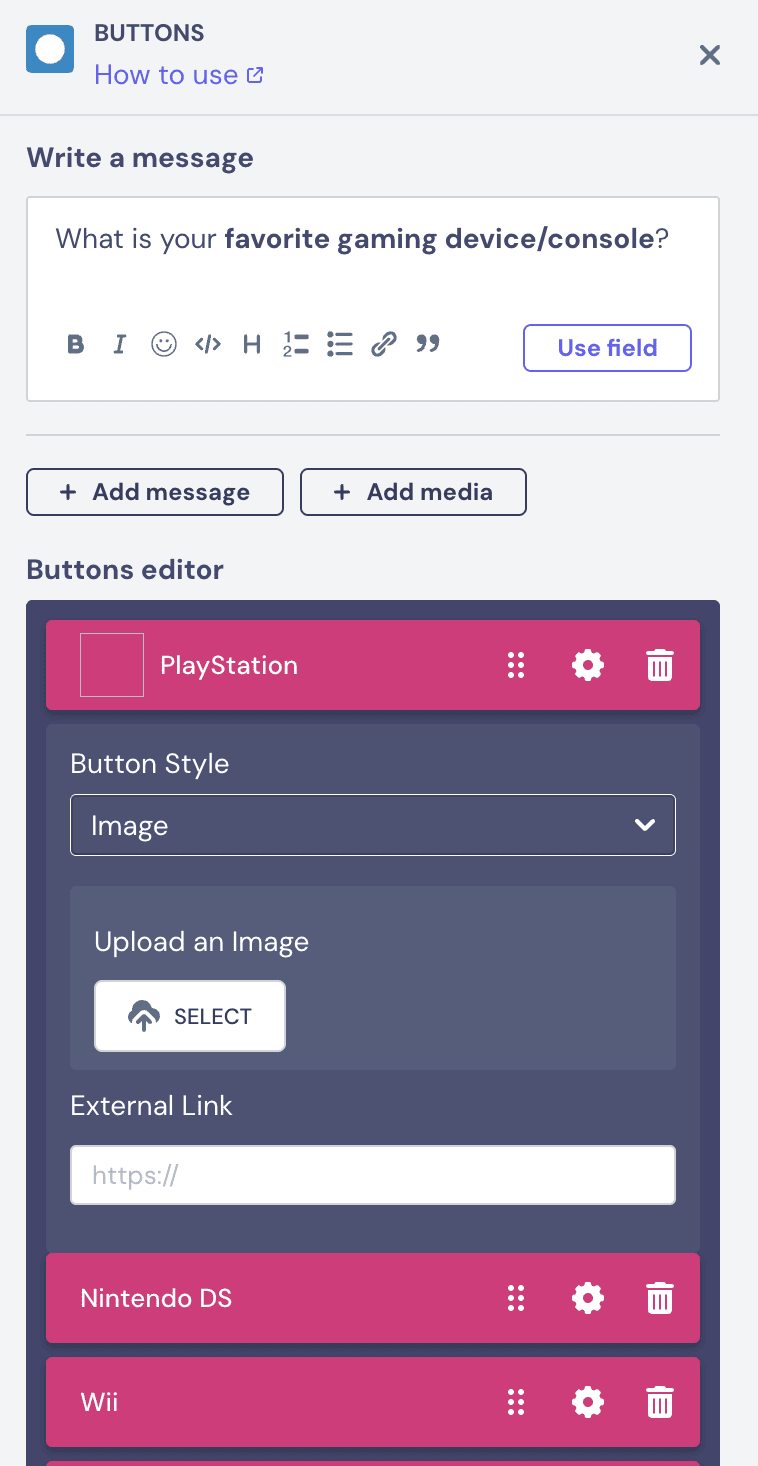
After you are done uploading the images for each button, scroll down the editor, and create a Field to store this answer:

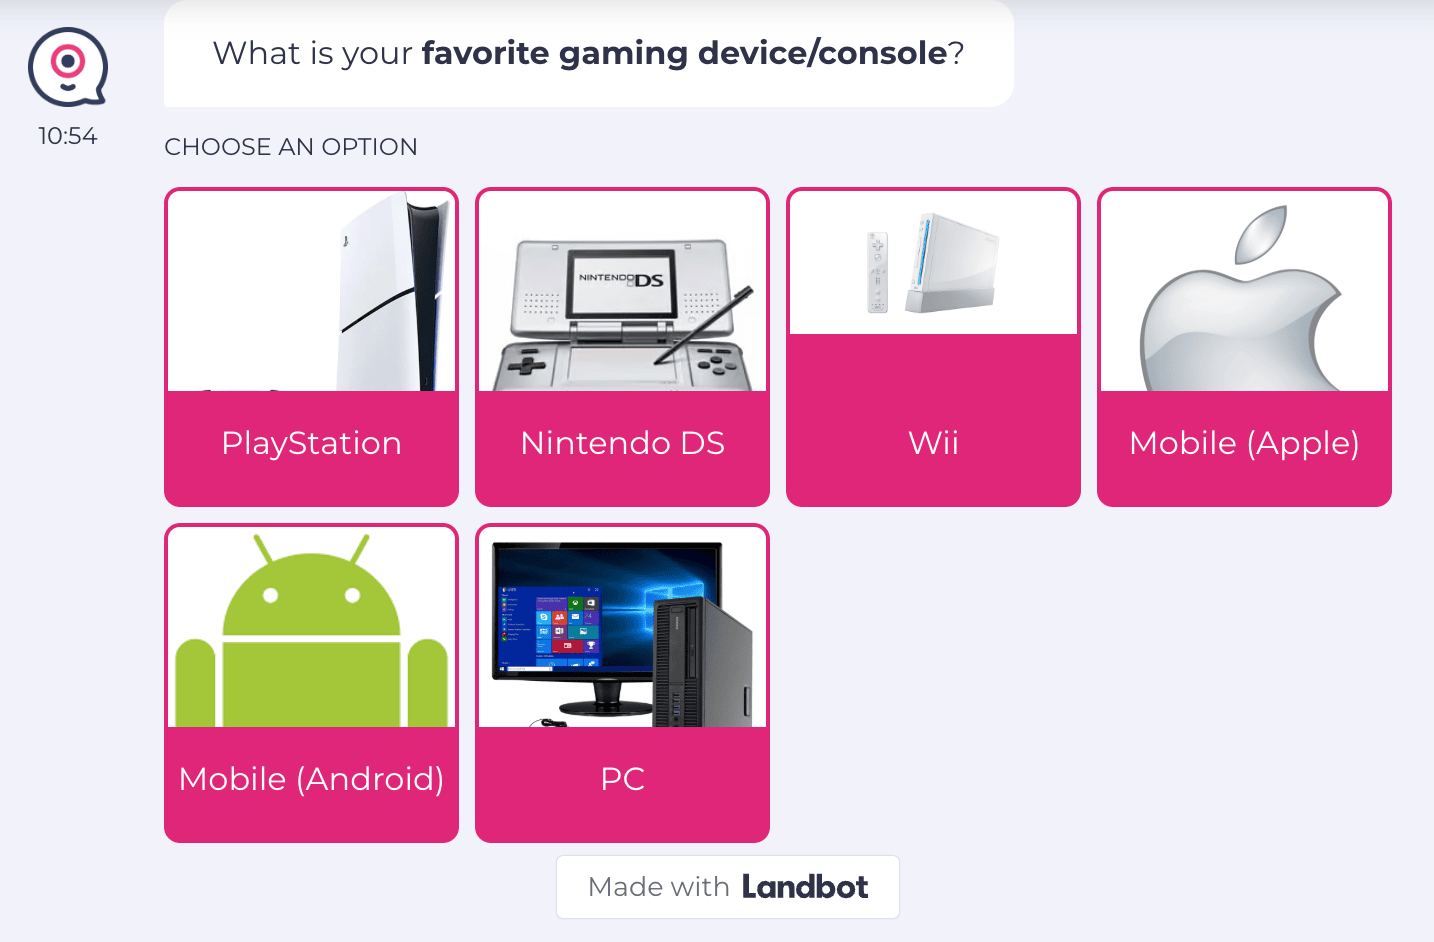
This is what the image button choice looks like on the front end:
8. Ask a Question (Picture Choice)
Another great question type inside the Landbot chatbot builder is the “Picture choice” block, which allows you to offer an image choice in the form of a carousel instead of buttons. Draw an arrow from the “Default” button of your last block and select “Picture choice” from the menu.
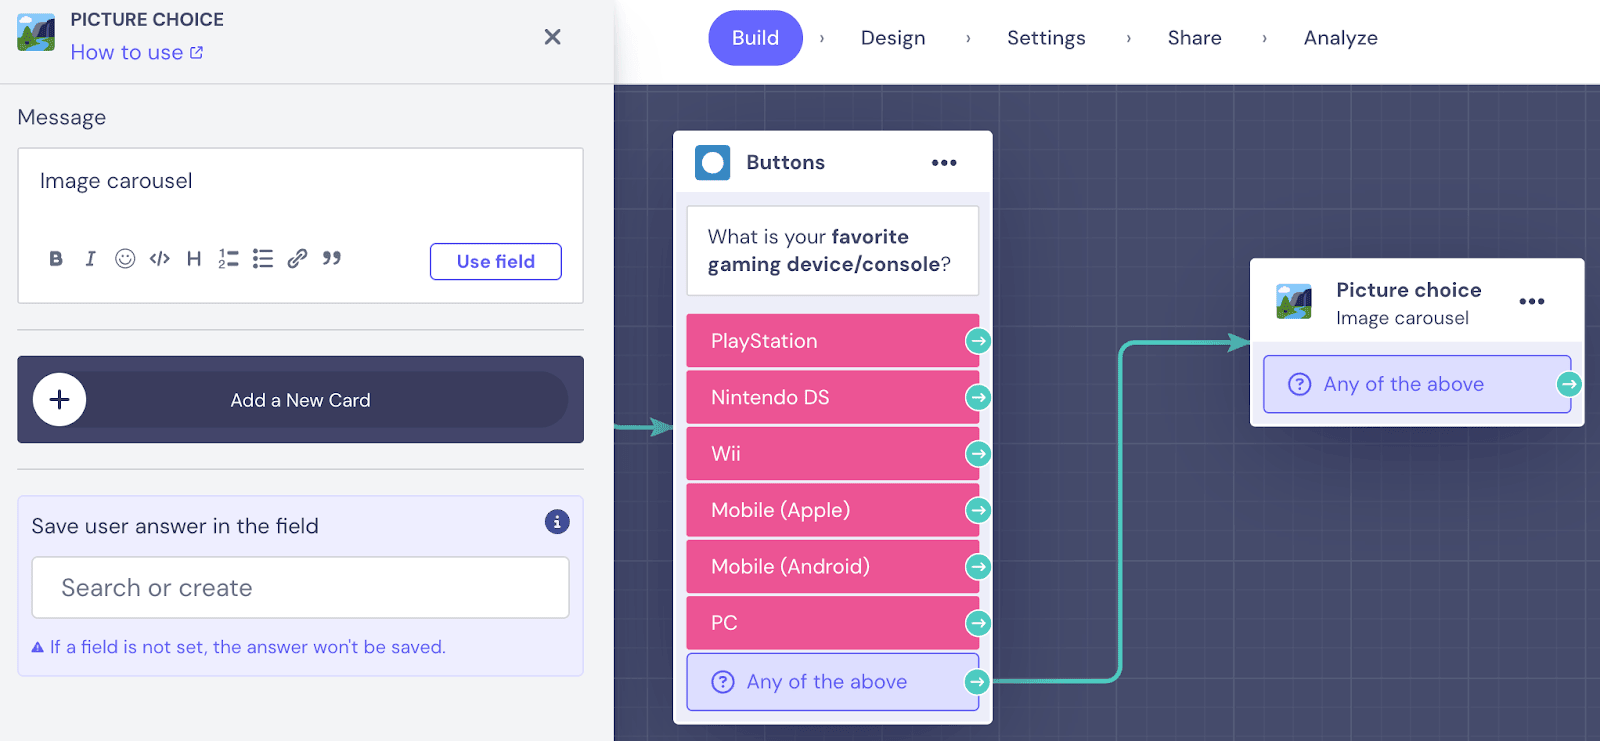
To set it up, you need to configure the three main fields:
- The question;
- The answers (Images);
- The Field to store the answer.
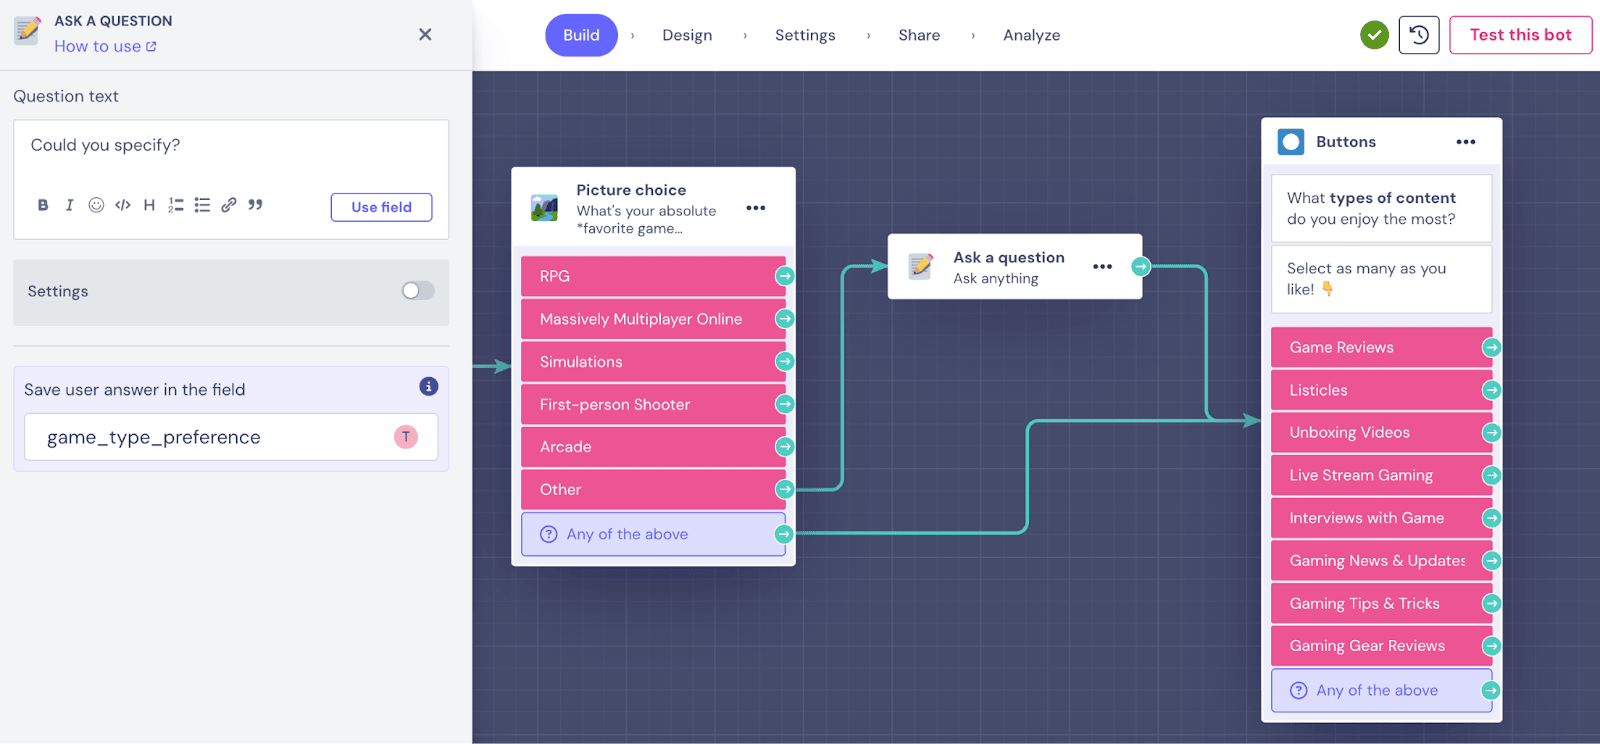
We decided to use this question type to ask about the type of games the user loves to play the most. Since there are several major game types, the picture choice seemed like a much better choice, as the normal buttons would have taken up the whole screen. When setting up picture choice, proceed the same way as with button images — define the answer options and upload a corresponding image.
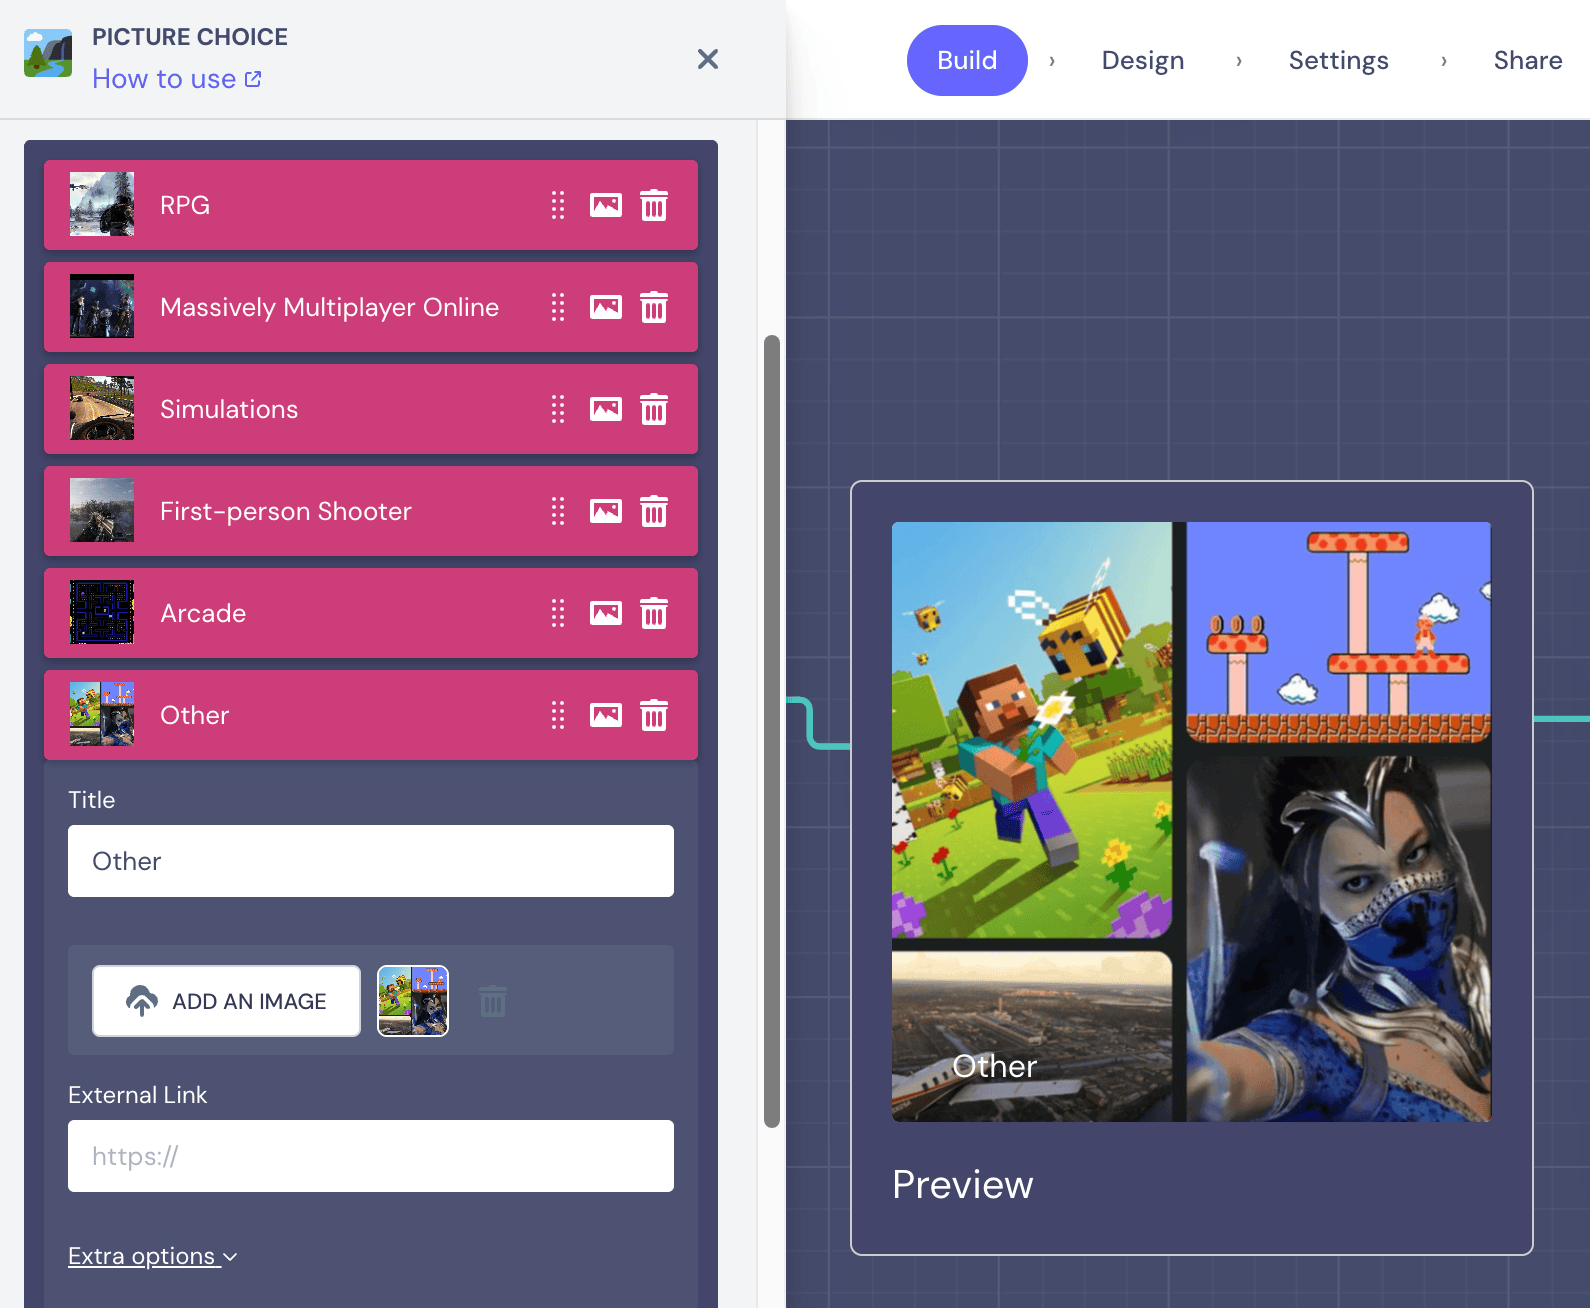
Last but not least, don’t forget to update the Field to save the user messages/responses in a way that’s easy to identify:
This is how your effort will reflect on the front end:
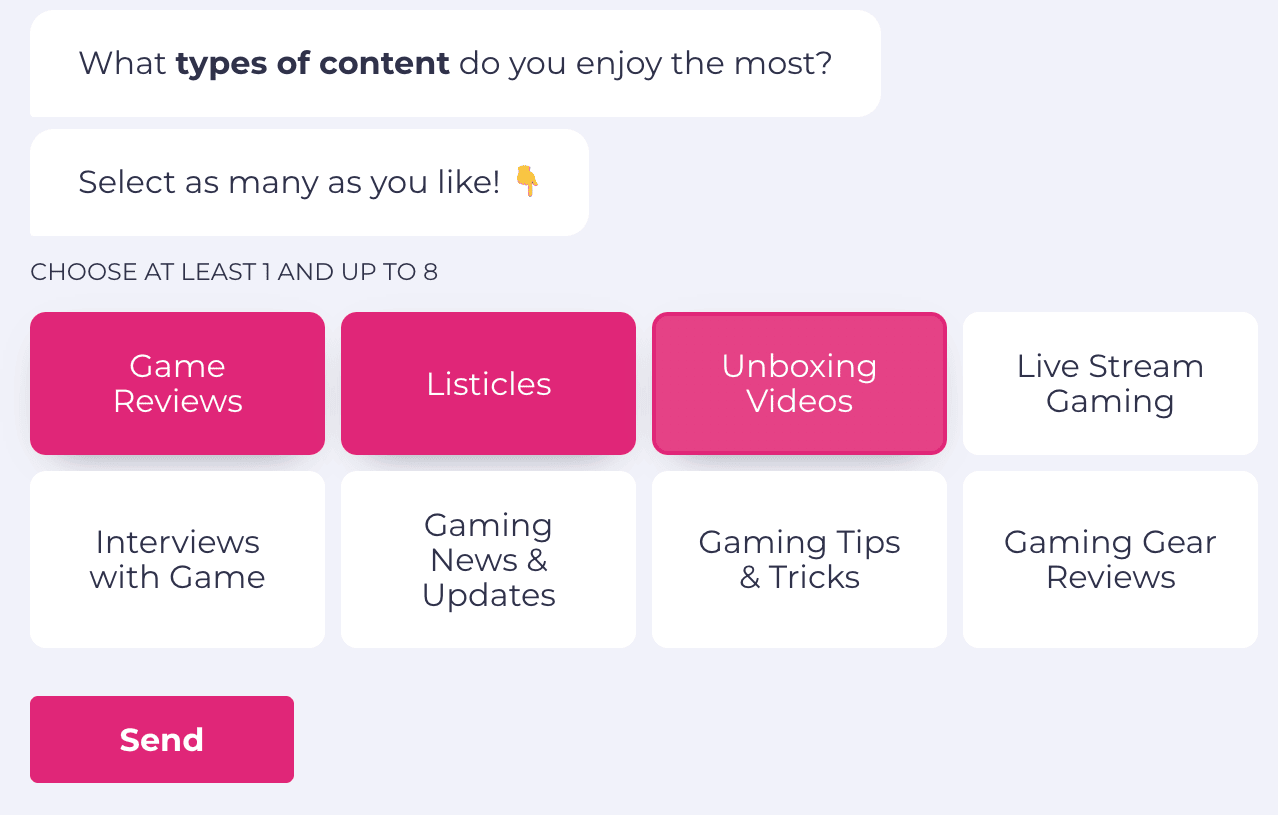
9. Ask a Question (Multiple Choice)
Our question variations adventure is not quite over yet… The Buttons block hides another key feature and that is multiple choice for times when a single choice just won’t do.
For instance, in our magazine subscription bot, we wanted to see what type of content the new subscriber enjoyed the most without limiting them to a single answer.
For configuring a multiple-choice question:
- Create another Buttons block and answers;
- Scroll down the editor and activate “Multiple choices”;
- Remember to set up the answer Field.
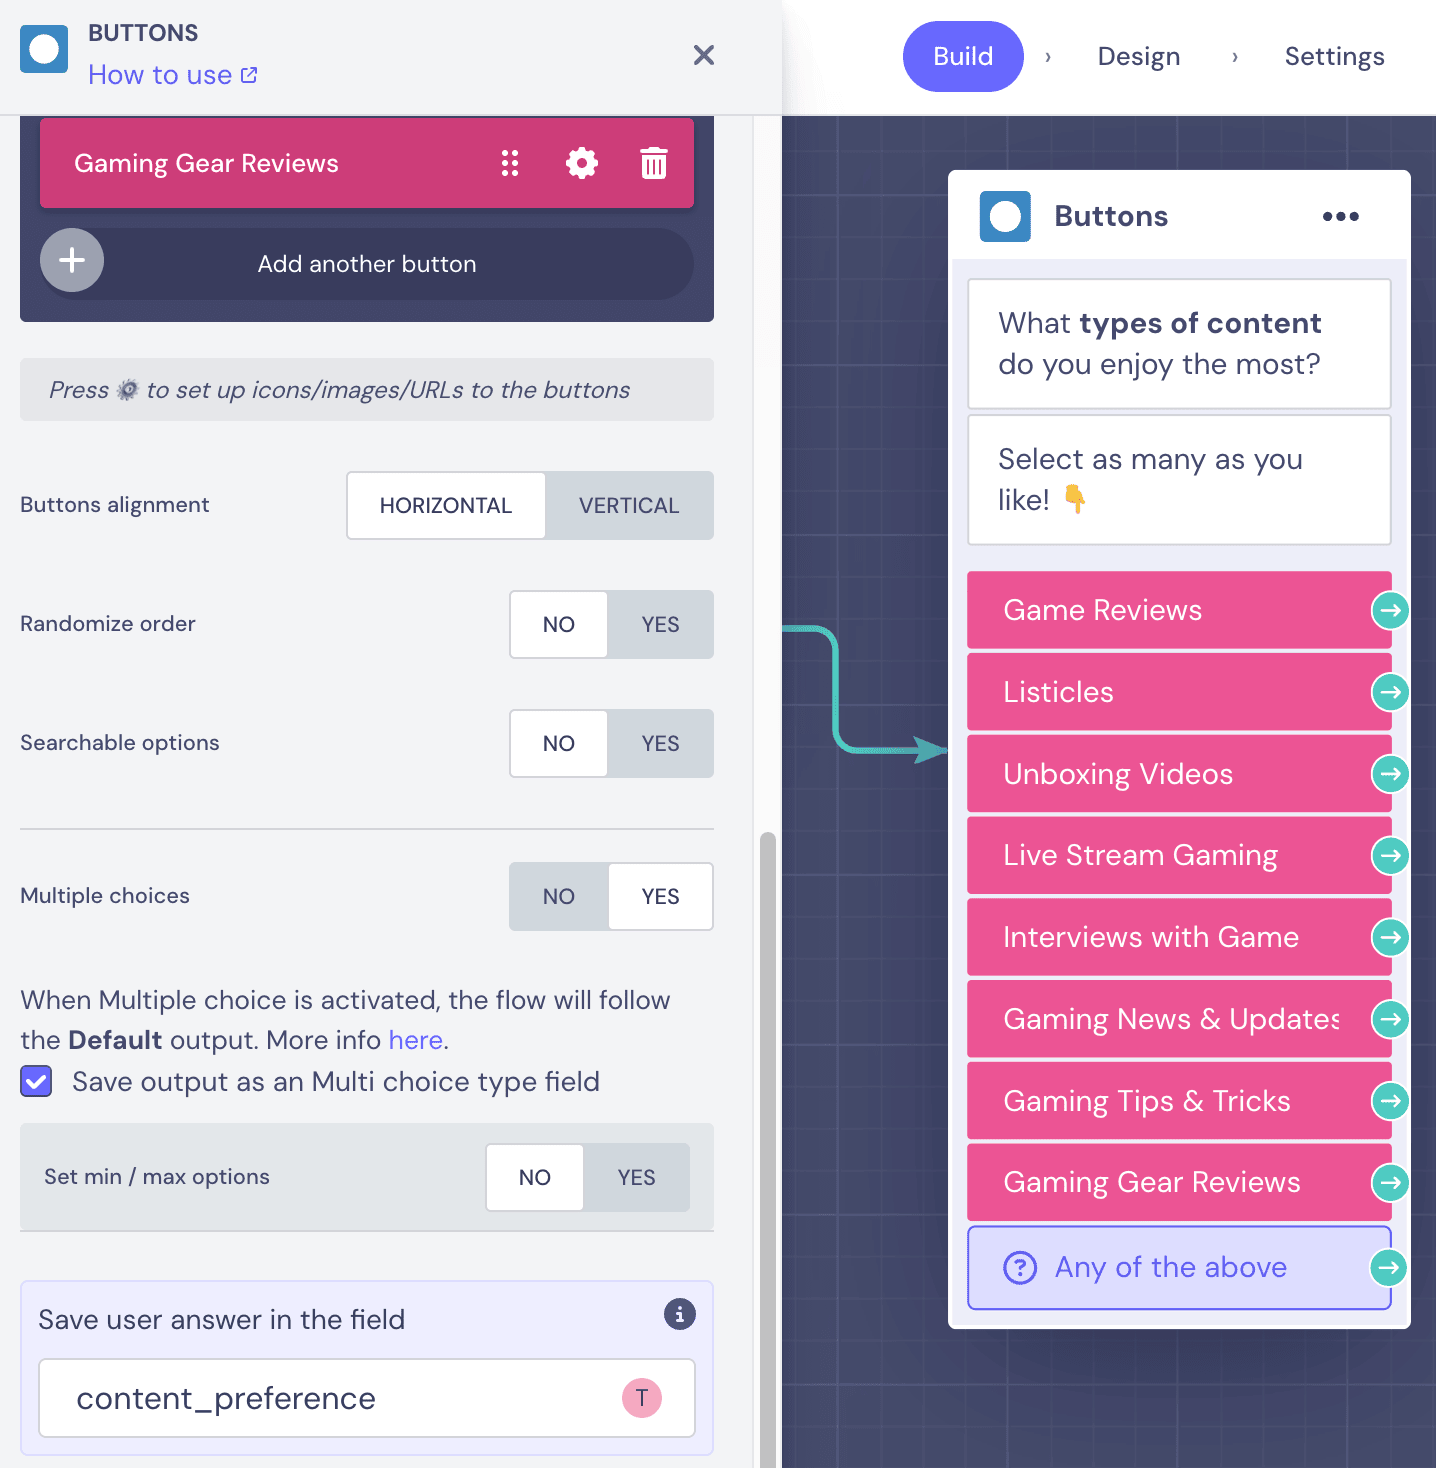
And that’s it. Your bot will now be able to offer users a multiple choice:
10. Ask a Question (Open-end)
Sometimes buttons can’t cover it all, and you need to give space to your user to express their opinion freely. To give space to write unconstrained user messages, you can use the “Ask a question” block, which simply offers an empty field for the user to fill in.
For instance, when you offer “Other” as a possible reply, you can connect it to an open-ended question block to determine what that other means.
The only thing to specify here is the question and, of course, the Field, which should be the same as the Field for the main question, so the new free-input answer will override “other”.
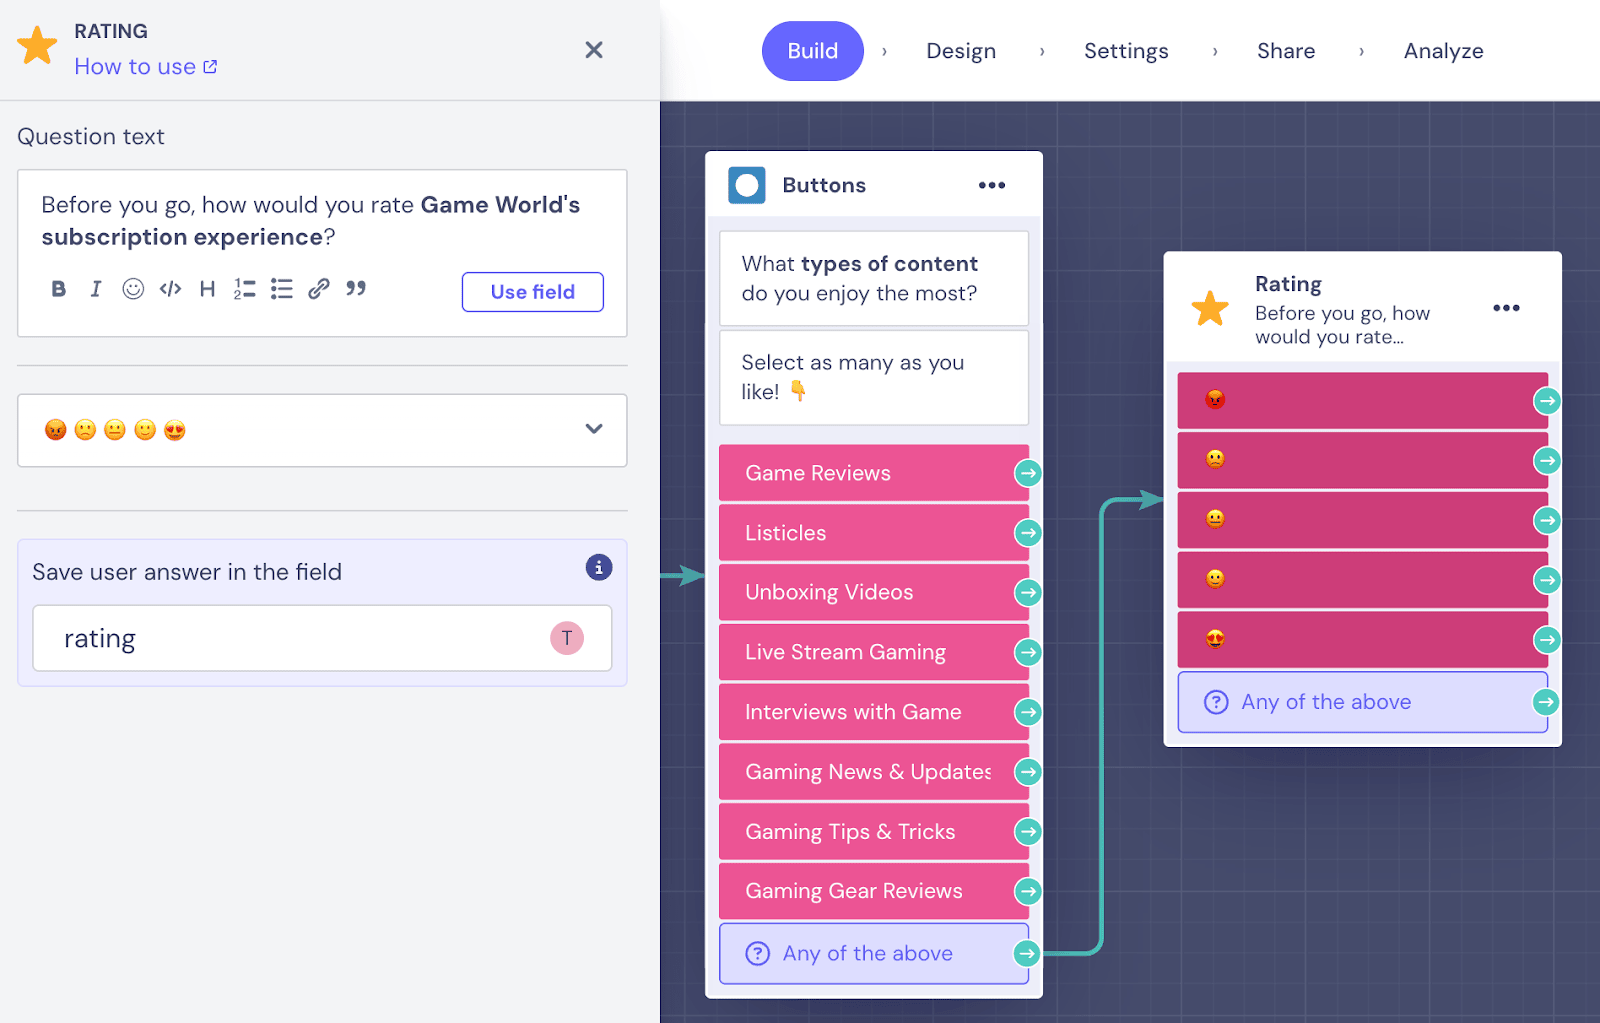
11. Let the User Rate the Experience
Want to know how your chatbot is doing?
For that, the Landbot chatbot builder offers the “Rating” block!
Simply draw an arrow from the last “Buttons” question and pick the “Rating” block from the menu.
The setup is, once again, pretty simple:
- Write your rating question;
- Select the rating format;
- Create the Field to save the answer.
12. Update Google Spreadsheet with New Data
Remember how we sent the user’s name and email address to our Google Spreadsheet? Well, now it’s time to update the rest of the information. Drag a green arrow from the “Any of the above” button of the last block and use the Google Sheets integration block once again.
Here, the setup is virtually the same, except you need to set the action to “Update a Row” as we want the bot to update a row it previously created.
When you decide on this option, the builder will ask you to choose a “reference column” to find the row that needs updating. Since a name is not very reliable as a reference, we set our reference column to “Email” and associated it with the email variable.

After the reference column, specify the fields you want to update by selecting the column and the Field to correspond to that column as before.
This means the bot will go to the sheet, check the “Email” column, find a match for the user, and fill out the rest of the information.
13. Create Segmented Mailing Lists on MailChimp
As you build the bot, ensure it's doing all it can to make your life easier.
For instance, if you are gathering emails, have the chatbot export those emails and other user data directly to MailChimp (or any other mailing service using Zapier).
We wanted our GameWorld subscription bot not only to export the data to MailChimp but also to send it to the right group within the mailing list to simplify the segmentation process.
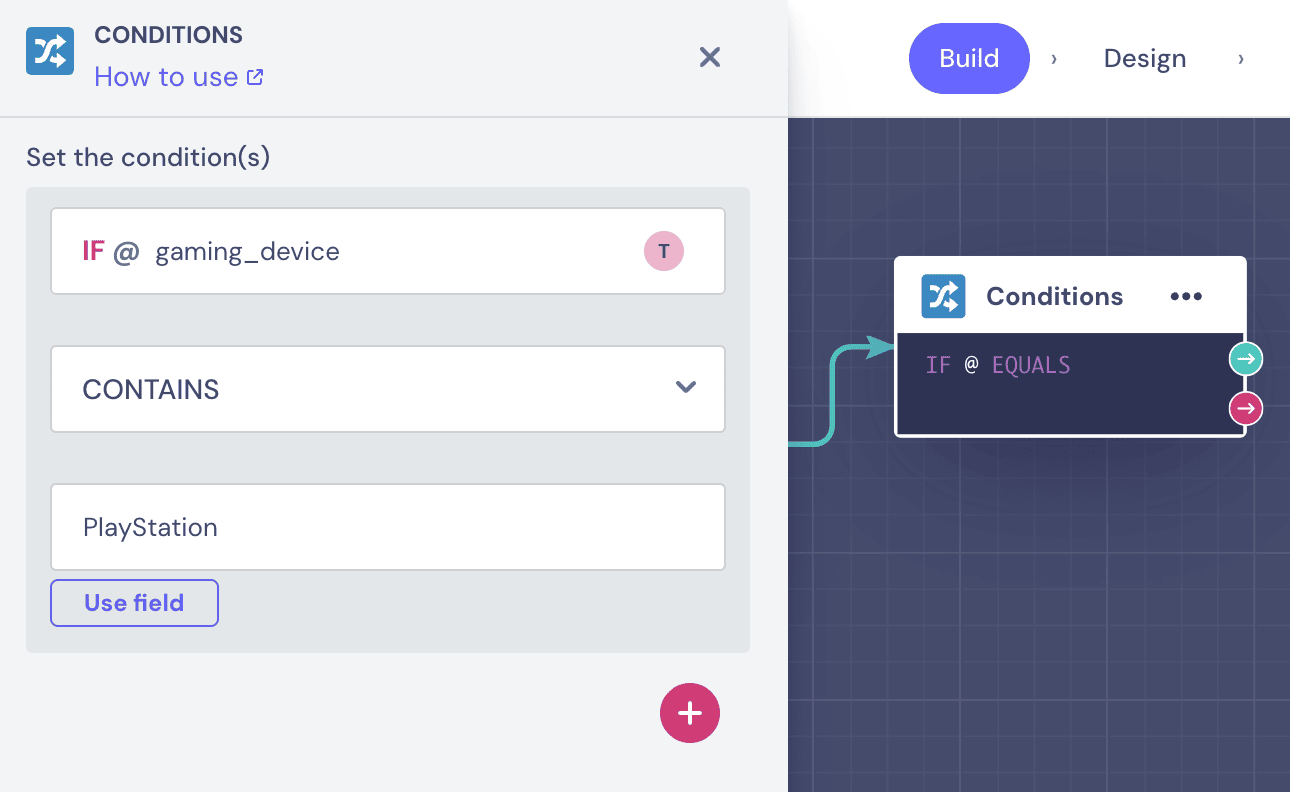
So, before integrating MailChimp into the bot, we set up a few “Conditions” blocks. These blocks allow you to set up conversational logic mechanisms in the style of “if this, then that”.
In the Landbot chatbot builder, the conditions you can use are:
- Equals to
- Does not equal to
- Contains
- Greater than
- Less than
- Is set
Since we wanted the bot to segment the subscribers based on their gaming device, we set up the condition as follows:
Then, you simply need to repeat this process for each of the possible devices by adding a “Conditions” block for each answer.
If the bot finds the condition to be correct, it will channel the information to Mailchimp via the green output. If not, it will follow to check the next condition and the next using the pink output. Now the Mailchimp integration!
Drag an arrow from the first condition and click “MAILCHIMP” from the menu. Pair your account with Landbot.
And set up the following according to the color codes in the image::
- Yellow: Email Associated with the account
- Green: Mailing list where you want to add the email
- Pink: Group within that mailing list (if applicable - in our case, the “Device” group)
- Dark Blue: @variable under which you are saving the user email
- Light Blue: Other values you want to upload (e.g., name, birthday etc.)

This way you can easily segment your subscription emails to the right group instantly. Repeat the setup for each group and you are done!

Note: This conversational assistant is only using the Google Spreadsheets and Mailchimp integrations. However, the Landbot chatbot builder offers a wide variety of similar easy-to-setup integrations to empower your bots including Slack and email notifications, Stripe, Calendly, Airtable, Zoom, Salesforce, and Zapier which connects to hundreds of other apps!
14. How to Test your Chatbot?
As you go and create your chatbot step by step, you should always check the user experience and quality of the connections. To do so, click the “Test this bot” button in the top right corner of the user interface.
From here, you can directly engage the new bot you just made as if you were a real customer on your website. Just follow the different answer strings and queries to see how you did in the building process and identify any possible errors.
You can even test the bot in a mobile view!
Once you have tested it yourself, we recommend sharing it as well with three different people once you publish it, to double-check everything is working as it should.
15. Customize Your Chatbot Branding For a Better Experience
Ok, so we’ve built the chatbot.
What now?
Well, the next step in perfecting the conversational chatbot of your own making is giving it a consistent LOOK for a better customer experience.
Since you went through all that trouble of making a bot from scratch, it better match your website branding and color scheme!
Landbot’s chatbot builder gives you plenty of options to let your brand personality shine through.
To bring up design elements, click on “Design” in the header menu.
It will open you to a whole new world of options! On the left side, you will see a large list of customization features:
- Design templates: Pick a theme from the already created attractive Landbot templates. These come in handy when you need to get the bot out into the world relatively quickly.
- General: Select the font family and background for your bot.
- Layout: Modify the logo and text that appear in the header of the chat, as well as edit the launcher icon.
- Chat: Customize the message bubbles’ format and color, the buttons’ layout, and the bot avatar.
- Custom code: If you know CSS and/or JavaScript, this section lets you make more advanced changes to your bot’s design — the only limit is your creativity!
NOTE: Be sure to click APPLY to save the changes in each of the design sections. And, once you are satisfied, remember to press PUBLISH in the upper right corner to update the bot.
16. How to Add a Chatbot to Your Website? (or Make a Bot Landing Page!)
Now that our Landbot has undergone the necessary “brand-lift” makeover, we can show it off to the world and start collecting subscribers and leads.
Sorry to repeat myself, but (once again) the Landbot chatbot builder makes this process super easy!
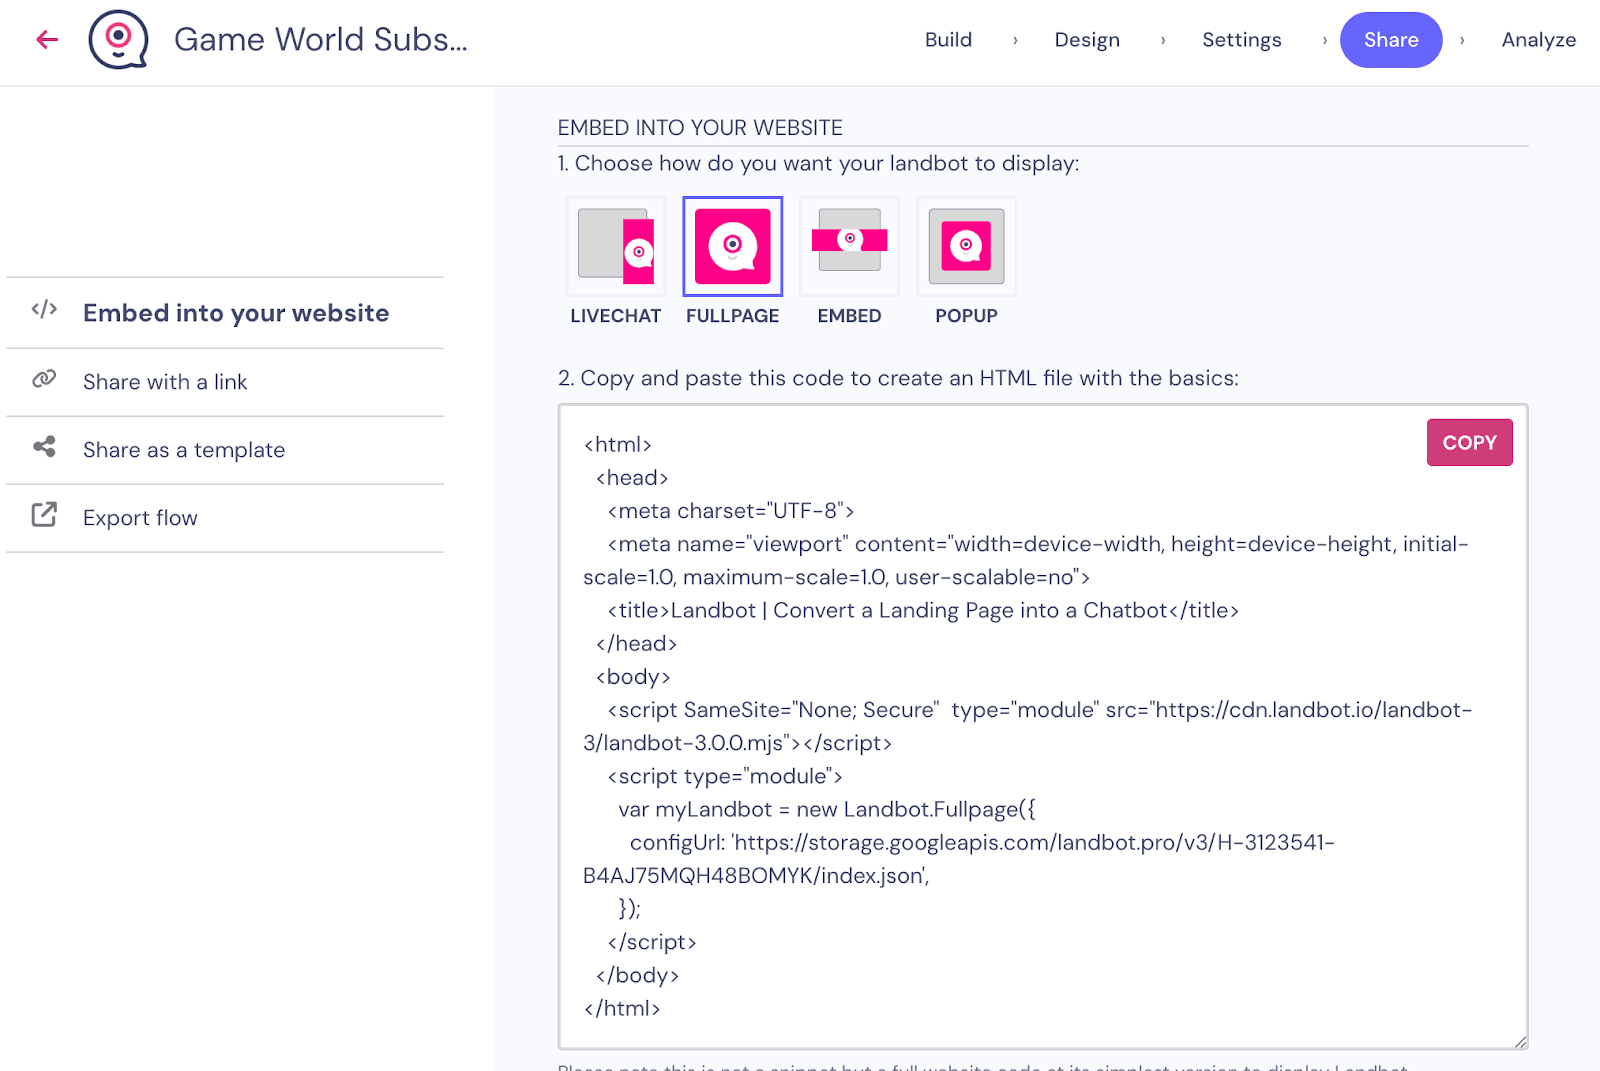
Go back to the Landbot app. Click “Share” at the top of the navigation bar.
Here, you can find four different embed options:
- Live Chat: Have your bot display a live chat message in the corner of the user's screen.
- Full page: Have the bot engage the user and take up the entire screen
- Embed: Display your bot as an embedded function in one section of your website.
- Popup: Have the bot popup upon landing on your site (or after a certain number of seconds).
Clicking on any of the icons will show you a slightly different set of easy-to-follow instructions.
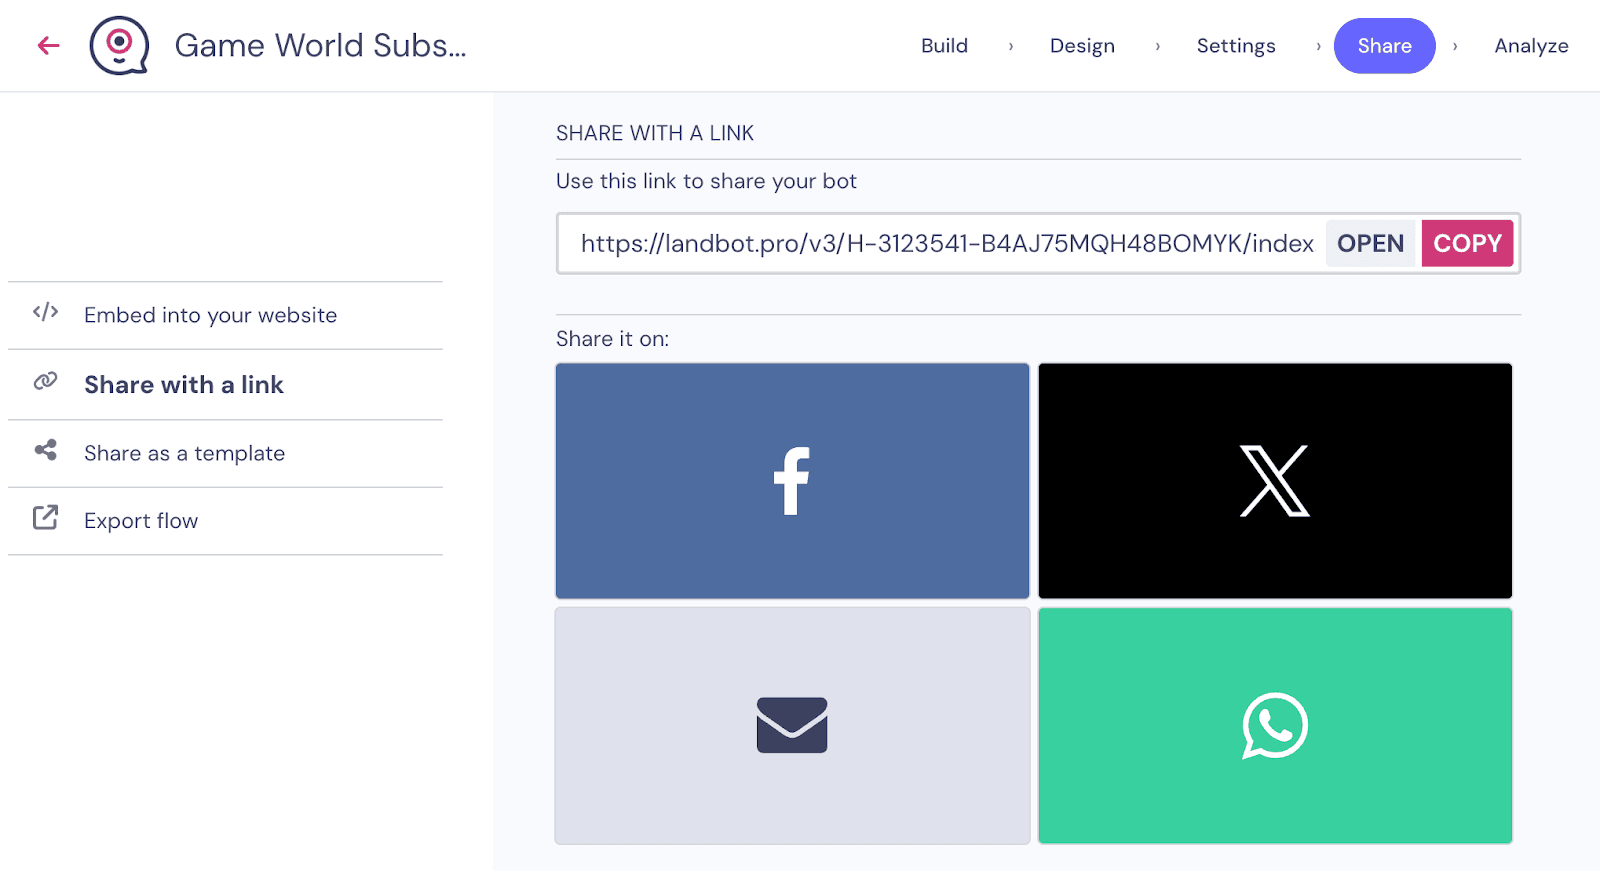
On the other hand, if you just want to create a temporary landing page and don’t care so much about the URL, select the option “Share with a Link” in the left-side menu. Here, you will find an automatically generated Landbot chatbot URL, which you can link anywhere on your website, in an email, or share on social media.
Note: Have a WordPress website? Then make sure to check out our tailored tutorial on how to install your custom chatbot for your WordPress site!
Pro-Tips for Optimizing Rule-Based Website Chatbots
Do's:
- Clear and Concise Rules: Develop clear and concise rules to cover common user queries and ensure consistent responses.
- Prioritize FAQs: Focus on addressing frequently asked questions to provide efficient and relevant assistance to users.
- Structured Conversation Flows: Create structured conversation flows with clear decision trees to guide users through interactions seamlessly.
- Error Handling: Implement error handling prompts to handle misunderstandings and gracefully steer conversations back on track.
- Personalization Variables: Utilize variables for personalization, such as the user's name, to enhance the conversational experience.
- Testing and Updates on a Regular Basis: Continuously test and refine the chatbot's rules to improve accuracy and relevance over time.
- Simple and Intuitive Design: Keep the chatbot interface simple and intuitive for easy navigation and interaction.
- Visual Elements: Incorporate visually appealing elements, such as icons or images, to enhance the interface’s aesthetics and engagement.
- Consistent Branding: Maintain consistent branding elements, including colors and tone, throughout the chatbot interface to reinforce brand identity.
- Responsive Design: Ensure the interface is responsive and compatible with various devices and screen sizes for optimal user experience.
Don'ts:
- Overly Complex Rules: Avoid creating excessively complex rules that may confuse users or result in unpredictable responses.
- Ambiguous Responses: Ensure responses are clear and unambiguous to prevent user frustration and misunderstanding.
- Ignoring Edge Cases: Consider edge cases and exceptions in rule design to provide comprehensive and accurate responses in all scenarios.
- Rigid Conversation Paths: Avoid rigid conversation paths that limit user flexibility and fail to accommodate diverse user needs.
- Lack of Adaptability: Ensure the chatbot can adapt to evolving user queries and needs by regularly updating and expanding its rule set.
- Inadequate Testing: Neglecting thorough testing can result in overlooked errors or gaps in the rule-based logic, leading to suboptimal user experiences.
- Cluttered Interface: Avoid cluttering the interface with excessive elements or information that may overwhelm users and hinder usability.
- Inconsistent Branding: Inconsistencies in branding elements can detract from the chatbot's credibility and user trust.
Pro-Tips for Advanced Users
If you’re already a more advanced chatbot builder, here are some Landbot features you can explore to bring your bots to the next level:
👉 Build a hybrid AI chatbot to personalize lead generation
👉 Use the Webhooks block to connect with a REST API outside of our native integrations
👉 Try the Code block to integrate JavaScript into Landbot to create even more dynamic conversations
These are just a few examples of more advanced features, but even by just following our tutorial, you’ll build a powerful subscription/lead generation chatbot.
Make sure to head over to our Knowledge Center, where you can find courses, webinars, tutorials, and all the content you need to become an expert bot builder!
Did You Learn How to Create a Chatbot?
As you’ve seen, chatbots are easy enough to handle. So now, you can build one every time you want to create a form, generate leads, answer FAQs, score prospects, design surveys, publish job applications, empower your customer service team, or whatever else you can think of to automate.
Are you ready for it?
Start your exciting journey to providing conversational experiences today!
FAQs About Creating a Chatbot for Your Website
1. What is the best platform to create a chatbot for my website?
Several platforms offer robust tools for creating chatbots without coding. One notable option is Landbot, known for its intuitive no-code interface that allows users to design sophisticated conversational workflows. It supports multiple channels, including websites, WhatsApp, and Facebook Messenger, and offers seamless integration with tools like Salesforce and Slack.
2. How long does it take to build a chatbot for a website?
The time can range from just a few minutes with no-code builders like Landbot to several weeks if you’re developing a highly customized, AI-powered chatbot. It all depends on complexity, integrations, and the platform you use.
3. Do I need coding skills to build a chatbot?
No, coding skills are not necessary to build a chatbot. No-code platforms like Landbot provide drag-and-drop interfaces, enabling users to create and customize chatbots without any programming knowledge. These platforms offer various templates and integrations to suit different business needs.
4. What are the most popular tools to build a chatbot?
Several platforms offer robust tools for creating chatbots without coding. One notable option is Landbot, known for its intuitive no-code interface that allows users to design sophisticated conversational workflows. It supports multiple channels, including websites, WhatsApp, and Facebook Messenger, and offers seamless integration with tools like Salesforce and Slack.
5. What are the benefits of having a chatbot on my website?
A chatbot can improve customer support, capture leads 24/7, answer FAQs instantly, guide users through products or services, and reduce the workload on human support teams.


.avif)
.avif)
.avif)
%20(1).png)
.avif)