


.svg)
Please note that 'Variables' are now called 'Fields' in Landbot's platform.
Website chatbots are a great way to engage with potential and current customers, streamline your customer-facing operations such as sales and support, and collect valuable customer data.
But how do you make sure the data your chatbots collect is effectively stored and organized?
The answer lies in integrating your website chatbots with Google Sheets.
In this article, we'll walk you through the steps of integrating your Landbot web chatbot with Google Sheets so that you can get the most out of your data and drive better business outcomes.
Advantages & Use Cases of Integrating Your Chatbot with Google Sheets
Google Sheets is a practical tool for managing data thanks to its real-time collaboration features and ease of use. By integrating it with your Landbot chatbot, you will be able to take it one step further with:
- Centralized data collection: a Google Sheets integration allows you to automatically store all interactions between your bot and your (potential) customers in one place that’s easily accessible by anyone on your team.
- Real-time data analysis: since data is collected in real time, you can access it while the interaction is still happening, enabling you to make faster decisions regarding each lead or customer.
- Streamlined workflow: use the data collected by your chatbot and recorded on Google Sheets to automate further customer interactions, track metrics, and generate reports.
As you can see, an integration between your chatbot and Google Sheets offers advantages that help improve data collection and handling.
Two of the most common use cases for this integration are:
- Feedback collection: you can set up your chatbot to collect feedback or survey responses from your customers. The data is collected by the chatbot through a conversational flow and is then stored in Google Sheets, where you can easily access it, analyze the replies, and identify issues and areas of improvement.
- Lead generation: this integration allows you to collect lead information like name, organization, and contact details, and access this information on Google Sheets, where you can organize the data, use it to follow up with leads, or feed it into your CRM to move them forward in your sales journey.
Integrating your chatbot with Google Sheets is an efficient solution whether you’re looking to improve your lead generation process, gather customer feedback, or just monitor chatbot performance.
Curious about how to get started? Let’s jump right in!
Setting up Your Landbot Chatbot and Google Sheets Integration
Before you set up your chatbot and Google Sheets integration, you need to build your website chatbot first.
If you’re just getting started with Landbot, you can take our full Web Chatbot Building course in the Landbot Academy.
If you’re already familiar with Landbot chatbot building, and are looking into a Google Sheets integration specifically for lead generation, you can check out this tutorial on how to build a lead generation chatbot.
Finally, if you just need a quick refresher, here’s our 2-minute website chatbot video tutorial:
Once your web chatbot is set up and ready to collect data, you can move on to the Google Sheets integration process.
1. Prepare Your Google Sheet
Before setting up the Google Sheets block in your chatbot flow, create the Google Sheet you’ll use to store the data collected by the chatbot. Make sure to give it an identifiable name so that you can easily find and select it when adding it to the bot.
Next, you’ll need to set up columns to match the data fields you’ll be collecting via the chatbot. For the sake of this tutorial, let’s go with “Name”, “Email address”, and “Phone number.”
2. Set Up the Google Sheets Integration Block
For this next part, I’ll be using a pre-built chatbot that you can also use to better follow along with the next steps. If you don’t have a Landbot account yet, you’ll need to create one to be able to access the chatbot template.
So, going back to the Landbot builder, after you’ve defined the questions you want to ask and the data you want to collect, go ahead and add a Google Sheets block after the last question.

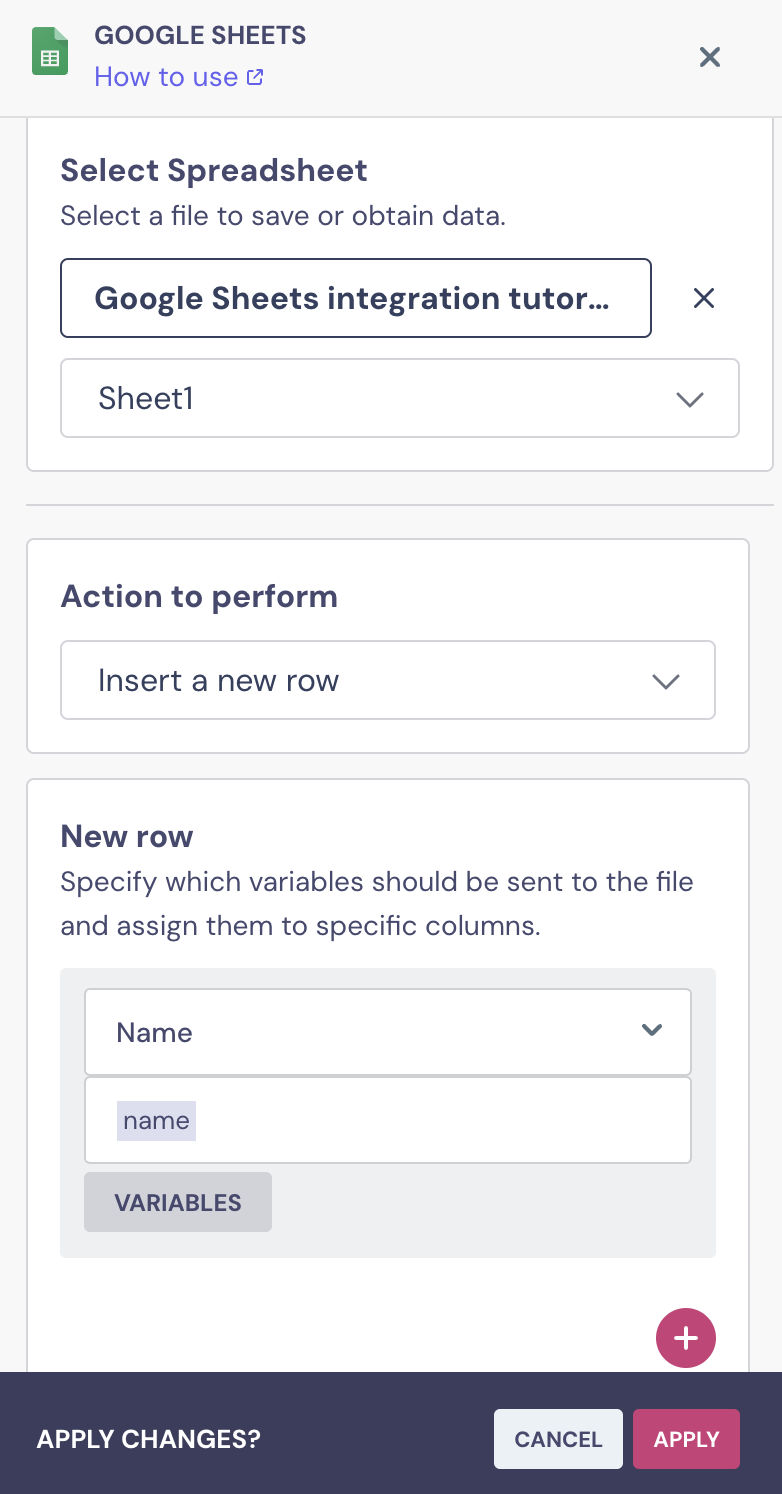
You’ll first need to log into your Google account. Then, you’ll need to select the spreadsheet (that you’ve previously created) and the specific sheet where the information will be sent to. Finally, select the type of action you want to perform:
- Insert a new row;
- Update a row;
- Get data from the sheet.
The Google Sheets block can insert a new row in the spreadsheet, update an already existing row, or get data from the file and feed it back into the bot. In this case, we want to store the information by inserting a new row.
Finally, all that’s left to do is to pair the input variables with the columns under which you want to store them. For that, just select the column on your spreadsheet and the respective variable. Make sure that, while building the chatbot flow, each question block has the variables created and linked to the question.
Once the block is ready, you are good to go! Whenever someone interacts with your chatbot, the information will be automatically stored in your spreadsheet.
3. Extra Tip: Use Multiple Google Sheets Blocks
Just like any integration you may use to collect and store information, such as Airtable or Hubspot, the Google Sheets integration will store the user’s information only when the conversation reaches the integration block.
That means that, if a user abandons the conversation midway through, say, between providing an email address and a phone number, the information they shared won’t be stored if the flow hasn’t reached the Google Sheets block.
A good workaround for this issue is to have multiple Google Sheets blocks — one after each answer you want to store. This way, you can ensure that you’ve collected everything you need from the user before they leave the conversation.
In our chatbot template, we have already added a Google Sheets block that creates a new row after asking for the user’s email address and adds both the email address and the name to your spreadsheet.
We will add the phone number question after the first Google Sheets block and then add a second Google Sheets block that will update the existing row on the spreadsheet.

For that, we will need an identifier or reference column. Instead of using the name, we recommend using the email address as the reference, as it is unique. This way, we can make sure we are updating the right row.

Once both Google Sheets blocks are set up, while the user is interacting with the chatbot, the name and email address will be stored first. If the user leaves halfway through, you will at least already have one contact to be able to reach them. And if they keep going and complete the flow, their phone number will be added to the first record created in your spreadsheet.
That’s it! Your chatbot Google Sheets integration is that easy to set up, but if you prefer, you can also follow this tutorial in video format:
And don’t forget, you are able to manage your Google Sheets integration in the “Integrations” tab inside the Landbot builder, where you can find all your Google accounts linked to your Landbot workspace.
Conclusion
As you can see, integrating your website chatbots with Google Sheets is not only easy, but it’s also a great way to unlock the full potential of the data collected by your bots.
Ready to get started?
If you haven’t already, sign up for Landbot today and start building your own chatbot Google Sheets integrations.
%20(1).avif)


.avif)

.avif)
%20(1).png)
.avif)