.svg)
Please note that 'Variables' are now called 'Fields' in Landbot's platform.
When thinking of building a chatbot using Dialogflow or a similar NLP tool, you probably don’t even consider no-code bot-building platforms. Designing a conversation tree block by block, controlling user input at every stage, is not the NLP way.
Though, as we emphasized in another article discussing the concept and utility of Natural Language Processing chatbots, being puritan about AI and NLP bots is not the most business-friendly approach. In other words, focusing too much on building a bot that is indistinguishable from a human is time-consuming (also still impossible) and often beside the point. In business, efficiency wins.
So, how do you create a chatbot, the ultimate tool of conversational marketing, in a way that feels natural but not chaotic and lets you stay in control?
Root your NLP in an intuitive no-code chatbot platform. Landbot is famous for its intuitive no-code interface that allows users to create choose-your-adventure bots. Here, conditional logic, variables, and simpler keyword identifiers drive hyper-personalization (rather than natural language).
On the other hand, Dialogflow is famous for streamlining natural language processing development. Yet, despite implications, the tool remains quite complex and usually off-limits to an average marketer. By providing a Dialogflow integration, Landbot allows you to combine elements of NLP with no-code features.
Furthermore, creating a chatbot using Dialogflow, or a Dialogflow-WhatsApp chatbot, within the Landbot infrastructure gives you greater control over the conversation and allows for a combination of rule and NLP-based inputs.
Continue reading to learn a bit more about Dialogflow, or jump straight to the Landbot-Dialogflow integration process and example.
Understanding Dialogflow Natural Language Processing
Before being acquired by Google, Dialogflow was known as API.AI. Following the acquisition, the entire service has become free and available to all Google Cloud Platform. (GSP is priced based on usage but does offer a free tier.)
Dialogflow markets itself as the go-to tool for artificial intelligence and machine learning solutions. While Google might be working on something of the sort in the background, Dialogflow is, in essence, a Natural Language Processing engine with a major focus on Natural Language Understanding (NLU), the “understanding” part of NLP.
NLU is all about helping the algorithm identify what the user is talking about and collect the necessary data to generate accurate responses. While the Dialogflow engine is able to learn and improve, that improvement can only be enticed by active training on the part of the developer/narrative designer. The system can’t learn from its own experience, and so, you can’t really speak of machine learning in this case.
Developers use Dialogflow in three main ways:
- To create natural language chatbots without coding
- To enable bots to carry out various non-conversational functions using like retrieving information via APIs (much like the webhook function in Landbot)
- Purely as an NLU engine (the user’s server calls Dialogflow’s API to analyze natural language and retrieve from the crucial data needed to provide a relevant response)
The Basics Components of Dialogflow
🔶 Interface
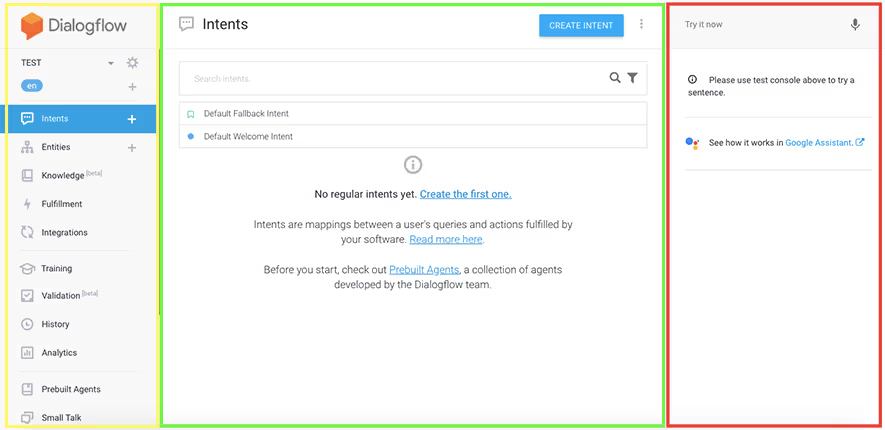
There are three main sections that make up Dialogflow’s user interface:
- Left: Menu (self-explanatory)
- Middle: Work Area (here is where you create intents, train your bot, design responses, etc.)
- Right: Test Area (space to test your design instantly)
🔶 Agent
In the simplest of terms, Dialogflow’s Agent is the bot you are building. Being the tool’s most basic unit, it handles the conversation with your end-users. Think of it as a human call center agent who needs to be trained before being able to do the job.
Setting an agent up is the first step toward creating an NLP Dialogflow chatbot.
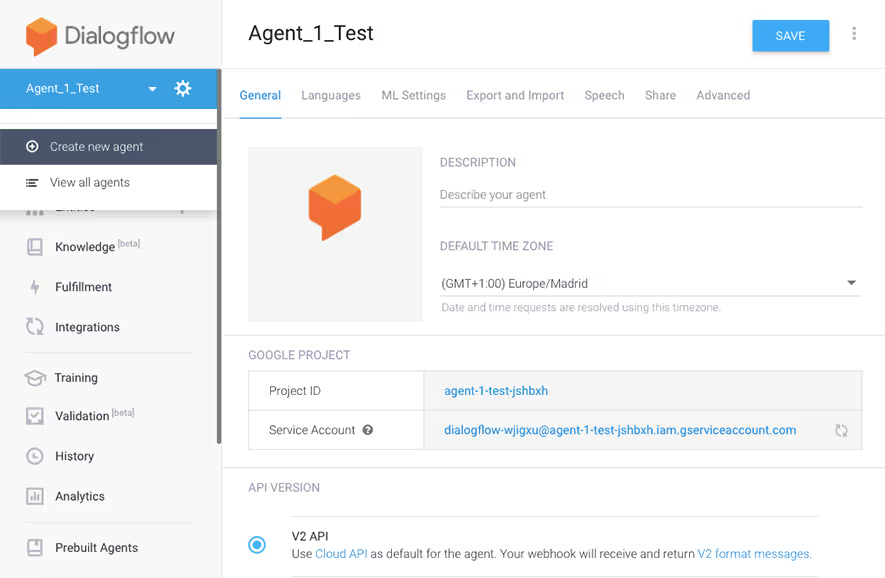
You will be able to see or switch between agents in the drop-down menu on the left or by clicking “View all agents.” An agent is made up of one or more intents.
🔶 Intents
In the simplest of terms, intents help your agent identify intent data, or else what the user means by writing or saying a particular phrase or sentence. They help your agent perceive and analyze the user’s input and select the most relevant reaction.
For instance, intent in Dialogflow can identify that the meaning of “Hi” is a “Greeting” and so decide on an appropriate response. In this sense, you can train your agent to differentiate between intent to find information, intent to buy, or intent to make a reservation.
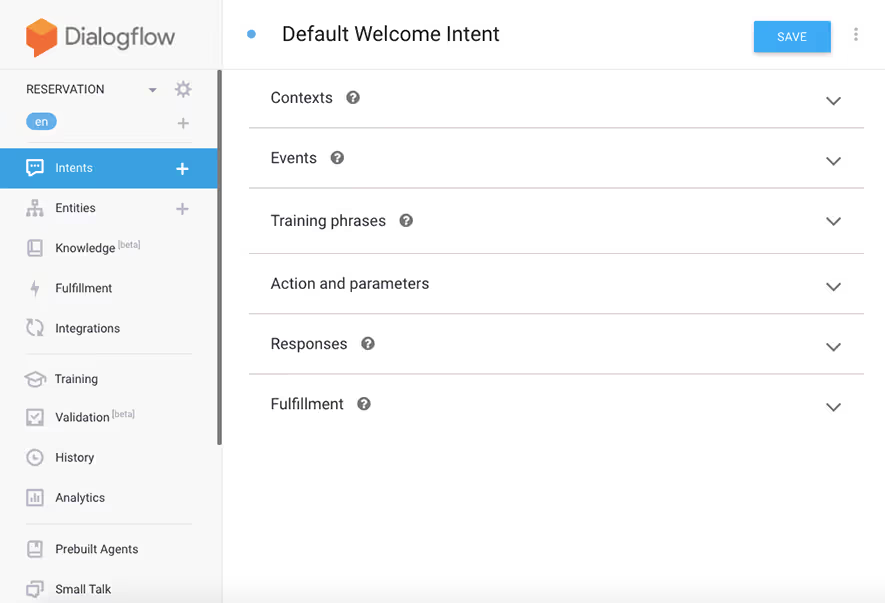
Dialogflow’s Intents section has multiple components: Contexts, Training Phrase (User Says), Events, Action, Response, and Fulfillment. However, not all are compulsory for the intent to work properly.
🔶 Training Phrases (User Says)
Within your intent, you are able to define an unlimited list of “User Says” training phrases that help the agent identify and trigger that particular intent.
The idea is to list different variations of the same request/question a person can use. The more variations you define, the better chance an agent will “understand” and trigger a correct intent.
Below you see a list of varying greetings that ensure the agent will be able to recognize it:
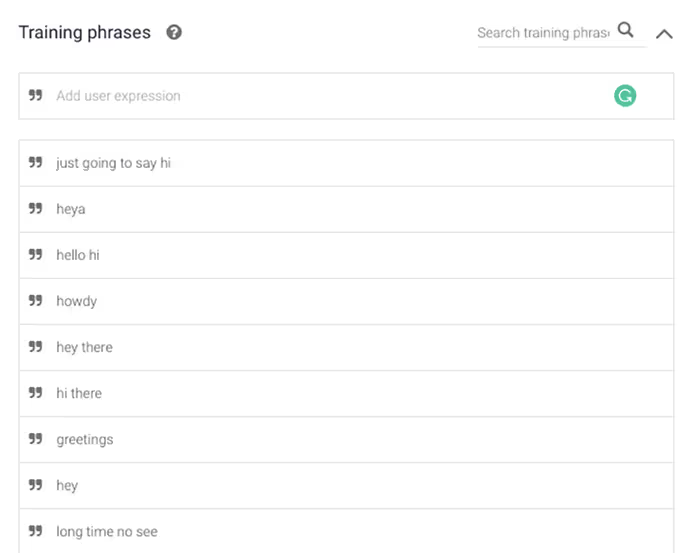
For a more complex example, the below list of phrases ensures an agent is capable of recognizing the user is requesting transport instructions using a variety of different formulations:
- How to get there?
- How can I get to XXX
- What’s the best way to reach XXX
- I want to know how to arrive at XXX
- I wanna know how to get to XXX
- How do I get there XXX
- How do I arrive at XXX
- Can I get there by…
- Is it possible to come…
- Can I come by…
🔶 Entities
Entities are used to identify and extract useful, actionable data from users’ natural language inputs (something like @variables in Landbot, only a bit smarter).
So, while intents enable your agent to understand users’ motivation behind a particular input, entities are a way to pick out specific pieces of information mentioned in unstructured natural language input. A typical entity can be a time, date, location, or name.
Dialogflow already contains a wide variety of built-in entities which are called system entities (e.g., @sys.geo-city or @sys.date). Therefore, you are able to associate a lot of entities by entering the training phrases, and Dialogflow identifies them automatically.

If the system parameters are not enough, you can create your own entities by clicking on the corresponding section in the left-side menu. (I will go through the entity-creation process in a bit!)

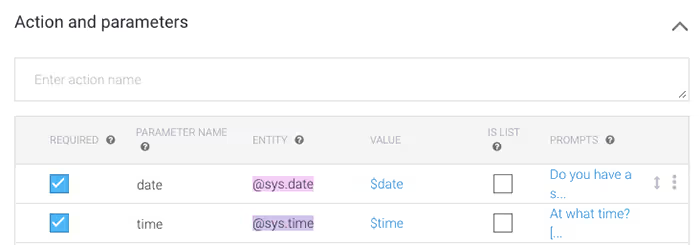
If you want an entity to be mapped, you need to specify it in the Actions & Parameters section of the Intent you are editing.
🔶 Fulfillment
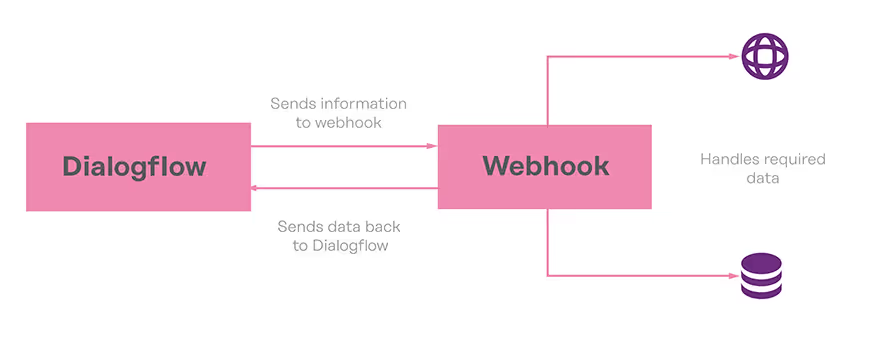
Designing for fulfillment in Dialogflow is very much the same as implementing a webhook in Landbot. It enables your bot/agent to retrieve, check or verify information from a 3rd party database via an API connection. To give you an example, imagine the user asks:
- What’s going to be the weather in Barcelona this weekend?
Dialogflow identifies the intent and key entities:
- What’s going to be the weather in Barcelona this weekend?
And sends the information to the designed webhook which handles the request and sends the required data back.
Nevertheless, fulfillment is not required for your NLP bot to function correctly. In other words, don’t worry about it too much.
🔶 Response
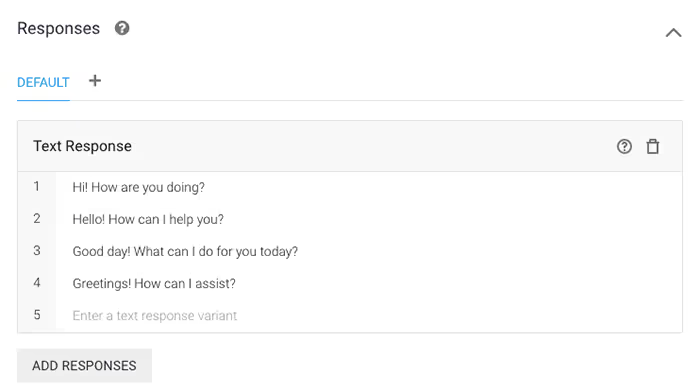
The response section includes the content that Dialogflow will deliver to the end-user once the intent or request for fulfillment has been completed. Depending on the host device of your bot, the response will be presented as textual and/or rich content or as an interactive voice response.
You must design a variation of responses for each and every intent. The responses can contain static text or variables which will display the collected or retrieved information.
🔶 Context
Think of “Context” as the glue that chains seemingly unrelated intents together.
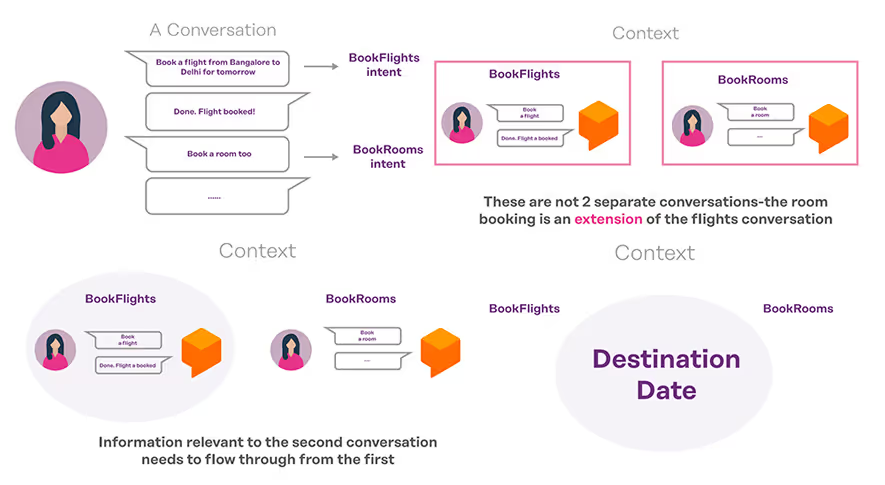
In Dialogflow, Context is used so the agent can remember (or better said, “store”) a reference to captured entity values as the user moves from one intent to another throughout the course of the conversation.
They can be used to fix broken conversations or to branch conversations. A clever example of this context use case was described in a Medium article by Moses Sam Paul. He shows how context helps the user to proceed from booking a flight (intent 1) to booking a room (intent 2) without having to re-enter the crucial entity parameters: date of arrival and departure.
Contexts also give you much better control over more complex conversations by allowing you to define specific states/stages a conversation must be in to trigger an intent. One of the best and simplest examples I found representing this use of context is featured in The Chatbots Life article by Deborah Kay through a clever example of Knock-knock jokes. Be sure to check it out!
Still, while contexts can be very useful, if you are building a simple linear dialogue, you might not need them at all.
🔶 Prebuilt Agents & Small Talk
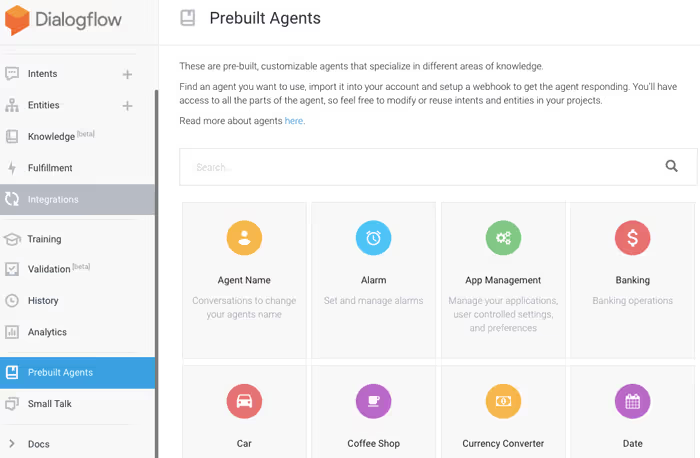
Besides the elements mentioned above, it’s important to mention that Dialogflow also offers a variety of prebuilt agents, which can be a great help if you are looking to cover some of the most basic conversational topics.
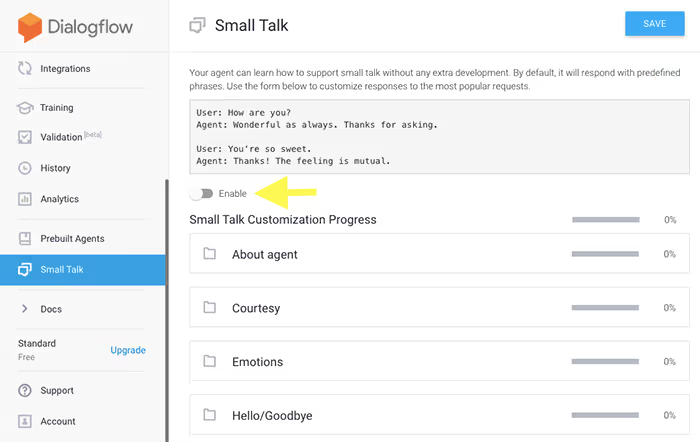
Furthermore, for any agent, you can also activate (but don’t have to) a “Smalltalk” intent. This feature is able to carry out the typical small talk by default — on top of the intents you built, making the bot seem a bit more friendly.
However, before taking any of the shortcuts, I recommend you try to understand and build intents yourself and understand how they work. It is likely to save you a world of trouble because when it comes to NLP, even the shortcuts are tricky.
How to Create a Chatbot with Dialogflow: Simple & Linear
But enough theory!
To help demystify Dialogflow just a little as well as help you understand its workings, I will go through building a simple agent. Naturally, in order to get started, you need a Dialogflow account. As mentioned, setting up Dialogflow is free, though Google will ask for your credit or debit card info mainly to ensure you are not a robot but an actual person.
1. Activate Dialogflow Account & Create Your First Agent
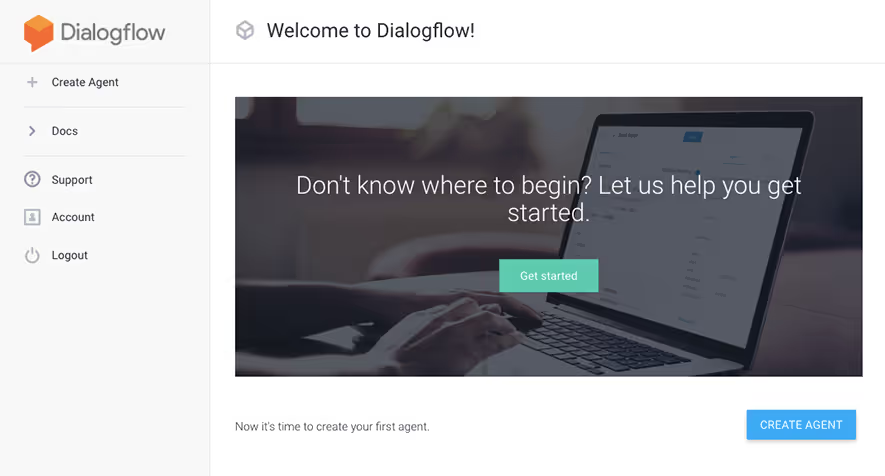
To create your first agent, simply click on the “+ Create Agent” option in the side menu on the left.
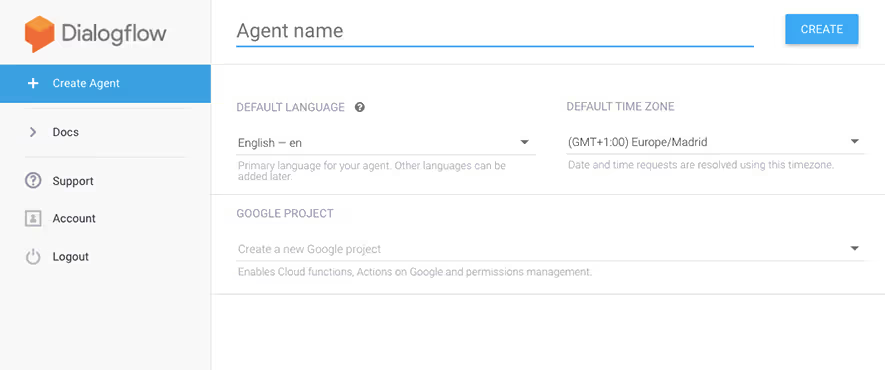
Fill in the agent’s name, default language, etc.
Once done, Dialogflow will redirect you to the main user interface. Without further ado, it will invite you to create the first intent for your agent.
2. Get Familiar with Default Intents
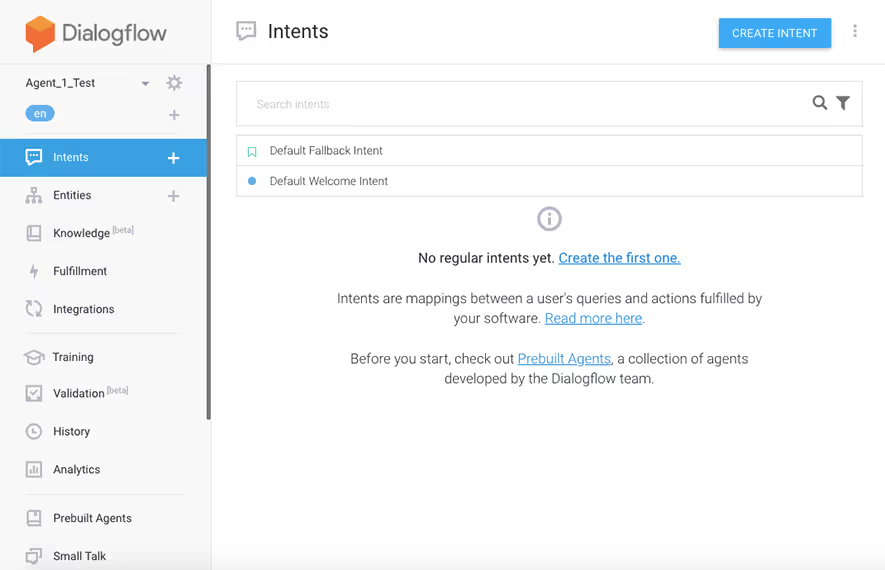
As you can see, there are already two default intents available:
- Default Fallback Intent: This intent helps you deal with the instances when your agent is not able to match user input with any of the intents. Instead, it responds with a polite “Sorry, could you say that again?” or similar preset responses. If you want, you are free to add or edit the default responses in the fallback intent and change them to something that fits your brand’s tone.
- Default Welcome Intent: This is a simple intent ready to react to any form of greeting there is with a plethora of training phrases already in place. Hence, thanks to the Default Welcome Intent, the bot already knows how to react when someone says “Hello” or any other greeting alternative.
3. Create Your Custom Intent
For the purposes of this demonstration, I decided to create a simple agent with a straightforward reservation intent.
Before anything else, give your intent a clear, descriptive name. Something like “Intent 1” can work if you have just a couple of intents, but with anything more complex, it’s likely to cause issues.
Next, ignore the “Context” and “Events,” as neither of which is necessary to make this intent work. Instead, focus on the training phrases.
🔺 Define Training Phrases
So, to train my agent on the reservation intent, I typed a list of phrases people are likely to use when making a restaurant reservation.
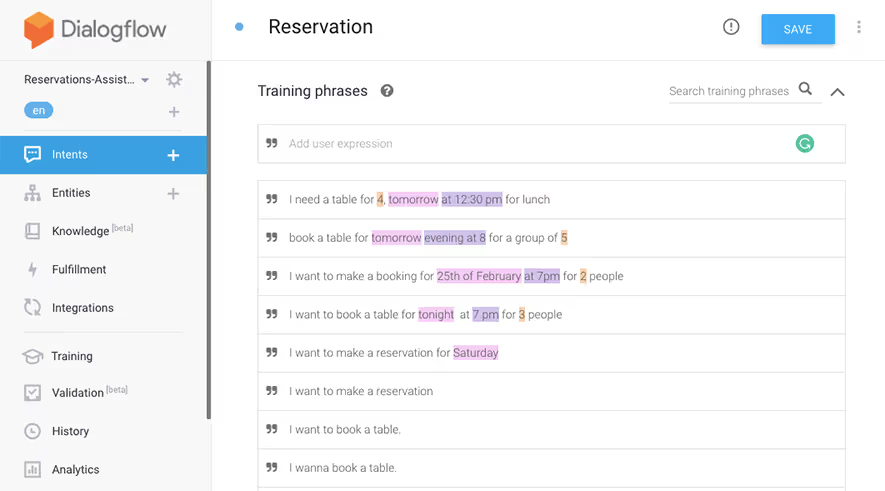
Do note that Dialogflow automatically highlighted entities with which it was already familiar (system entities).
🔺Identify Entities Crucial to Intent Fulfillment
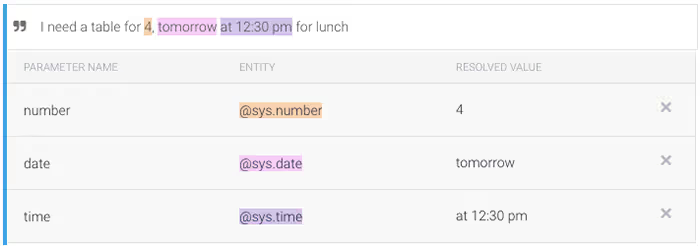
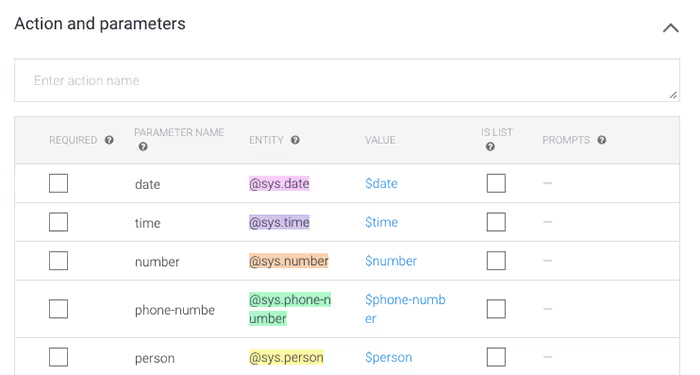
The system analyzed the natural language and isolated as well as classified key data necessary to make a reservation: date, time, and the number of guests.
However, to complete the reservation successfully, I also needed to collect a person's name and phone number. Therefore, I added a few training phrases to ensure the agent will be able to identify this information within the natural language input.
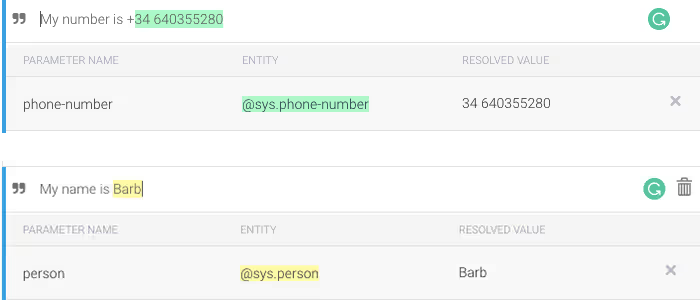
Scrolling past the training phrases, the identified entities are stored in the “Actions & Parameters” section:
🔺Define Required Entities & Their Prompts
Going through the variations of the training phrases, you can notice that some of them include more information than others. In fact, some include no data whatsoever. So, how do you make sure that after the agent identifies intent, it proceeds to collect ALL of the needed information?
The solution is quite simple.
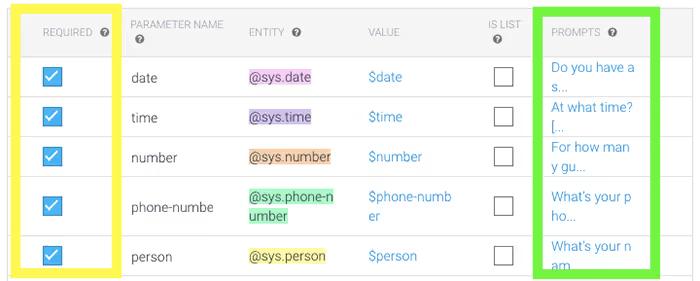
All you need to do is tick a box to classify the entity as required and create PROMPTS (questions) the agent will ask if any of the required information is missing.
To edit a prompt, click on the blue text under the PROMPTS column corresponding to the entity for which you want to design it. A pop-up window will open, giving you space to create not one but different variations of the prompt:
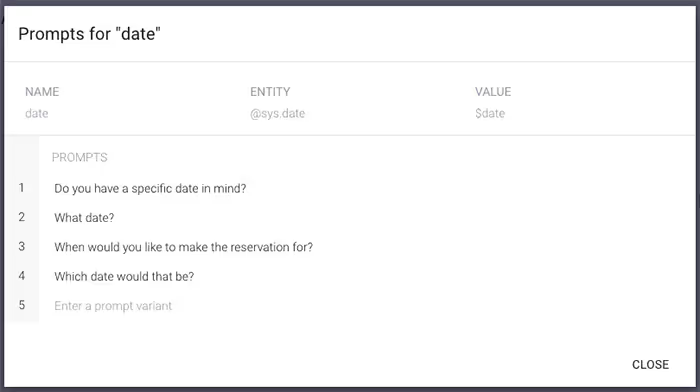
Creating a prompt for each of the entities will ensure your bot will identify what’s missing and ask for it. For instance, if a user simply says, “I want to make a reservation,” the bot will ask a question for each and every entity. But if the user says, “Book me a table for four tomorrow at 7 pm,” the bot will only ask for the name and phone number it would have identified and the other three required entities from the first user input. Make sure to SAVE all your changes in the top right corner!
🔺Create Custom Entities
What if our restaurant has more than one location?
Sure, this bot is capable of making a reservation, but it’s no good if we don’t know which of the restaurants the user plans to visit. In this case, we can create a CUSTOM ENTITY for the restaurant location.
So, make sure you save all changes in the Intent section and click the “Entities” option in the left-side menu.
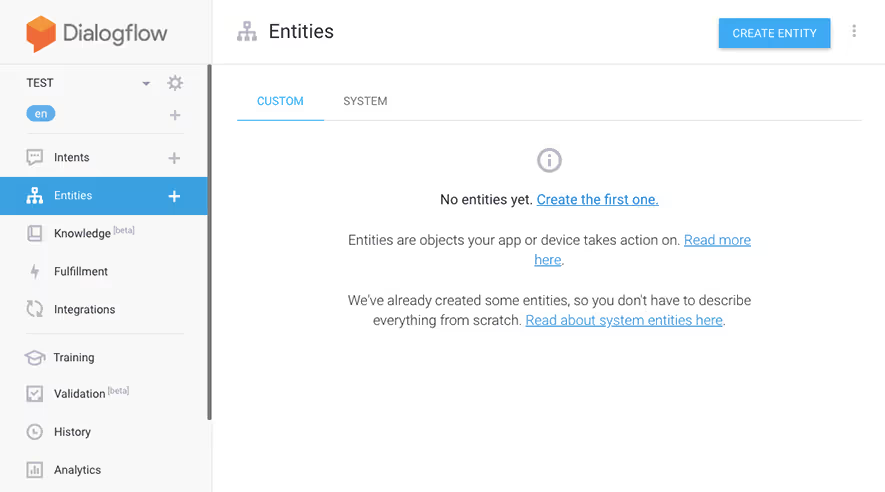
Click to create your first entity.
First, Dialogflow will prompt you to define your entity name and create its parameters.
Regarding this sample intent use case, I decided to define two different restaurant locations that will be classified under the same entity.
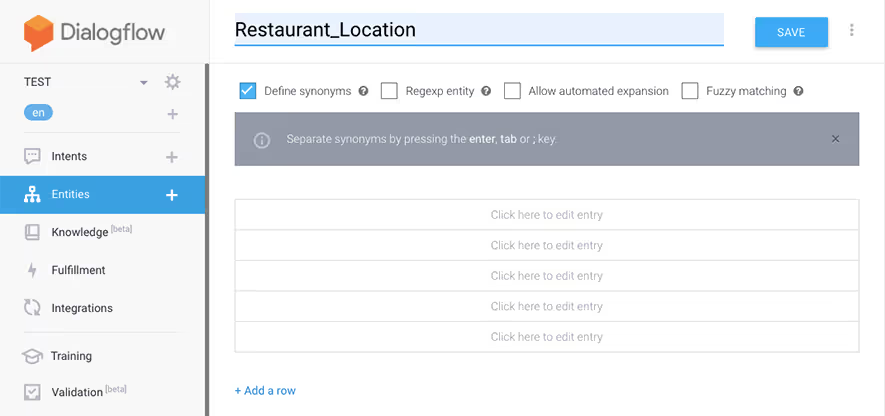
After clicking “Click here to edit entry,” Dialogflow prompts you to enter “Reference Value” and a “Synonym” of that value.

Since my entity is “Restaurant_Location,” the reference values that fall under this entity are the names of our restaurant locations: NAP Mar and NAP Antic.

However, let's say not all of my fictitious customers might know the specific name of a particular branch. Therefore, to make it easier, I created a list of synonyms customers might use to describe these locations:

If you want to be 100% sure the bot catches the location no matter what typo comes in the way, turn on FUZZY MATCHING in the options under the entity title. This way, if someone types “Balard” instead of “Baluard” the bot will know that the user is talking about the NAP Antic location.
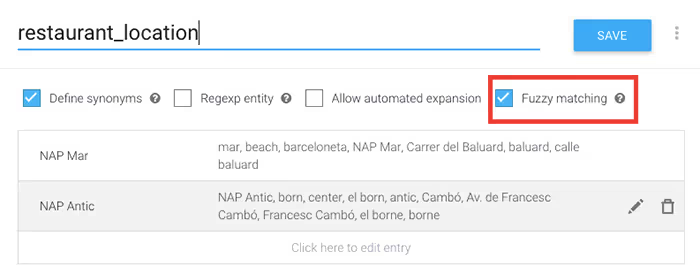
Hit SAVE to store the entity, and let’s go try it out!
First, to make sure your bot recognizes the entity, I tried adding a training sentence including the location.
As you can see, thanks to the synonyms we defined, the agent knows that the word “beach” refers to one of the restaurant branches and hence identifies it as a restaurant location:
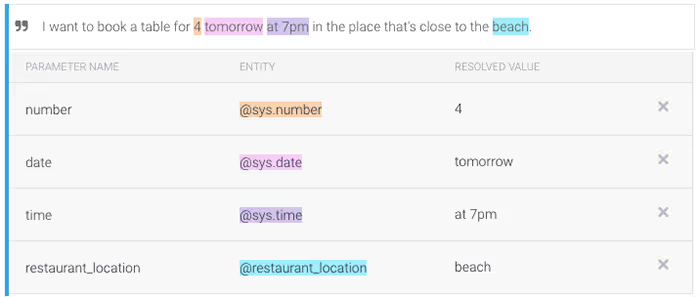
The same way, it identifies the actual name of our branch as a location:

Let’s test whether I trained the bot properly. In the video, you can see that from a fairly messy sentence the bot successfully retrieved the four mentioned entities and proceeded to ask about those that were still missing.
🔺Design Intent Responses
Last but not least, I needed to define a list of responses I would want the users to receive. In this case, the responses include a recap of all the entered entity values confirming the reservation:
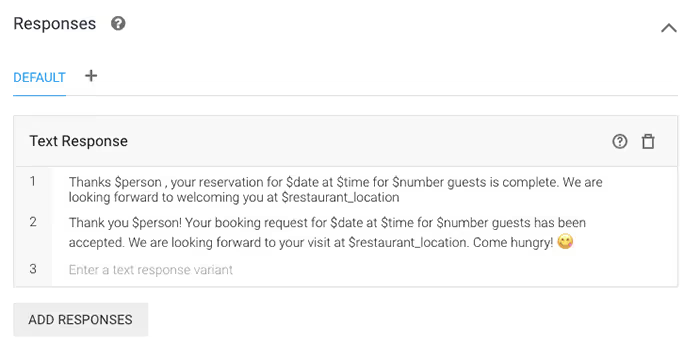
See the processing and response of the test below:
How to Integrate Dialogflow with Landbot
Landbot made a name for itself by allowing non-techy professionals to build a conversational interface from start to finish without coding. However, up until now, these conversational interfaces needed to be rule-based, relying on conditional logic and keyword recognition for hyper-personalization.
There is nothing wrong with that. Though, if you have an interface such as WhatsApp which doesn’t really allow for rich responses, the conversation design becomes a bit more challenging. Previously, I discussed a variety of tips and tricks for WhatsApp conversation design when working with a rule-based bot.
But, all tricks have their limits. Now, thanks to the Dialogflow integration, you are able to leverage all of Landbot’s no-code features while using NLP. So, let’s take a look at how we can integrate a Dialogflow agent into Landbot’s chatbot builder!
1. Create a Dialogflow Block in Landbot
Draw an arrow from the green exit point to create a new block as usual. Search for Dialogflow integration and select.
There are three main sections inside the Dialogflow block.
2. Dialogflow Block Section I: Upload Project JSON Key
The first section is key to the integration. It requires you to upload a so-called Google Project JSON key which corresponds to a single Dialogflow agent.
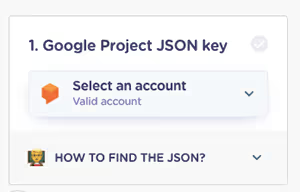
To be able to do that, you need to download that key from Dialogflow.
Here is how!
Click to access the settings of your agent you want to connect with Landbot. In our case, that would be our Reservations-Assistant.

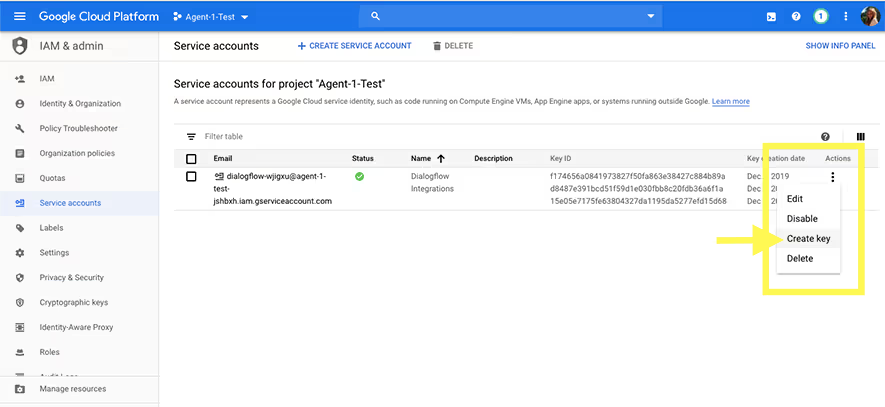
Then, click on the link in the “Service Account” field.
A new tab will open. Click on the three dots under “Actions” and select “Create key.”
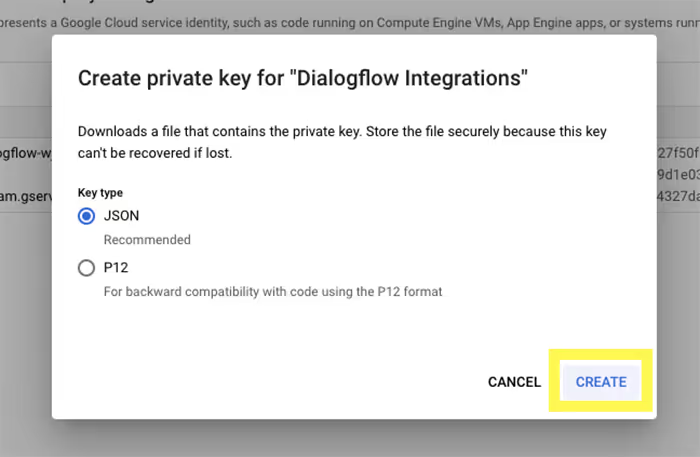
Next, confirm you want to create a JSON file.
The file will be downloaded to your PC:

Once all that is done, go back to your Landbot builder and upload the JSON key.
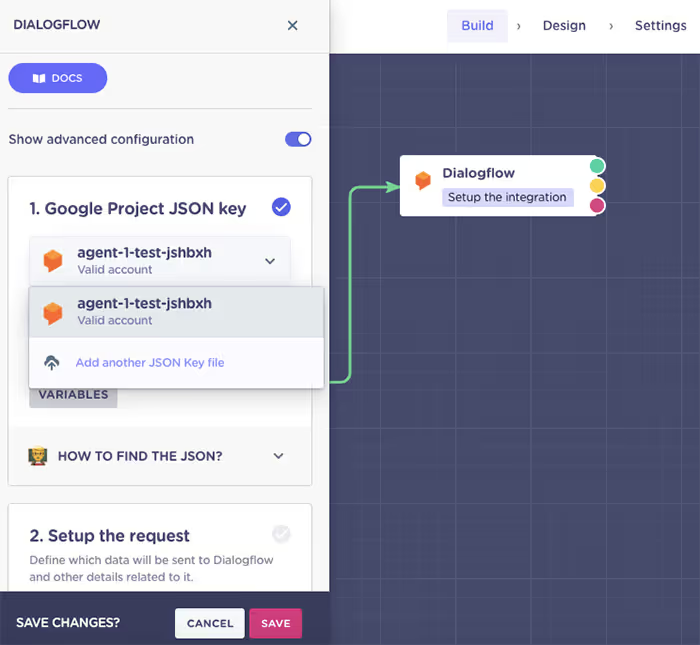
Below you will see a field called “Dialogflow Session Identifier” with @id variable. This is a unique conversation ID for Dialogflow to be able to distinguish among conversations. No need to worry about that.
3. Dialogflow Block Section II: Setup the Request
In this field, you will be defining the information you want to send to Dialogflow.
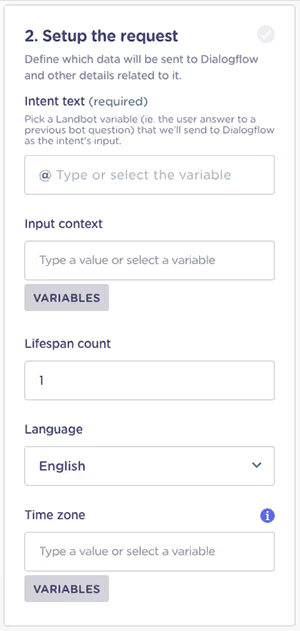
- Intent Text. A compulsory field that needs to feature the variable that captures users’ natural language input.
- Input Context. An optional field to help narrow down your intent. The context needs to be defined in Dialogflow as well in order to work.
- Lifespan Count. Only required if Input Context is defined. It tells the bot how long to remember a certain context. In Dialogflow, the default lifespan setting is five responses or 20 minutes.
- Language. English is the default language. Adjust only if you defined a different language in your Dialogflow agent.
- Timezone. Optional field. If not set in Landbot, the bot will use the pre-set timezone in Dialogflow.
For the purposes of our example, the only field in “Set the Request” we need to define is the Input Text. We go straight from the open answer welcome message to the Dialogflow block. Hence, our input text will be that answer which is stored under the default @welcome variable. (You can verify that by clicking on the three dots in the right corner for the welcome block.
4. Dialogflow Block Section III: Save the Response
In the last section of the Dialogflow integration block, we need to define what data we want to pull from the NLU engine back to Landbot.
- Entities. A field where you need to define which entity values you want to receive from Dialogflow’s analysis of users’ natural language input.
- Response. A compulsory field where you need to choose a variable to represent Dialogflow’s responses in the Landbot interface.
- Output Context. An optional field only necessary if you have defined output context in Dialogflow.
- Payloads. Requires basic coding knowledge. When data is transmitted over the Internet, each unit sent comprises both header information and the actual data being sent AKA payload. Headers and metadata are sent only to enable payload delivery.
I designed the Reservation Intent to collect the following data: date, time, number of guests, location, name, and phone number. Therefore, these will be the same entities I will want to take back to Landbot builder for further processing.
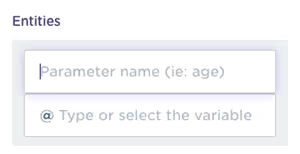
For this to work, the parameter name you input into the section needs to be the same as the parameter name you defined in Dialogflow.
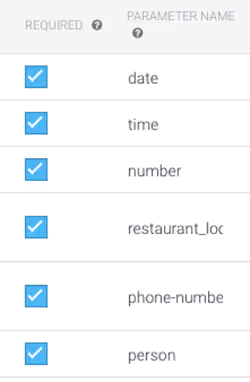
Now, simply associate each parameter with a variable (create your own or use one of Landbot’s pre-set ones).
Next, remember how we created responses Dialogflow? Or the data prompts we defined to get all the information we need from the customer?

The next part of the “Setup the Response” section allows you to create a variable to represent Dialogflow responses (be it final responses or prompts) and display them on your Landbot interface. I named the variable - simply - @response_1
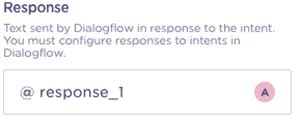
In most cases, you won’t require the output context or payloads, so skip the fields and click SAVE.
5. Create the Flow for Each Output
Now it’s time to connect the Dialogflow integration block with the rest of the world. As you can see, the block has three different outputs: Green, Yellow, and Pink.
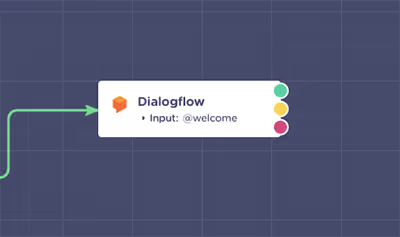
- Green Output = Success
The green output is the route the bot will take when the natural language input you sent to Dialogflow and matched with an intent successfully. In case you requested entities, the bot will take this path only once all of the required entities are collected. Success output allows the bot to proceed with the conversation flow.
- Yellow Output = Incomplete
Your bot will travel down the yellow route in case Dialogflow collected some but not all the required entities. Hence, after successfully matching the intent, it will return the conversation to Dialogflow, allowing it to ask the pre-designed prompts.
- Pink Output = Fail
The bot takes this path in case Dialogflow fails to match intent to the natural language input. Hence, the conversation flow follows the default fallback intent which will allow the user to try again.
What does this mean in practice? Draw an arrow from each output to create a Question: Text block, which allows for natural language input on the part of the user.
(Note: If you are creating an NLP flow for the web and want to make the end of the conversation more obvious, select the “Send a Message” block which will make the user input field not appear at all. Naturally, this will change nothing on interfaces such as WhatsApp or Facebook Messenger, where the input field is a natural part of the interface.)
However, instead of typing a question in the “Question Text” field, enter the Dialogflow response variable you created in the block before. Then, change the response variable from @text to @welcome since that is the input I set up for sending to Dialogflow in the main block:
This way, when the bot takes the:
- Green route @response_1 will correspond to the final intent response
- Yellow route @response_1 will correspond to one of the predefined prompts
- Pink route @response_1 will correspond to one of the responses defined in the “Default Fallback” intent
Thanks to the NLP integration, customers can complete the booking in a way that feels natural to them. They can provide information bit by bit:
Or all at once:
The bot will know what to do!
The Advantages of Building a Landbot Chatbot Using Dialogflow
Now that you have seen how to create a chatbot Dialogflow and Landbot, let’s take a closer look at the benefits of this connection.
Smart Data Collection
First of all, the use of Dialogflow allows Landbot to collect data more efficiently.
To be more precise, when your rule-based bot asks “What’s your name?” and the customer writes “My name’s John Smith,” the whole is saved under the @name variable in your CRM.
However, if you run the same simple question through Dialogflow, the agent will be able to single out the named entity and send only “John Smith” back to Landbot to be stored under the @name variable. A simple improvement that can take your chatbot lead generation to a whole new level.
Control & Efficiency
The usual problem with NLP bots is that they often leave users too much freedom. This creates an issue as the users end up being confused about what they can and cannot ask for and the appropriate way to ask for it. Using Landbot, you can create an NLP experience within the structure of a rule-based bot.

This not only structures the customer journey to avoid doubt and confusion but also makes creating NLP agents much easier as you can break down otherwise complex conversations into simpler intents.
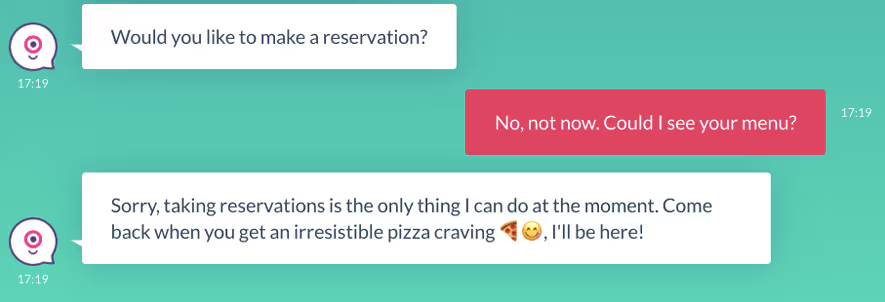
To be more specific, you may have noticed that my example reservation bot didn't give the user much choice by asking, "Would you like to make a reservation?" This way, it's pretty clear what the bot can and cannot do.
But!
You always have to account for exceptions. There will be people who answer "No, ....... " all I had to do is create a "No-Reservation" intent and try it with phrases like "No," "Nope," "Not now" and provide an appropriate response:
NLP & No-Code Visual Interface in ONE
Last but not least, Landbot allows you to design an NLP bot within a clean-cut, user-friendly visual interface.
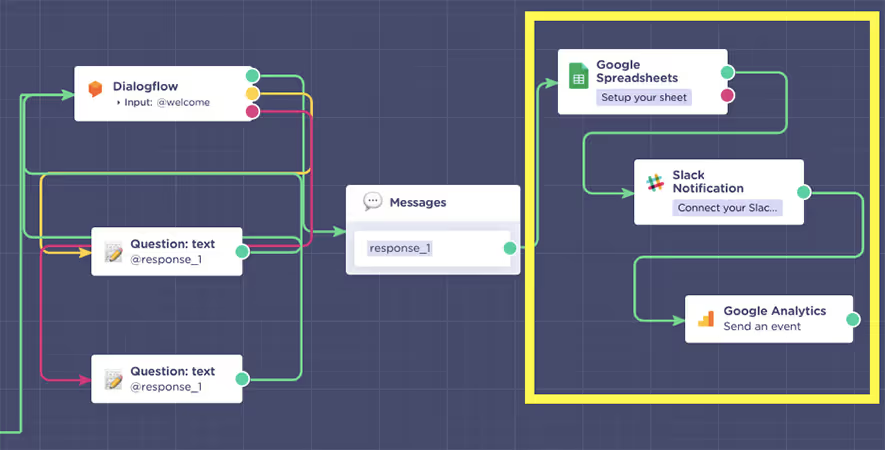
Hence, you can use Dialogflow only in what it is best at (the natural language understanding bit) and leave things such as integrations and frontend setup to Landbot, where you can do so by a few drag-n-drops.


%20(1).avif)

.avif)
%20(1).png)
.avif)


%20(1).png)
%20(1).png)
