

.avif)
.svg)
Please note that 'Variables' are now called 'Fields' in Landbot's platform.
With the expanding features and capabilities of WhatsApp Business API Platforms and the generative AI boom, more and more businesses are opting to create WhatsApp bots to communicate with their customer base in 2025. The popularity of these chatbots is not unwarranted, as case study after case study shows incredible results in engagement, resolution time, customer satisfaction, and even revenue growth.
If you, too, are looking to learn more about how to create a WhatsApp bot for your business, you have come to the right place. This article outlines how to build a chatbot solution for WhatsApp using both Landbot’s drag-and-drop builder and one of its AI Assistants — all while making the best use of WhatsApp automation.
So, without further ado, let’s see what it takes to create a WhatsApp bot for your business with Landbot.
What is a WhatsApp Bot?
A WhatsApp bot provides your leads and/or customers with a real-time automated conversational experience directly on the messaging app. Chatbots on WhatsApp can be rule-based (composed of decision-tree-type interactions offering a more structured experience) or NLP-based (using natural language processing for more or a more human conversational effect). However, to be able to deploy a bot on WhatsApp, you must apply and be approved for WhatsApp Business API integration.
The key advantages of a WhatsApp chatbot include the following:
- Being able to communicate with the audience instantly, without delay, because people check WhatsApp more frequently than email marketing messages.
- Enabling asynchronous communication, in other words, you are able to reply instantly, the customer can stop and restart the conversation at their own convenience, and the thread will never be lost.
- Getting in touch with your target audience without forcing them out of their comfort zone (via a messaging platform they use daily).
- Delivering a personalized experience with every interaction thanks to accurate user history and data collection.
A WhatsApp bot or assistant can be used for a variety of use cases across customer journeys from marketing campaigns and sales to customer support and success.
Who Can Build WhatsApp Bots?
WhatsApp Business API was first released in 2018. Since then, Meta has been working towards turning into a full-scale business platform on par with WeChat's success case in China. Businesses worldwide are starting to take advantage of the possibilities that come with WhatsApp’s deep market penetration (2B monthly active users) and ever more business-friendly features.
Still, even though WhatsApp did open its doors to businesses, the API integration is not up for grabs just for anyone.
WhatsApp Business API requires businesses to have a business profile and pass through an application process that prioritizes medium, large and enterprise-size businesses in selected industries. Before you can grace your audiences with an official WhatsApp chatbot, you need to:
- Review WhatsApp Commerce Policy to ensure your industry and/or use case doesn’t breach any of the imposed regulations;
- Apply for WhatsApp Business API and set up a WhatsApp phone number.
Leveraging WhatsApp Automation
Once you’ve set up your WhatsApp Business API account, established your opt-in strategy, and gotten your WhatsApp templates approved, you’re all set to start using all of WhatsApp's advanced features and automation capabilities.
WhatsApp chatbots are one of the most valuable and versatile features of the API, transforming basic notification templates into dynamic, AI-driven conversations. They enable you to share information effectively and gather user data to personalize your audience’s experience. With many BSP providers offering no-code or low-code bot-building services, implementing chatbots is now more accessible and cost-effective.
You can create chatbots using artificial intelligence, rule-based logic, or a hybrid approach, depending on your needs.
There are many benefits to using automated messaging on WhatsApp, including:
- Improved customer experience: WhatsApp chatbots are available 24/7, so they can reply via automated messages whenever a customer reaches out, establishing a closer connection with them and improving brand visibility.
- Improved sales: due to WhatsApp's promotional messages and product recommendation capabilities and the option of retargeting potential customers on their mobile devices.
- Lower costs: WhatsApp automation can take on many marketing efforts and sales tasks such as lead qualification and newsletter sending.
How to Build a WhatsApp Bot with Landbot's AI Assistants
When building AI chatbots, whether through no-code solutions or not, it's crucial to focus on the fundamentals of a well-designed user experience that aligns with your brand. Collaboration with your team and scalable deployment are essential aspects of the process. These core elements are integral to creating effective chatbots and are unlikely to change even as more AI-driven solutions emerge. Here are some key considerations:
- Designing targeted conversational experiences: Regardless of your customers’ position in their journey, it’s essential to craft a user experience tailored to their needs. AI-powered chatbots don't eliminate the need to design seamless interactions that address pain points, helping you successfully acquire, nurture, and retain customers and foster customer loyalty.
- Optimizing chatbot flows based on user behavior: AI chatbots learn and improve over time, but it's still vital to analyze performance and adjust flows to boost conversion rates based on user interactions.
- Integrating with third-party platforms: AI chatbot solutions must integrate smoothly with third-party systems. It's crucial to handle and process the data gathered by the bot effectively within your existing tech infrastructure.
- Providing assistance across multiple channels: Chatbots should be available across the various channels your customers use, such as WhatsApp, your website, or Messenger. Meeting customers on their preferred platforms and engaging them in user-friendly conversations remains essential.
Landbot's AI solutions facilitate human-like conversations in three primary use cases: Customer Service (FAQs), Lead Generation, and Appointment Assistance. These fully automated solutions make it easier than ever to create your own AI chatbots without needing to use our no-code builder.
All solutions are available for Web and WhatsApp. Choose your desired use case, then select your preferred channel — in this case, you'd pick WhatsApp.
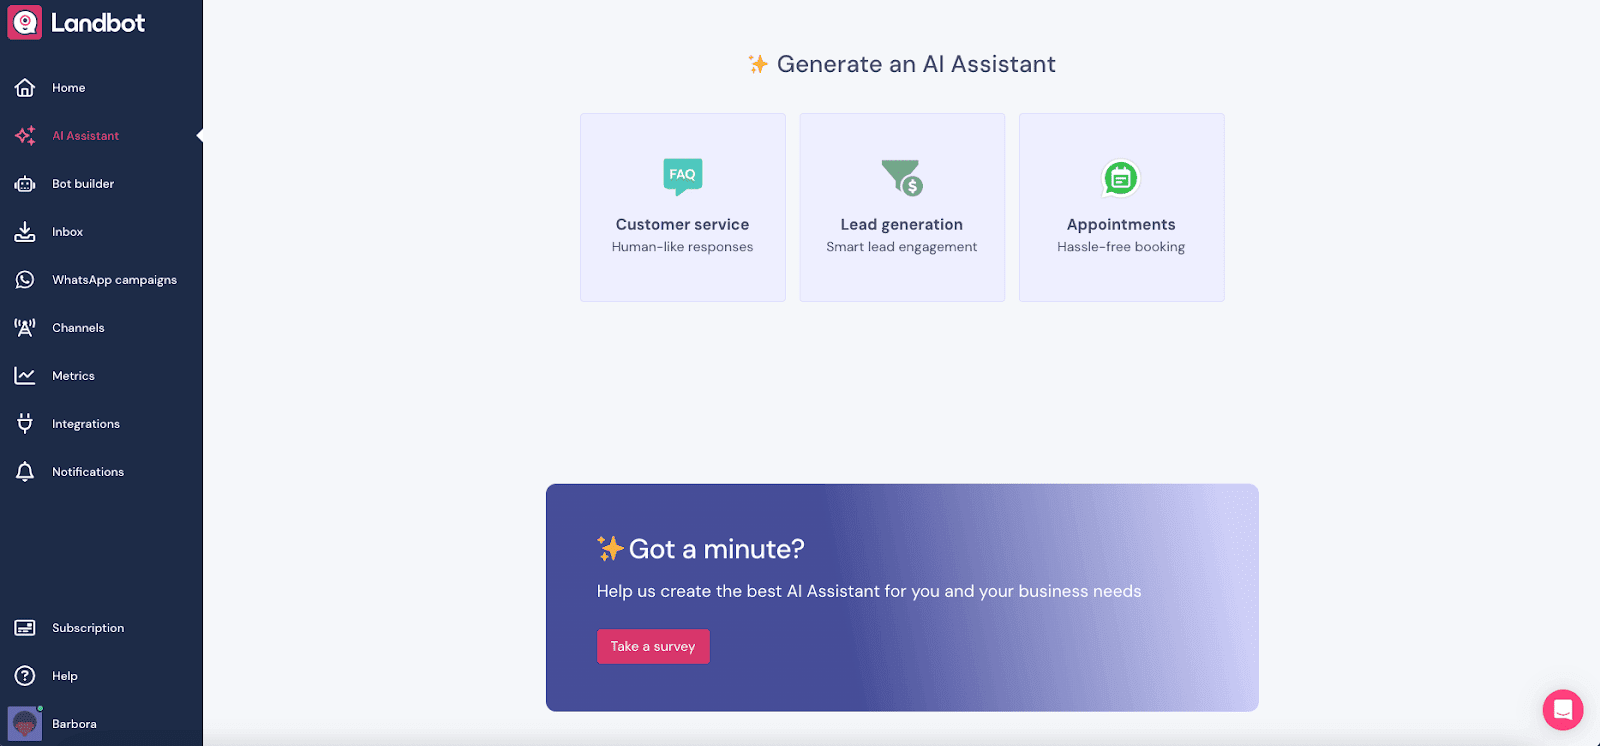
Let's have a look at each use case.
Customer Service (FAQ Assistant)
This feature serves as both a customer support tool and a sales ally. By enhancing the user experience and fostering trust, it increases the likelihood of converting prospects. Setup takes just minutes—simply copy-paste your FAQ data into the bot. The AI will respond to common questions using its own wording while remaining true to the facts.
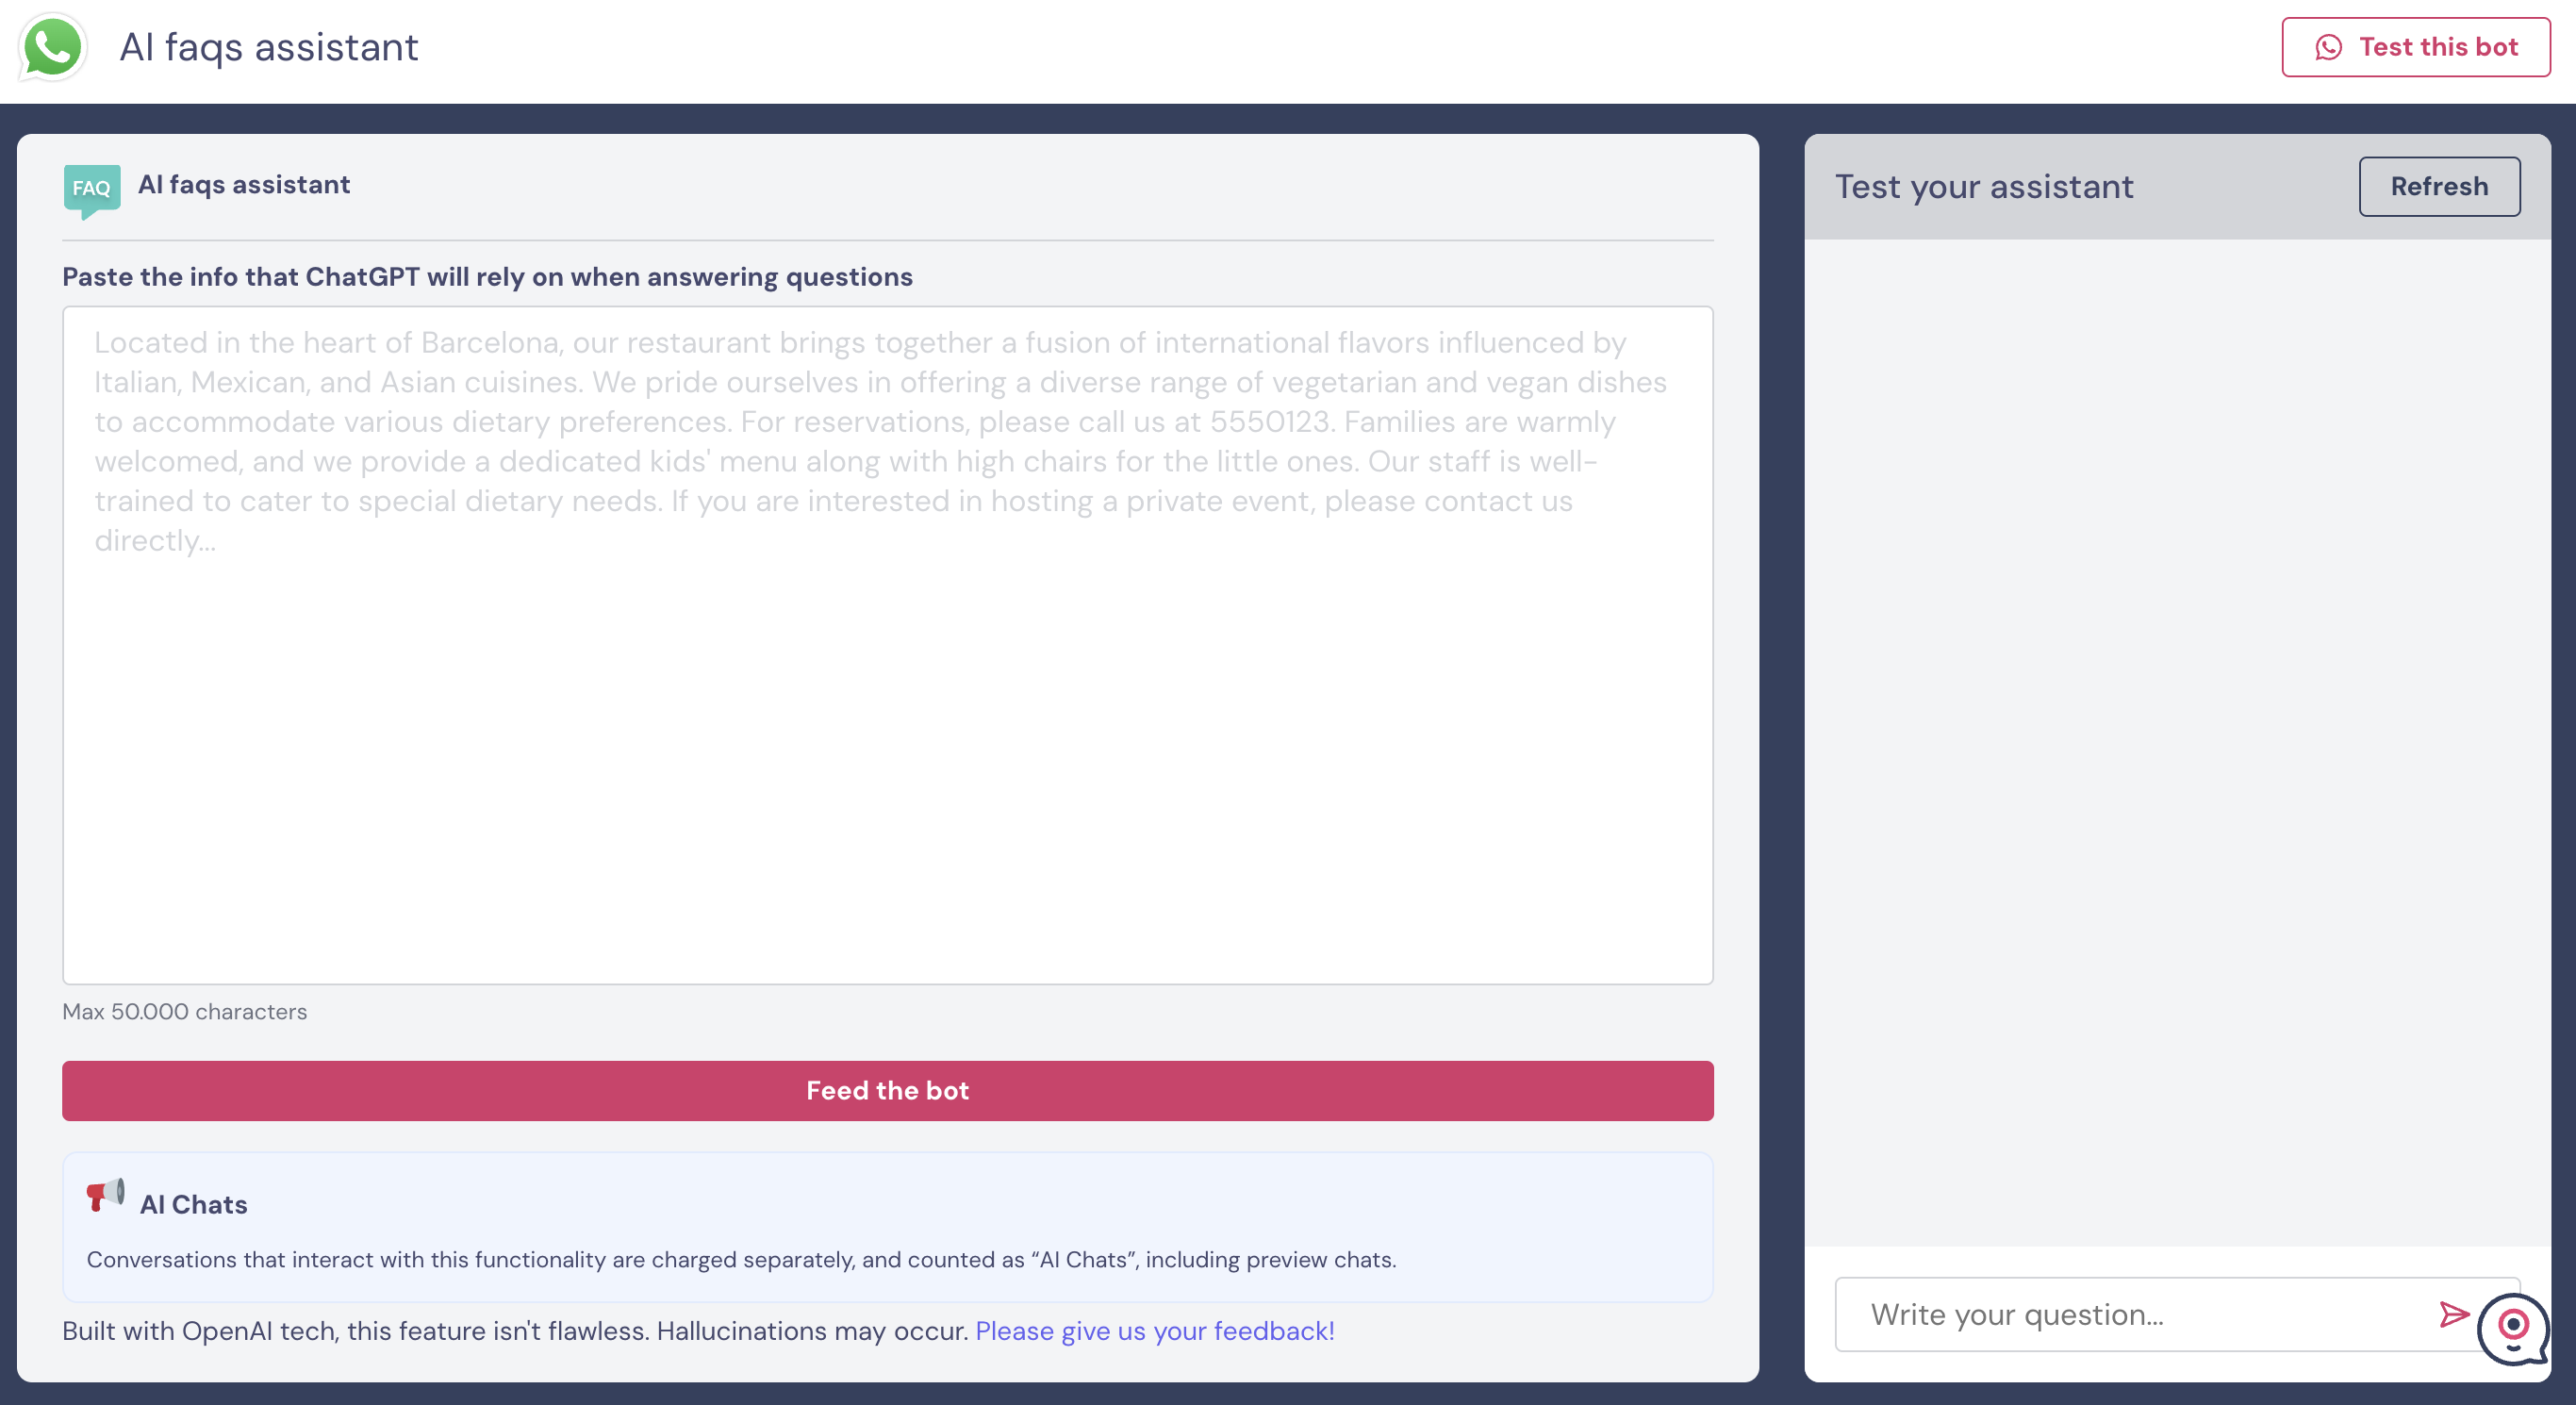
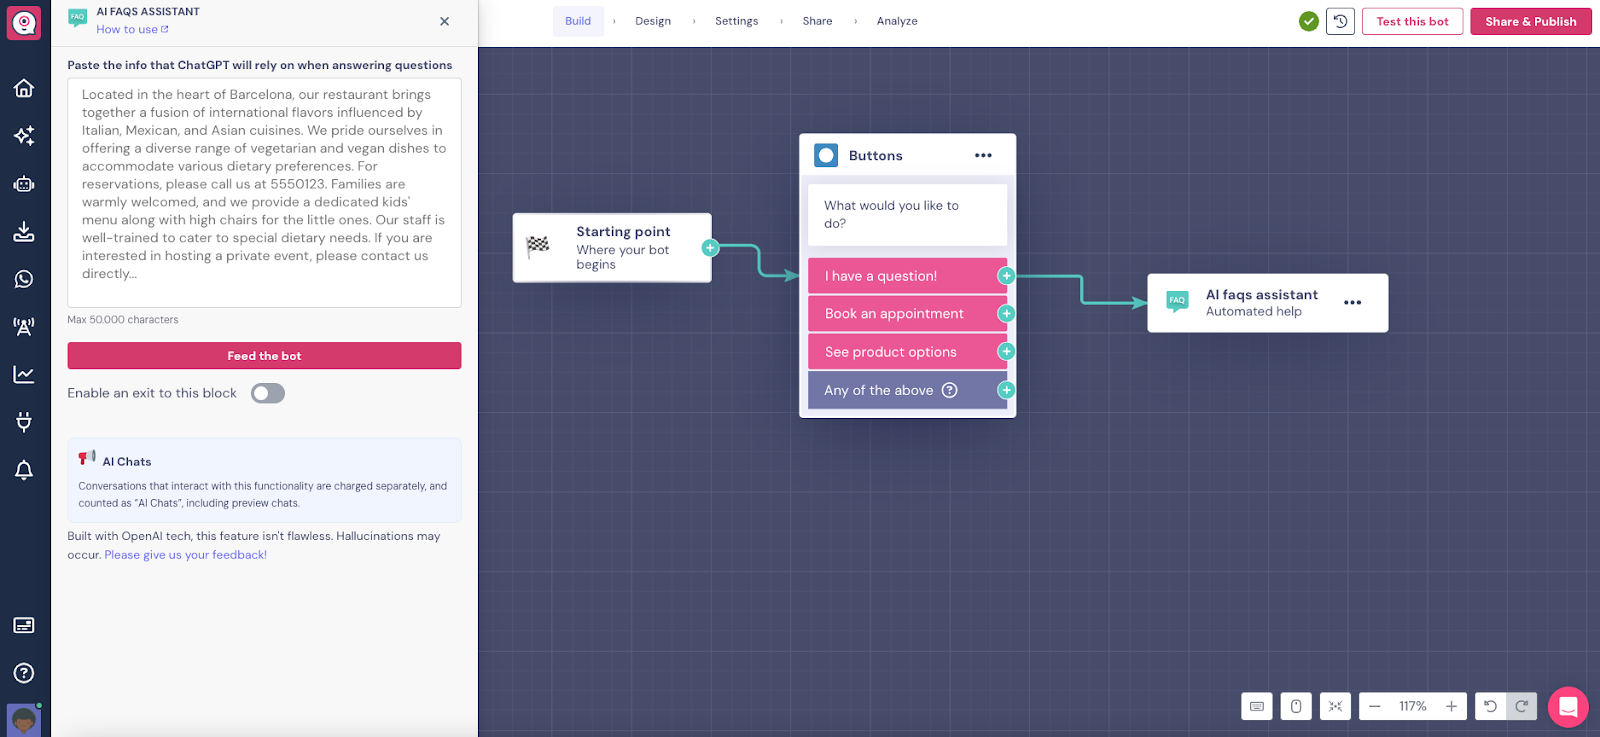
You can test the assistant on the right side of the screen and see how the AI uses the information you've provided. This feature is available outside the builder as a dedicated FAQ assistant, or it can be integrated into a more complex chatbot within the builder.
Learn more about the AI FAQ Assistant.
Lead Generation Assistant
If the goal of your chatbot is to gather information from leads, this feature is ideal. After choosing this option and the preferred channel, you'll be directed to a simple editor.

The setup might take a few extra minutes compared to the FAQ assistant, but it remains straightforward. Customize your welcome message, define the questions for your bot, and set variables to store user inputs and answers. The bot will use your instructions to engage with users and gather the required data.
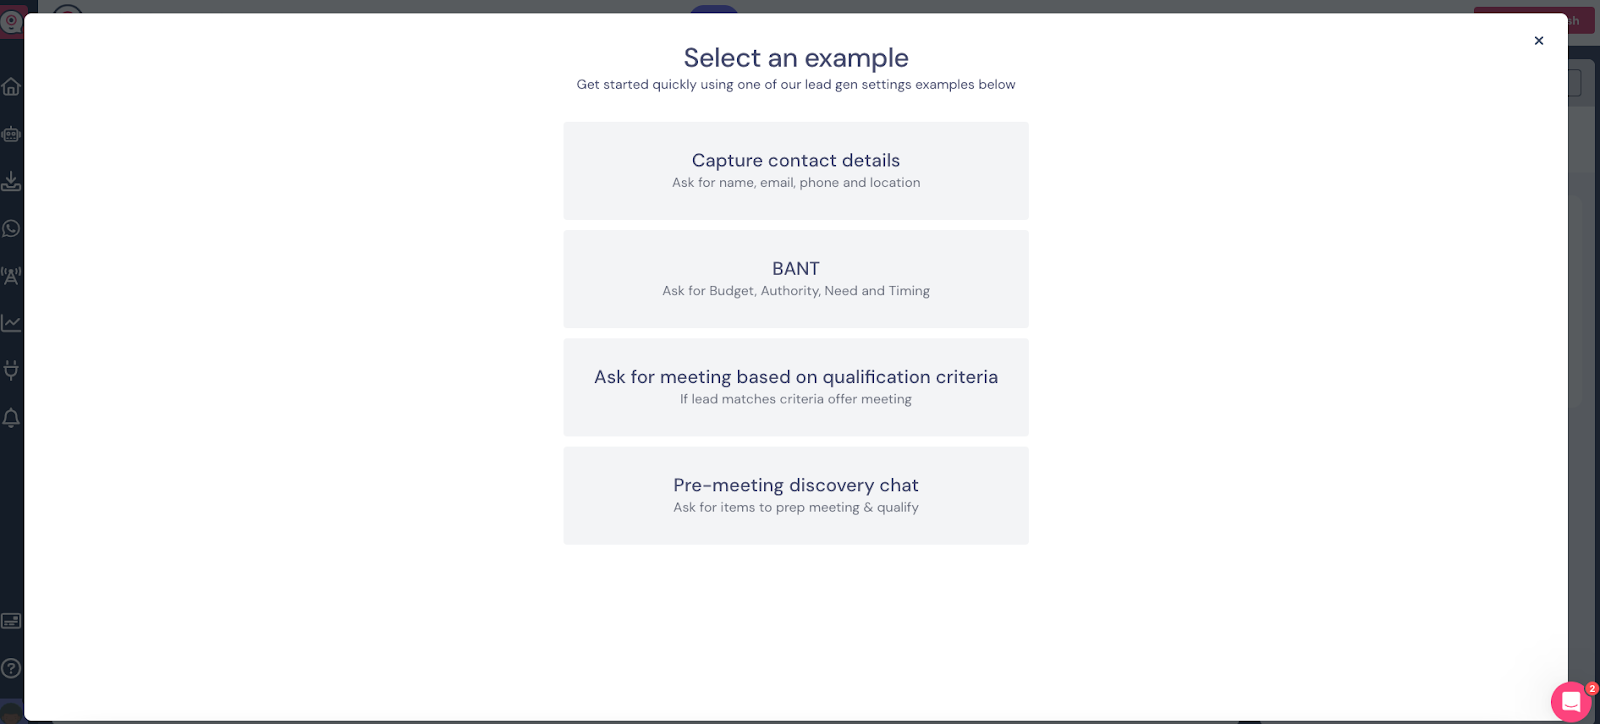
If you want to explore, click the "Use Example" buttons, which provide a set of pre-defined questions to get you started. For further customization, access the "Assistants Settings" section.
In the Assistants Settings section, you can optimize the bot's performance by providing additional information and guidelines for interacting with leads and accurately representing your company. This includes details about your mission, offerings, common questions, and more.
You can use this feature as described above or integrate it as a single block within a larger bot in the Landbot no-code builder. Discover more about the Lead Generation Assistant.
AI Appointment Assistant
The AI Appointment Assistant simplifies scheduling meetings for both parties. This advanced AI tool streamlines the appointment process and is easy to use.
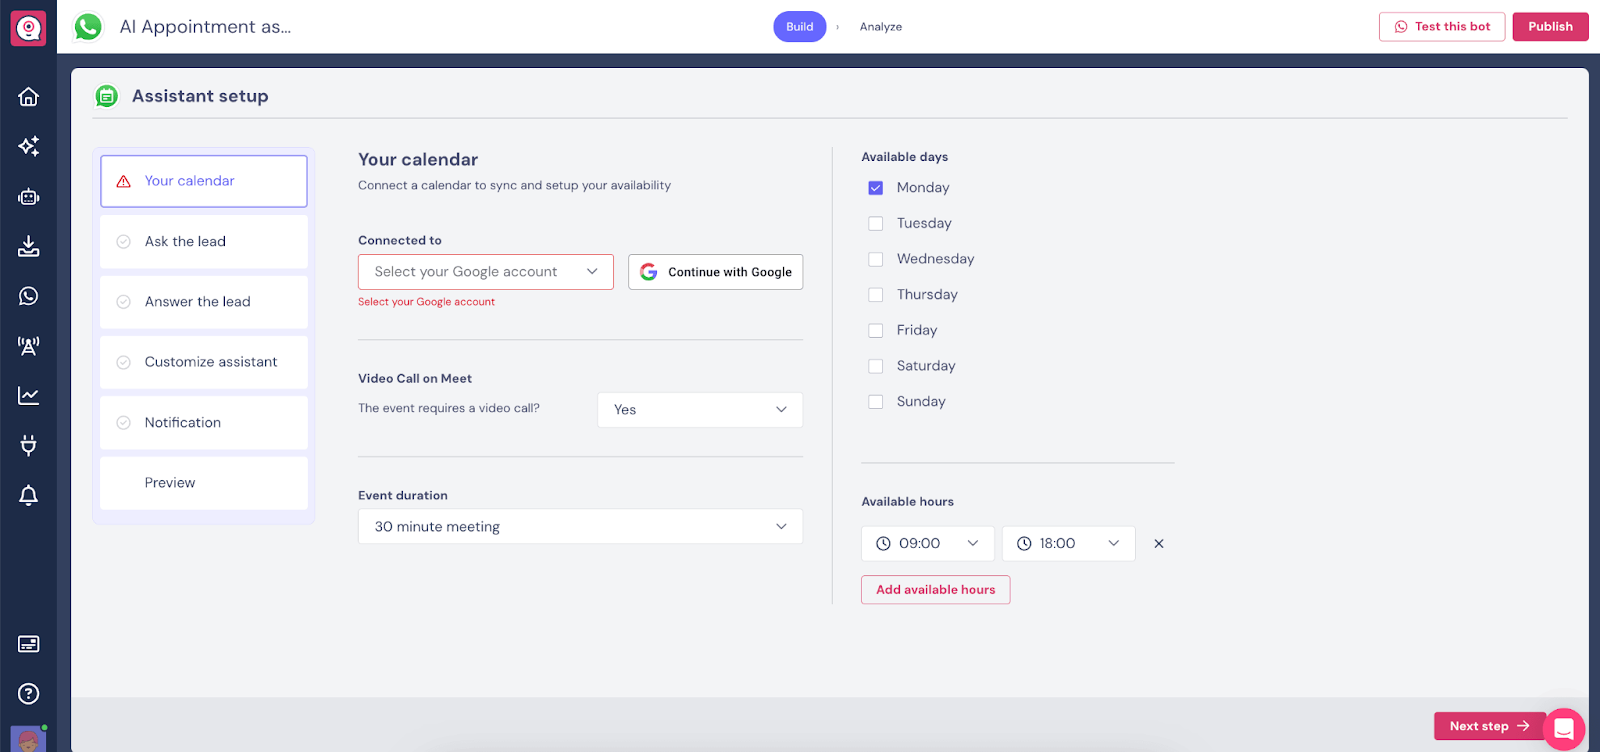
Configure the bot in six steps:
- Your Calendar: Connect your Google account and customize meeting details such as available dates and times, and meeting duration.
- Ask the Lead: Define the pre-meeting questions you want the lead to answer, using standard or custom questions.
- Answer the Lead: Provide the bot with information about common pre-meeting questions, allowing it to quickly address leads' queries.
- Customize Assistant: Assign a name to your Assistant, choose languages for interaction, and give it a touch of personality.
- Notifications: Add an email address to receive meeting notifications and information from the AI Assistant.
- Preview: Test your creation!
Once you've configured the assistant, it’s ready to use. Try the AI Appointments Assistant for WhatsApp or learn more about it.
How to Build a WhatsApp Bot with Landbot's No-Code Builder
If you're in a hurry, you can get a good idea of what steps you need to take to create and test your bot in the video below. Though, for a more detailed guide, follow this tutorial to the end.
For a complete video guide to building WhatsApp chatbots, visit our free course at Landbot Academy. This tutorial takes you through no-code chatbot creation and explains how to create a rule-based WhatsApp chatbot using a decision-tree-like structure powered by integrations. However, if you are more interested in building an NLP-based WhatsApp AI assistant, check out our step-by-step guides:
- Building a Dialogflow-based WhatsApp chatbot (or see Landbot-Dialogflow course at the Academy for a video guide).
- How to build a chatbot with GPT-3 (or see an AI on WhatsApp webinar recording for a video guide).
1. Set Up WhatsApp Bot Canvas
To set up your canvas. Navigate from the home screen to dashboard by clicking on the bot icon in the navigation bar on the left:
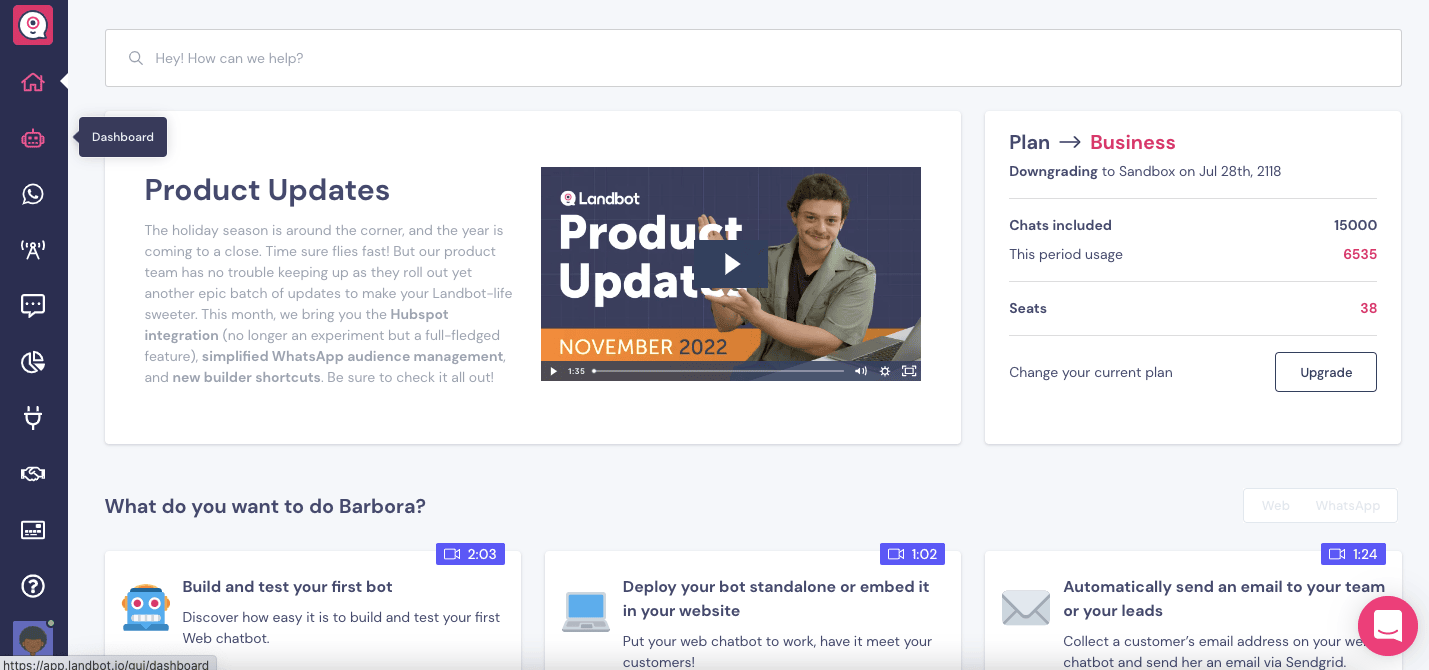
Once there, simply click on the “Build a Chatbot” button in the upper right corner and select WhatsApp as the channel and go straight to the building.
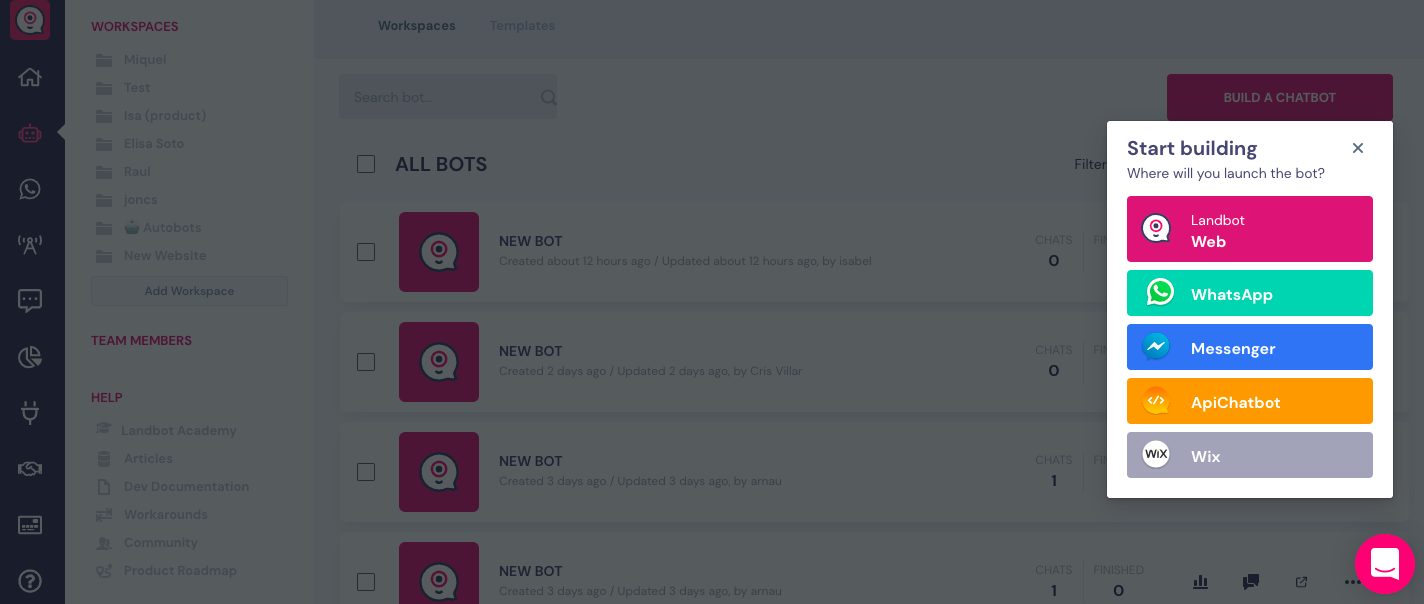
You will first be redirected to a template library where you can decide whether to use a pre-existing template or start from scratch.
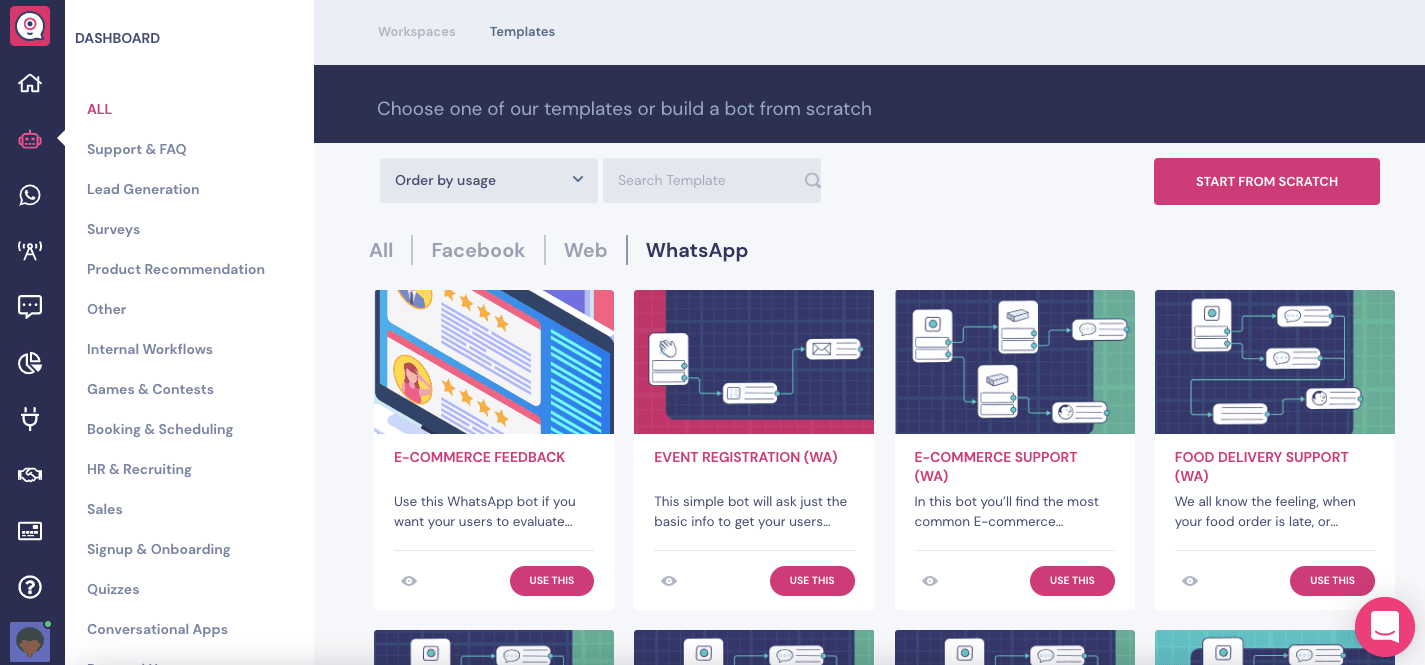
If you wish to play around and test the experience immediately, you can search through the bot design templates and activate one of them. Otherwise you can start completely from scratch by selecting the button “Start from scratch” in the upper right corner.
Whichever option you choose, you will be prompted to setup your WhatsApp testing channel in order to test your bot as you go.
2. Set up WhatsApp Testing Channel
To create your personal WhatsApp Business Testing channel, all you need to do is click on the WhatsApp in the navigation bar on the left. We already have a few functioning numbers but when you first open the feature, the list will be empty.
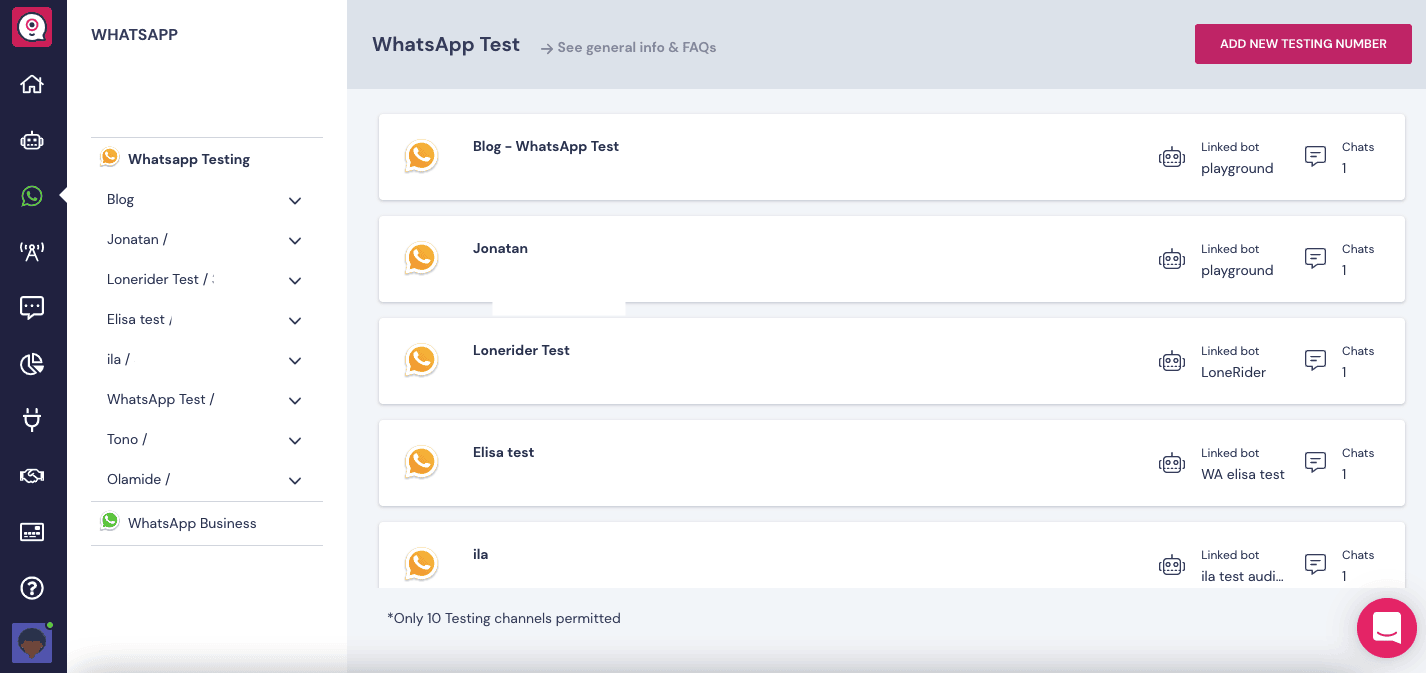
Click “Add New Testing Number”:
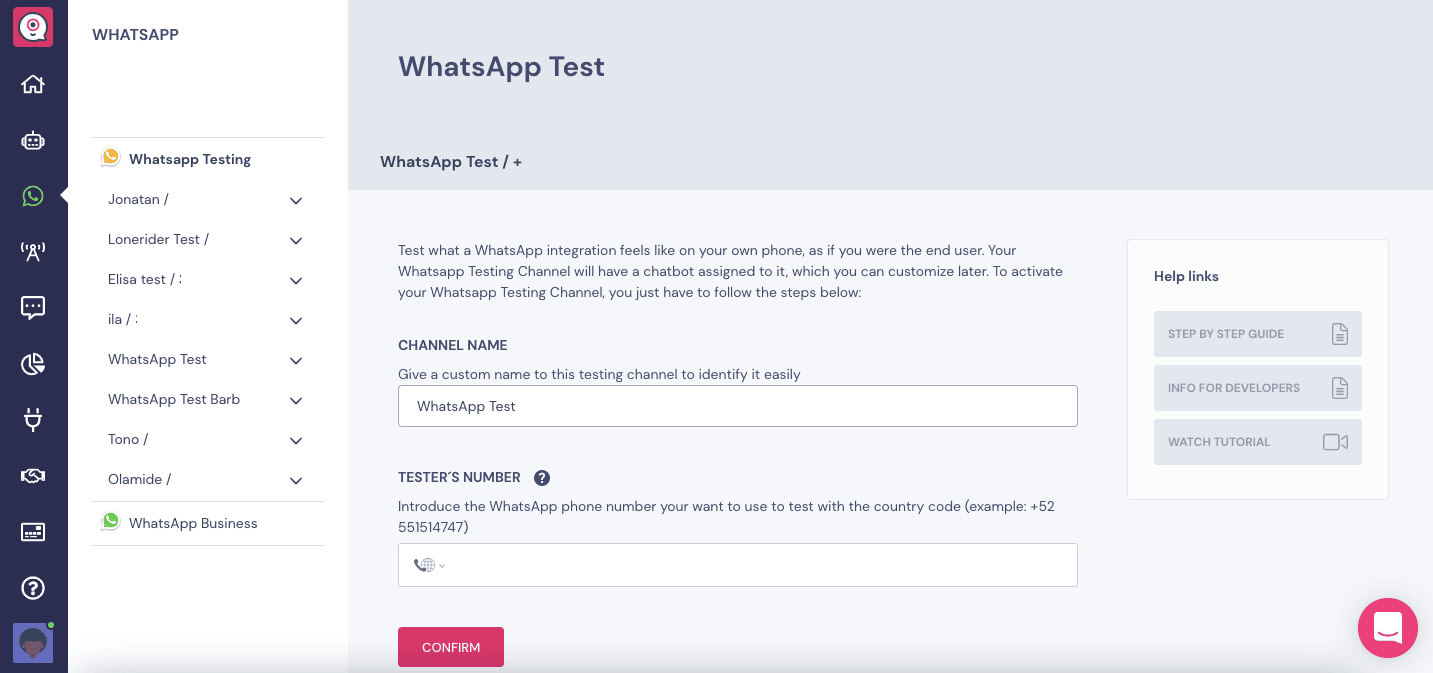
Choose a name for the testing channel, insert the desired test number and click “Confirm”. All in all, you can add up to 10 test channels.
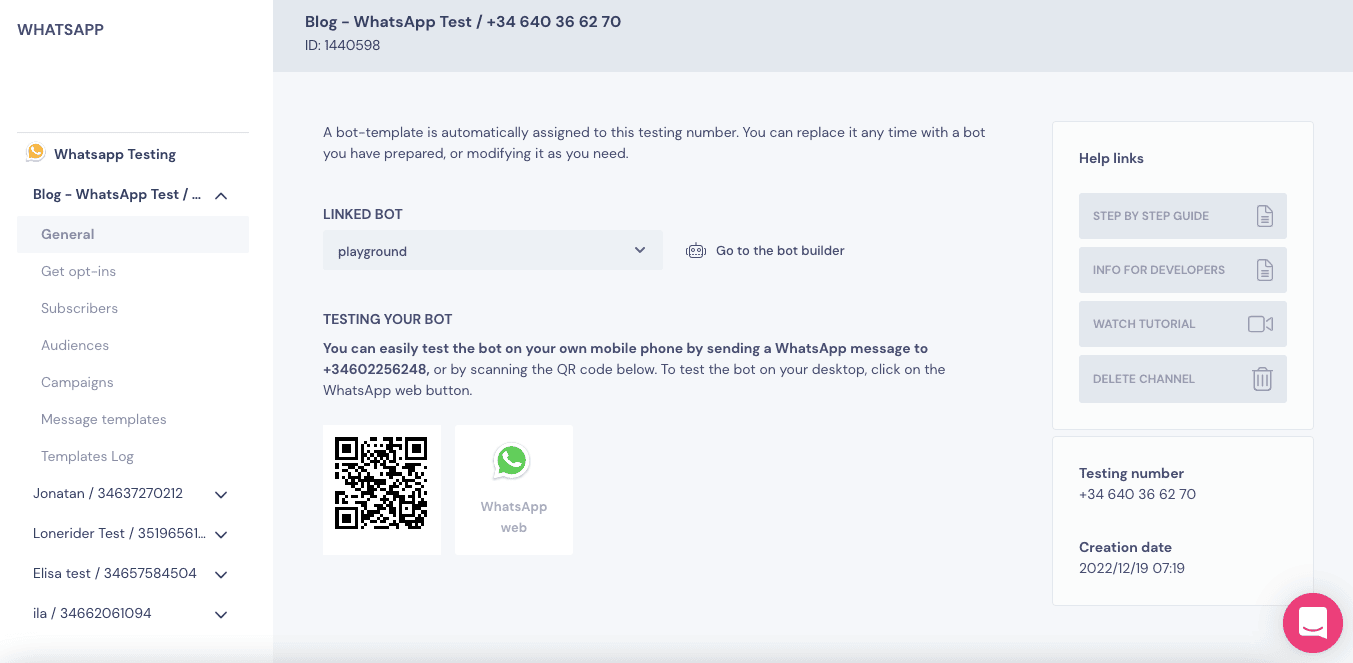
Next you will be prompted to link the number with a particular bot. As a default it will be linked to the “Playground” chatbot but you are free to change that immediately.
A window will pop-up allowing you to connect the number with any multi-channel bot you created on the Landbot platform:
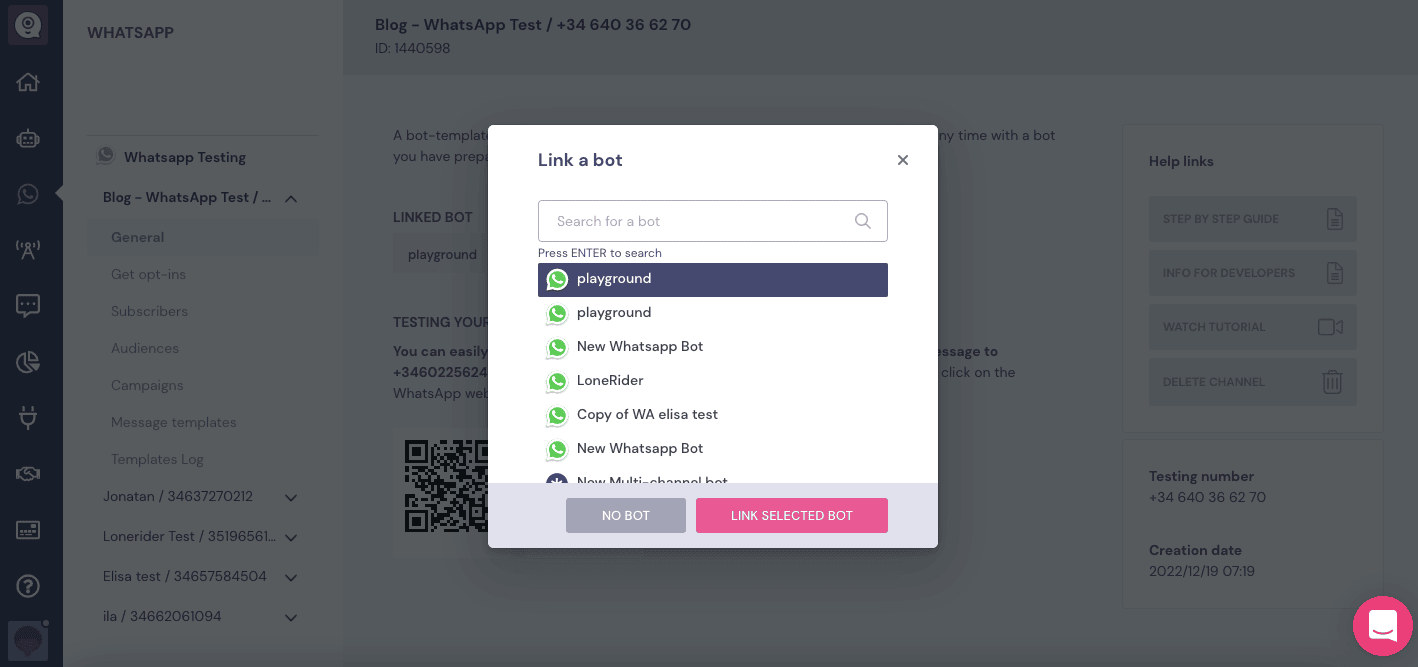
Make your selection and click “Link Selected Bot”.
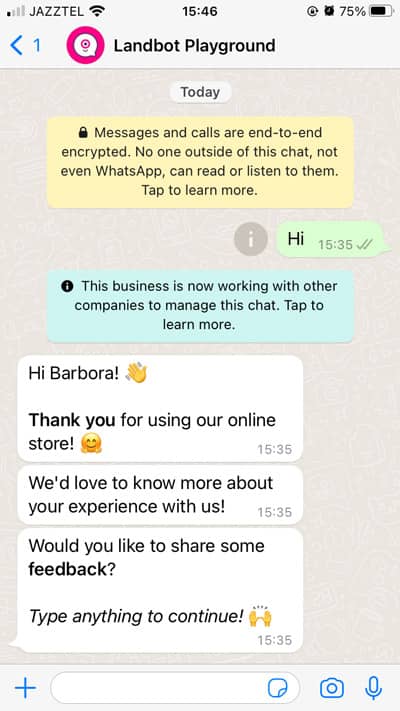
For example, I linked my number to an eCommerce feedback template bot and texted “Hi” to activate it. Soon, the bot replied:
3. Create Your First Block
Okay, let's go back to the building!
For the purposes of this tutorial we start from scratch.
When you first access the chatbot canvas you will notice two blocks are already allocated:
- User input
- Reply Buttons
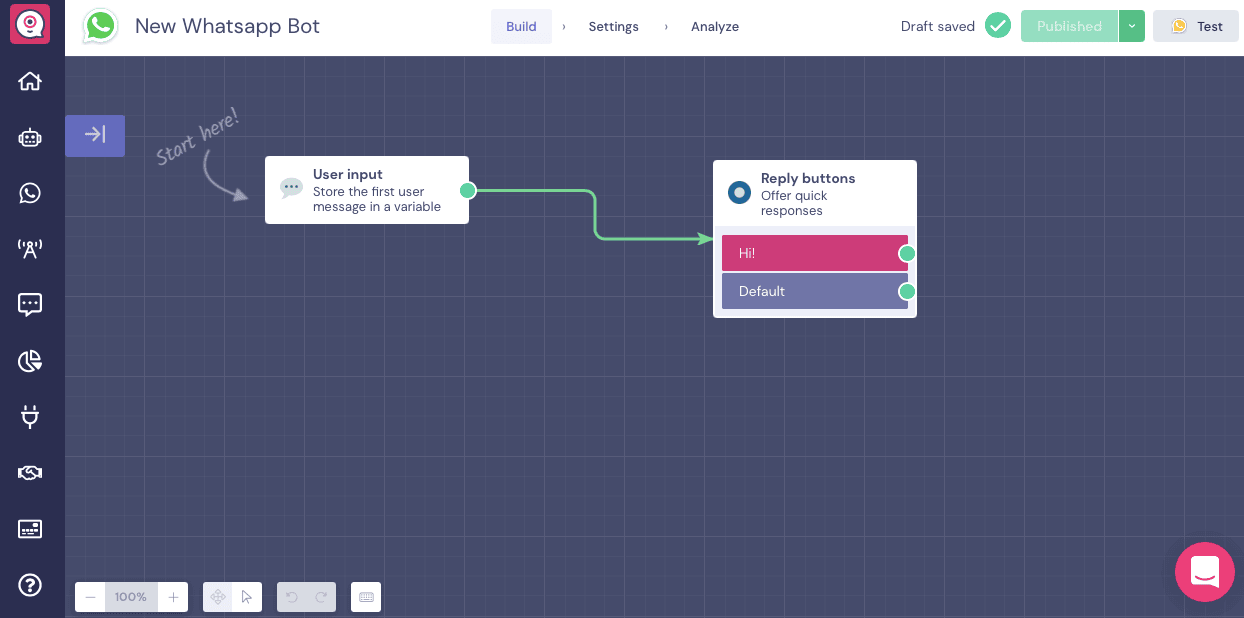
The User Input block is an extremely useful tool that helps capture and use your user's first interaction with your bot and—if you wish— already use that input to start personalizing.
By default, the user's first input to the chatbot will be saved in the string Variable @user_input. However, you can change the name and format of this variable to fit your purposes.
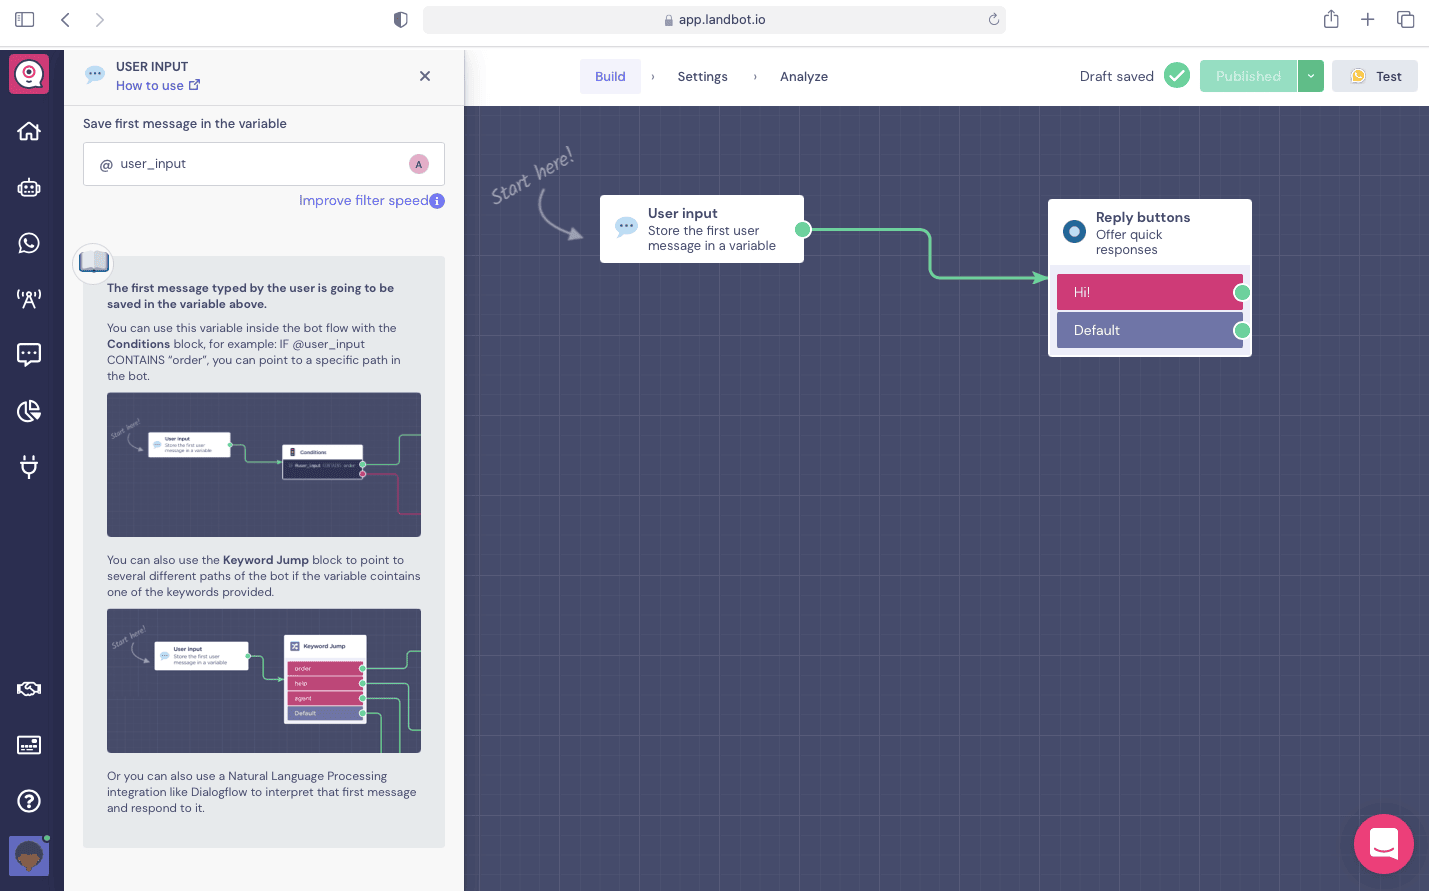
This user input can be unprompted (the user reaching out to you with their own agenda) or inspired by a template message notification that encouraged the user action.
How does it help you personalize?
Well, for example, you can follow up this block with the Keyword Jump block. It will look like this:

Using this block is best if the user input is in response to a template message that offers a “menu” of responses be it buttons or text options.
You can also use the Conditional Logic block which allows you to check if the input contains specific words that help you understand the request.
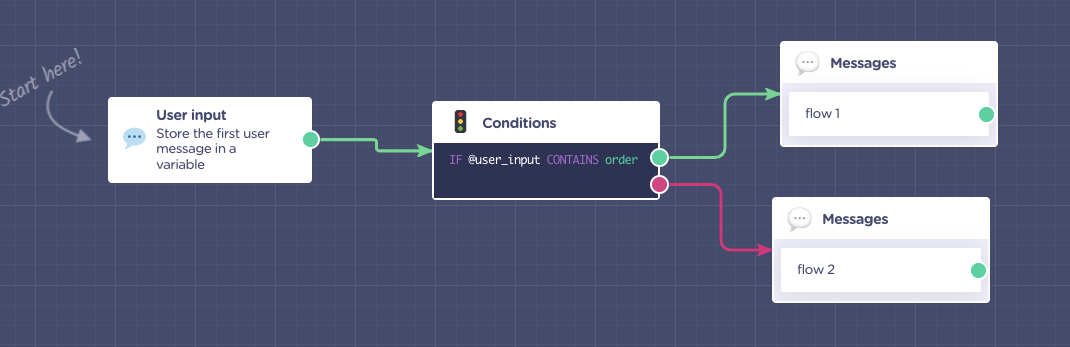
Or, if you are up for it, you can take things to the next level and use a Natural Language Processing integration like Dialogflow to interpret that first message and respond to it.
If you are not ready to personalize yet, you can use the user input (which can be a simple "Hi") to launch a single flow.
4. Ask a Question (Open Text & Number)
Landbot builder allows you to ask questions and trigger interactions in different formats
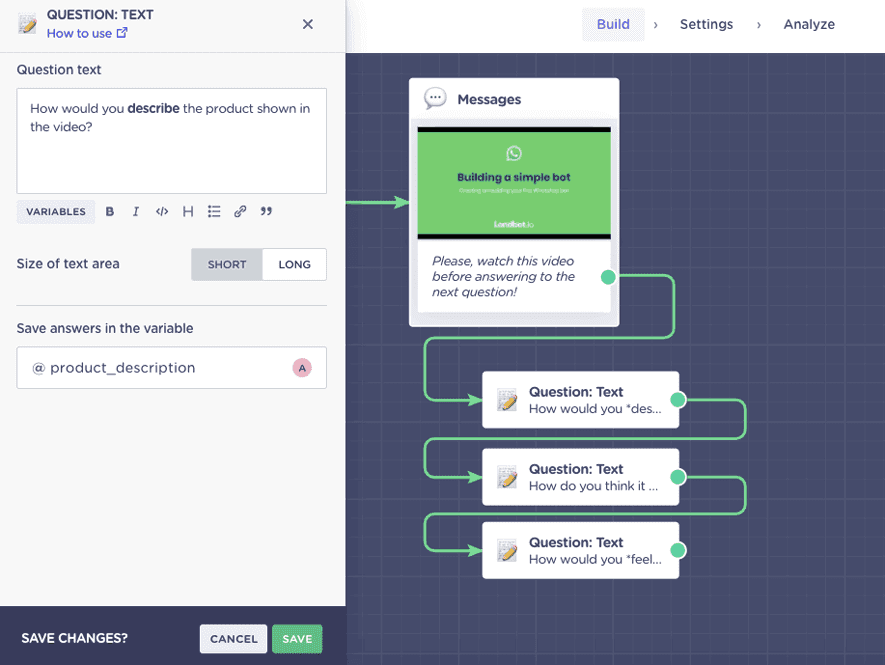
Question: Open Text
The first question type I will share with you is a simple open-ended question.
Drag an arrow from the green point of your message block and select “Text Question” from the menu:
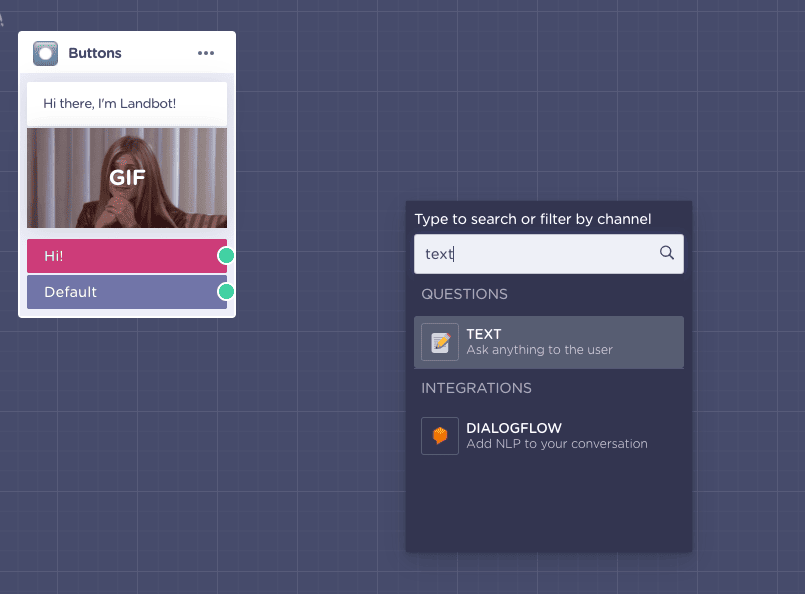
The “Text Question” block has two fields the configure:
- The question
- The variable under which you want to save the user’s answer
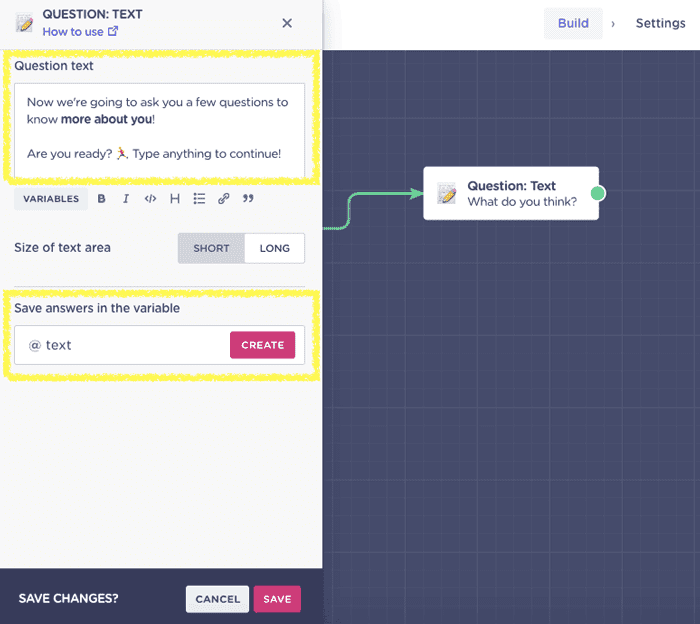
Since at this point the answer doesn't really contain important information and is more of a customer engagement prompt, I left the variable on the default "@text" setting.
Question: Number
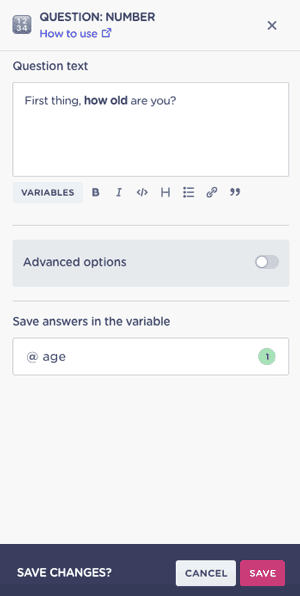
Next, I wanted to know the age of the user, as I don’t want to collect data of those under age.
When you want to collect a numerical answer, the best question block to choose is “Number” - naturally.
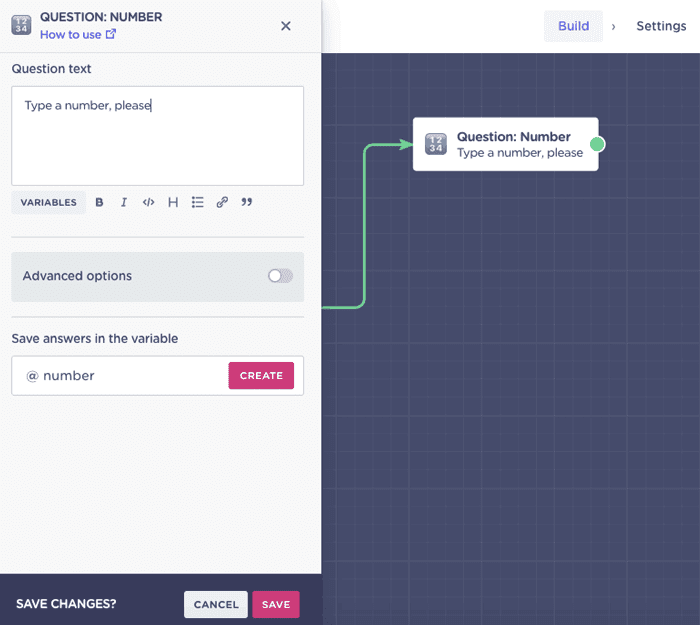
Since I will be asking for users' age, I will create a new specific variable to capture this data.
To do that, just type the desired name of the variable and click “CREATE”.
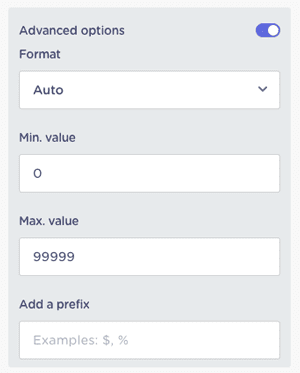
Note: If necessary, you can further customize the “Number Question” block by activating the “Advanced Options” field. It allows you to set min and max values as well as prefixes or numeric formats
5. Set Up Conditional Logic
Let’s say I want to differentiate between people who are 18 and over and the rest. To do that, all I need is to set up a condition that will split the conversation flow into two branches.
Draw an arrow from the last block (age) and select “Conditions” from the blocks menu.
In this case, I want to condition the @age of the respondent so I select it as the variable to condition. Next, you can choose what kind of condition to apply:
- Equal to
- Not equal to
- Contains
- Greater than
- Less than
- Is set
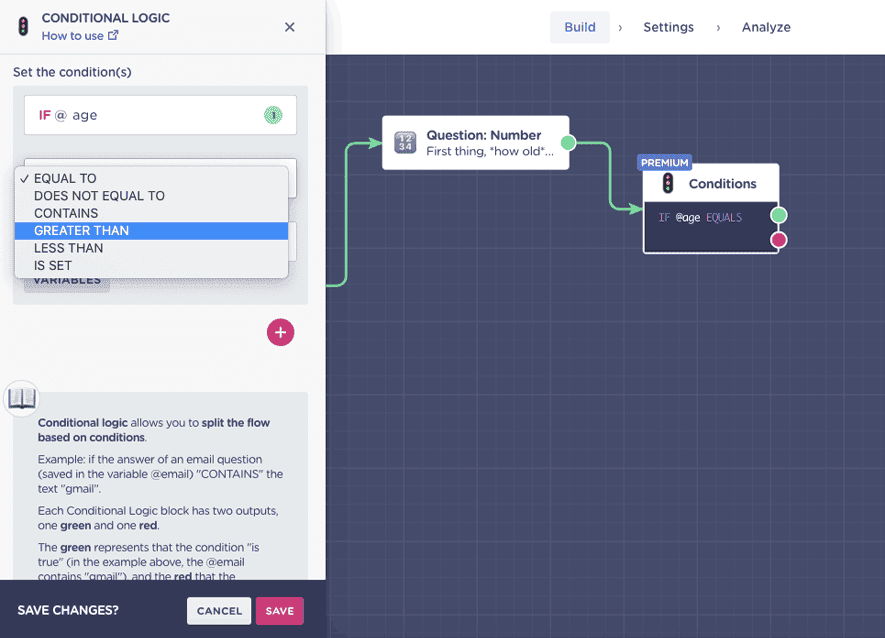
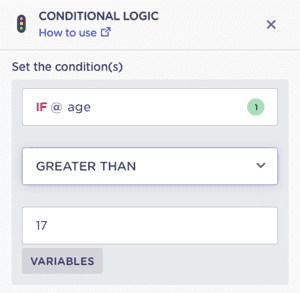
I selected, “Greater than” and set the last field to “17” so my condition looks like this:
IF @age is GREATER THAN 17 - meaning the condition is “TRUE” (green output), I will allow the respondent to continue. If it is “FALSE” (pink output) they will take a different path:
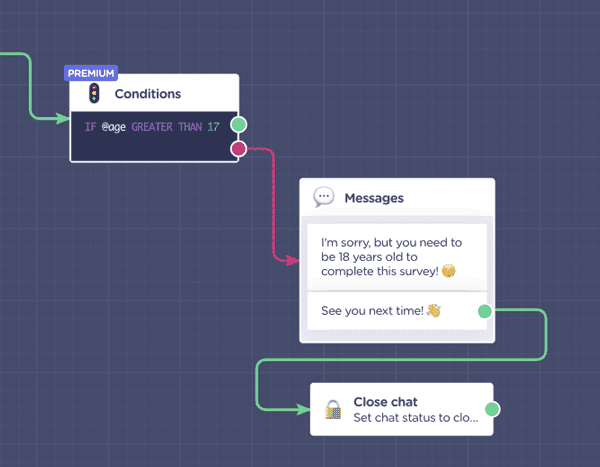
For the negative output, I chose a simple message block to inform the user he or she can’t participate in the survey and used the “Close Chat” function to mark the conversation as closed/locked in the system.
6. Button Responses (Reply Button & List)
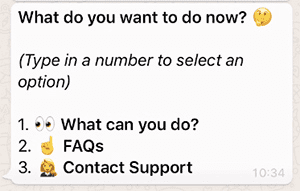
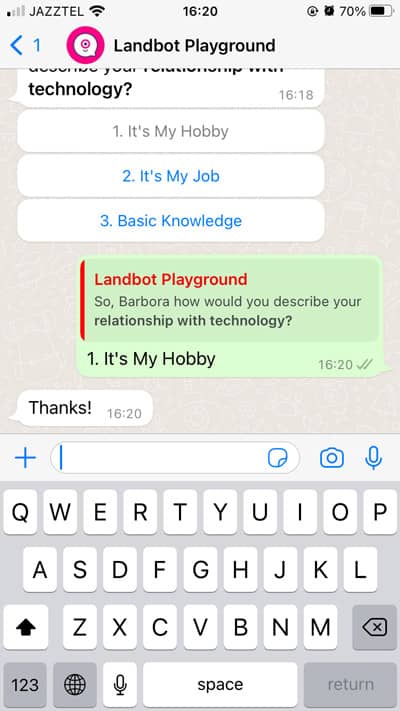
In the past, the WhatsApp interface didn’t allow the use of buttons. When designing a rule-based bot brands had to rely on the Keyword Jump feature or use UX tricks such as numbered choices (see example below):
However, things have changed. WhatsApp made some updates to the UI and so, buttons are no longer off limits. IIn fact, there are two different ways you can go about it, using Reply Buttons block or Buttons List block.
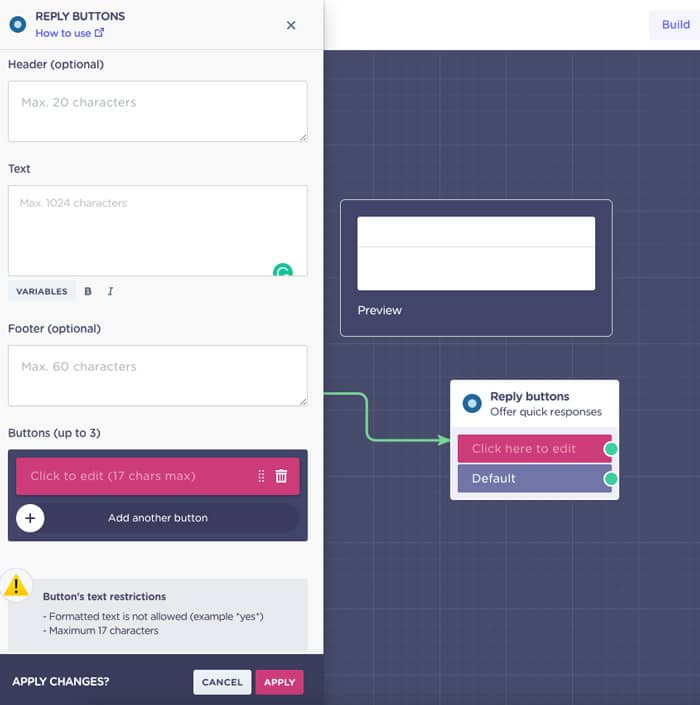
Reply Buttons
n Landbot, you can enjoy buttons by using the “Reply buttons” feature:
So, to get some button-action in my bot and assess participants in more detail, l asked about their experience with tech:
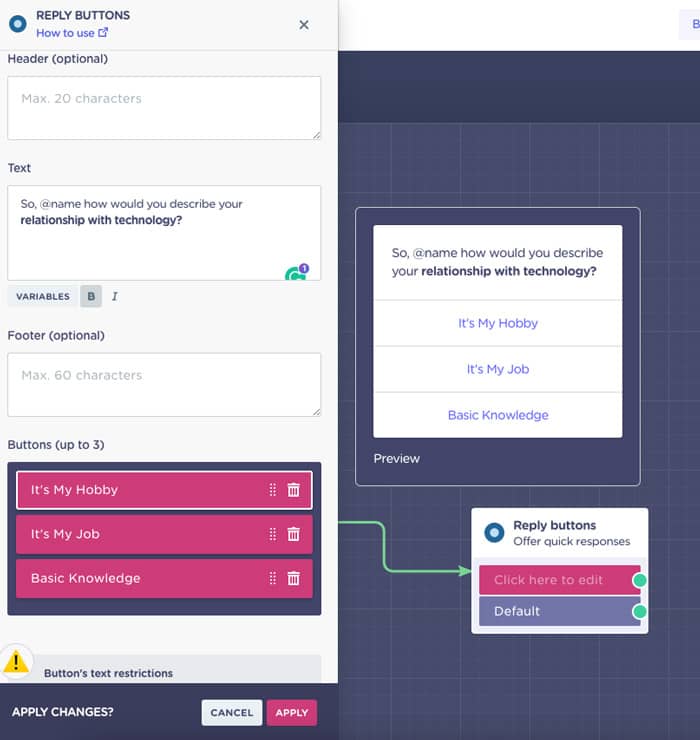
To save the user answer under a specific variable, scroll down the buttons editor and create variable that best captures the data you are asking for (you should do this for every question block that collects relevant data):

I immediately went to test the experience and this is how it looked on WhatsApp. This is how the selection looks like:
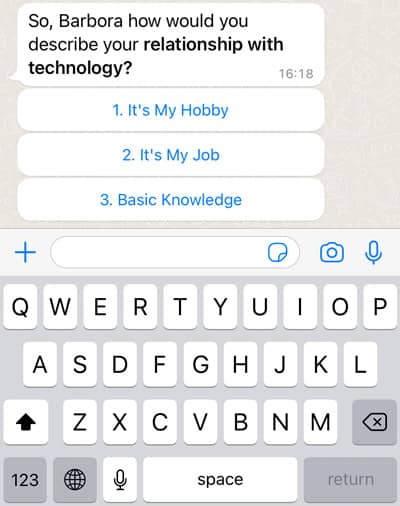
And, when the user selects one of the options, they’ll see this:
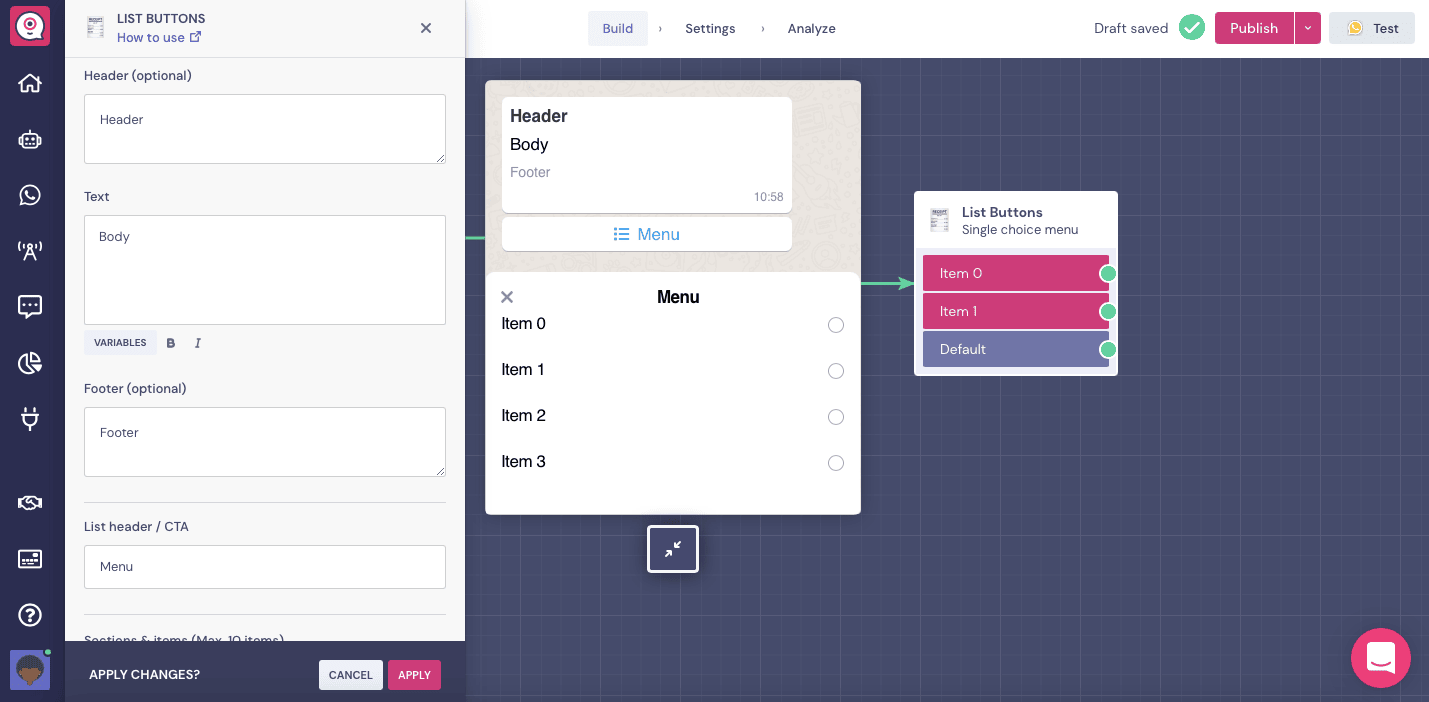
Buttons List
Another buttons option available for WhatsApp is Buttons List. It enables you to create a list of selectable items to be displayed as buttons.

The Buttons List is the better choice when you want to include many options, not just a couple as it only displays the "Main Menu" button inside the chat. The options only appear as a pop-up after the user clicks on the menu and so the chat doesn't end up looking awkward.
To create a Buttons List block is as easy as adding the Reply Buttons:
7. Add Media
Although WhatsApp only has the basic button feature and none of the fancier UI available for the web or Facebook Messenger bot, you can still have fun with content formats and use videos and images to help your cause.
After learning about the @tech_profile of the participants, I wanted to bring the survey without splitting the flow, so I dragged the arrow from the "Default" button. This means that no matter what the user answers all options lead to the same next step.
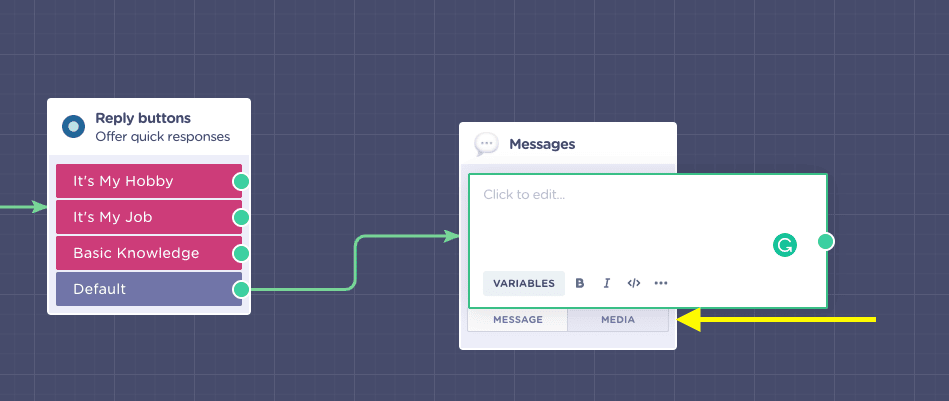
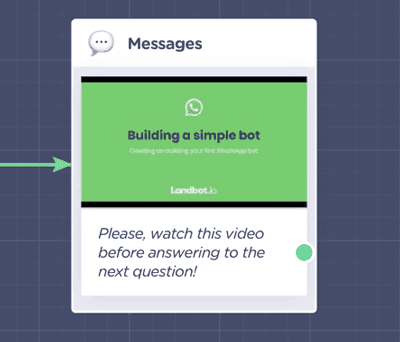
I chose the Message Block as it's ideal because of its flexibility. When you click on the “MEDIA” option, you can switch from text and, instead, easily upload a file, share a YouTube video, image or a rich URL link.
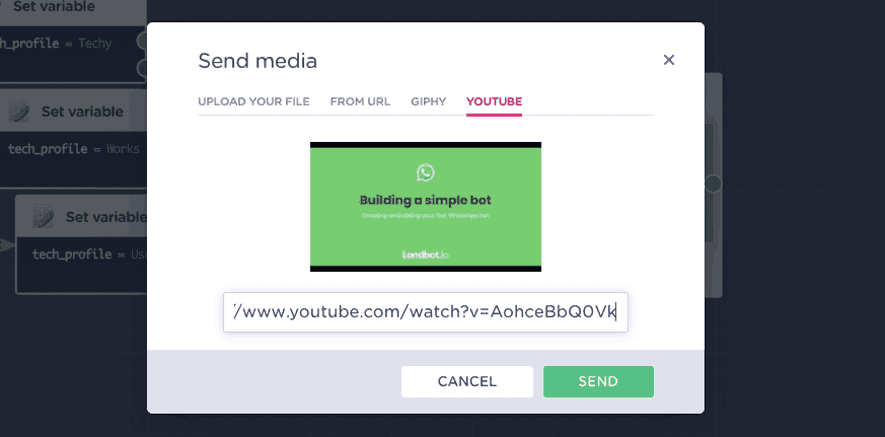
Of the options available, I chose YouTube and just copy-pasted the link of the video I want my bot to share.
Then I added a simple prompt asking the participants to watch the video before proceeding to answer the rest of the questions.
Next, I followed the video with three open-ended questions using the Text Question blocks, making sure each answer has its own variable.
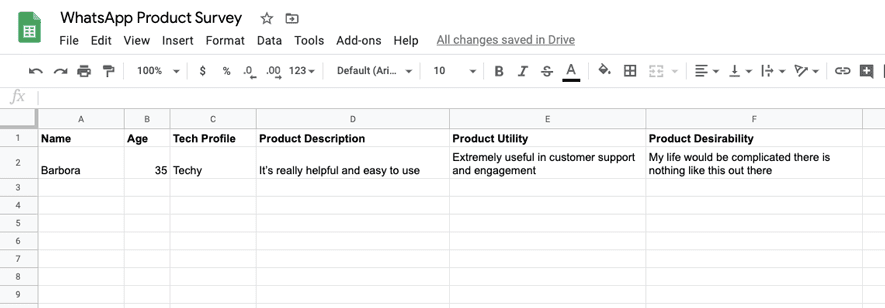
8. Export Collected Data: Google Sheets
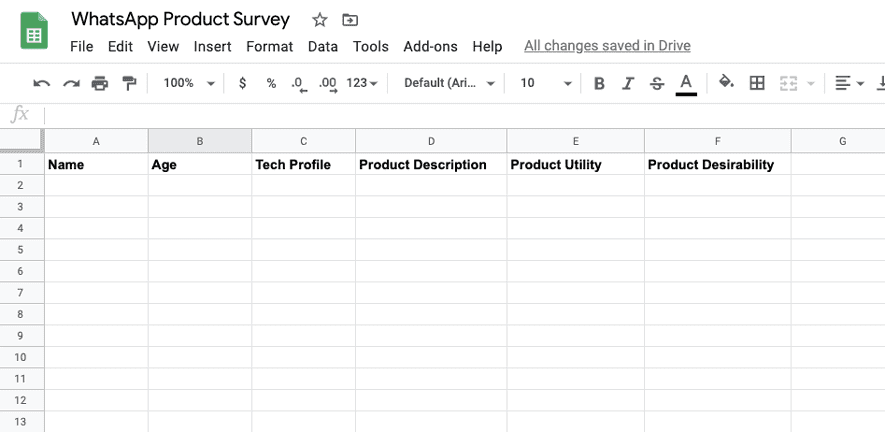
Before being able to integrate a Google spreadsheet into your WhatsApp bot, you need to create, well, the spreadsheet on your Google Drive.
I created a simple sheet to collect all the data by WhatsApp bot asked about in the conversational survey.
When you have this ready, go back to the builder, draw the usual arrow and select “Google Sheets” integration from the list.
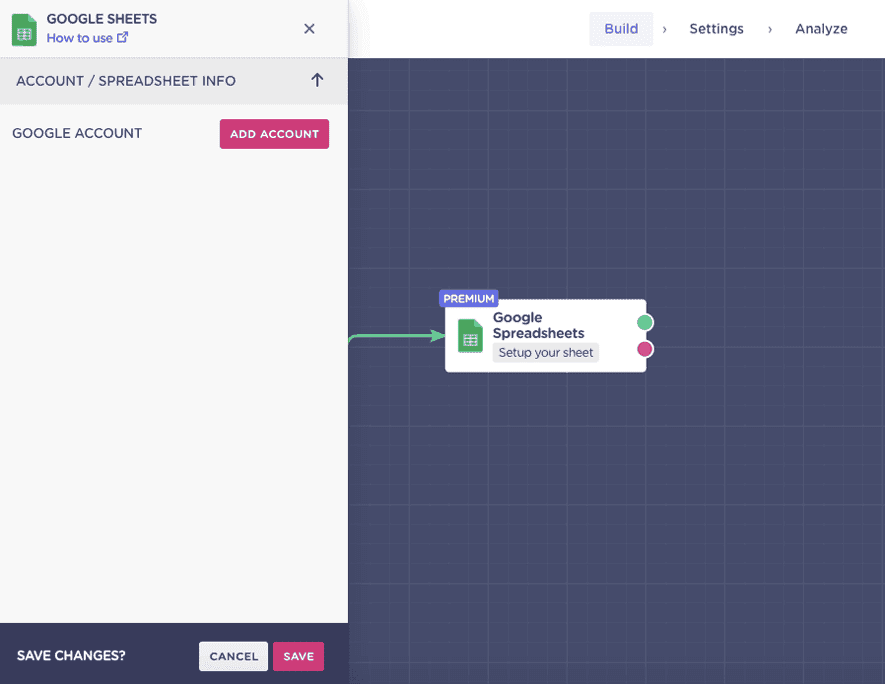
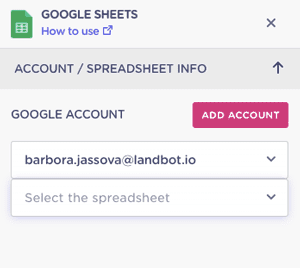
Click “Add Account”.A new tab will load asking you to give Landbot access to your Drive.Once done, the account will appear inside the integration.
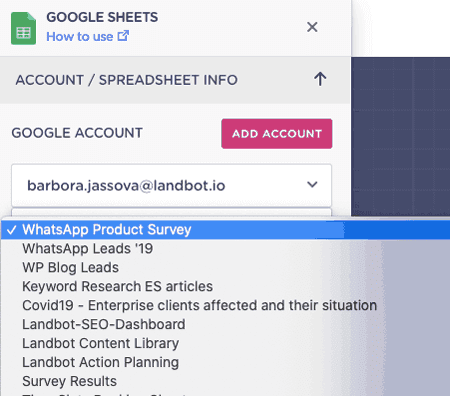
Click on the “Select the Spreadsheet” and choose the one you want to integrate from the list:
After that, the builder will ask you to also indicate a specific sheet within the selected spreadsheet which can come in handy if you have multiple ones within a single spreadsheet.
When that is all done, it’s time to configure the action I want to carry out:
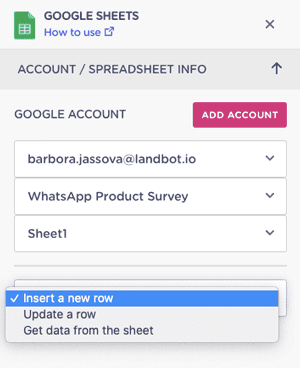
There are three different actions available. I can insert new data, update data or retrieve data. For the survey use case, I selected “Insert a new row” since every new submission will be new data.
Last but not least comes the fun part of pairing column names with the variables under which you stored user answers:

Just keep pressing the PLUS icon until you have assigned all the variables to their designated columns.
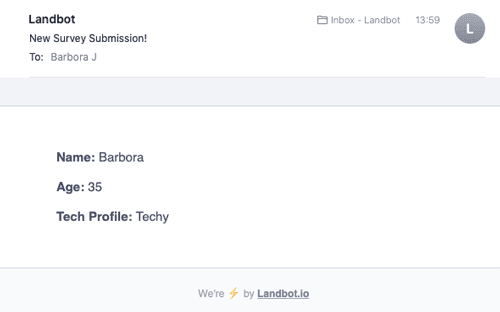
9. Send Your Team an Email Notification
If you want to be informed about the success of your survey (or maybe a sale or an incoming support ticket), Landbot lets you quickly set up an email notification.
Draw an arrow and select the “Send an Email” option from the block menu.
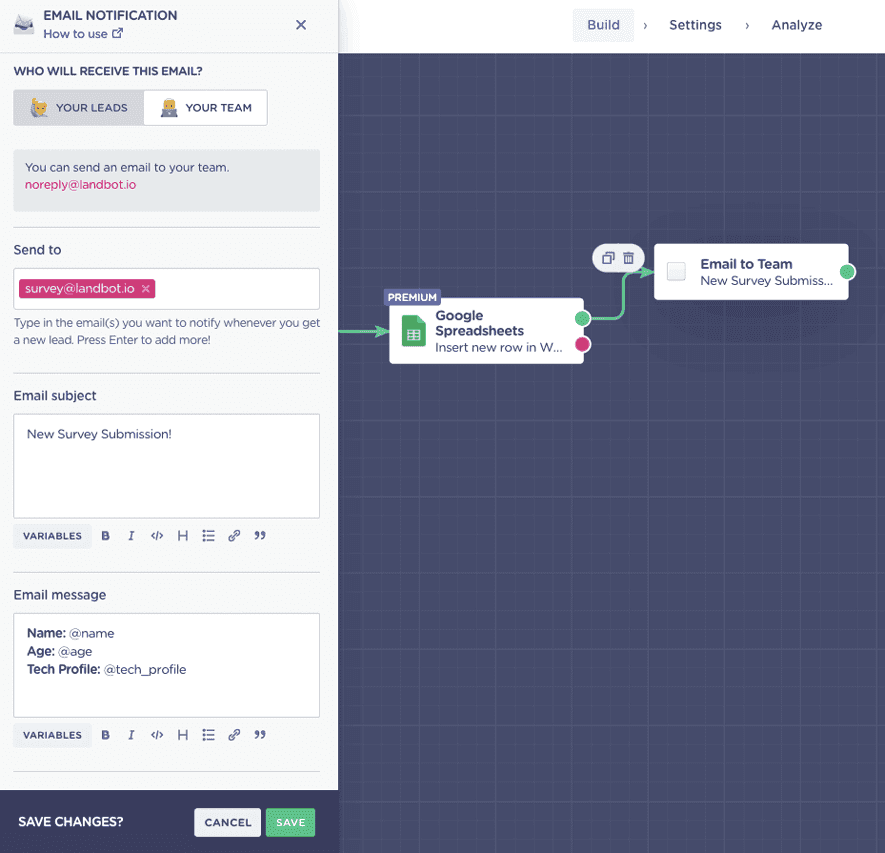
First, decide if this email notification will go to a team member or the user. I wanted to receive a notification about the survey submission so I chose the “Your Team” option.
Next, configure the email address, email subject, and message in the email.
And that's it.
10. Offer Human Hand-off Option
Transfer to a human agent is more typical for FAQ bots rather than surveys but I really wanted to show you how easy it is to set up with Landbot:
So, after I sawed all the data in Google Sheets and sent myself a notification, I thanked the user and offered him the following options using Buttons block once again:
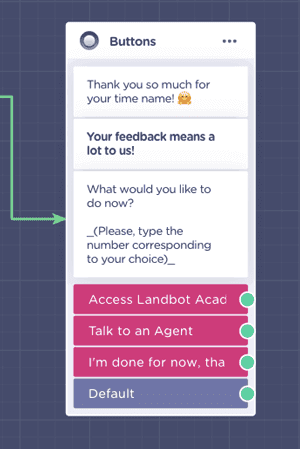
Option one offers access to learning resources, option two a chance to talk to an agent, and option three lets the user put an end to the conversation.
To set up the chatbot-to-human handoff, draw an arrow from the second “Talk to an Agent” option, and select “Human Takeover” from the menu.
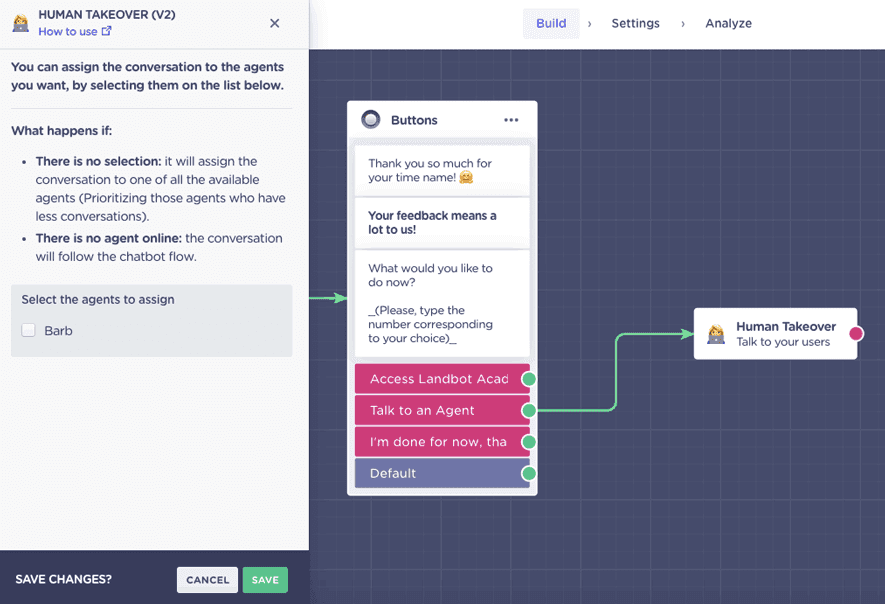
If you have more agents, you can assign the responsibility for a specific chatbot to a specific agent. If you don’t assign the takeover to anyone, the bot will select the agent with the least number of conversations automatically. And that is it to be honest.
To account for a situation when no agent is online, I continued the flow with a simple message:
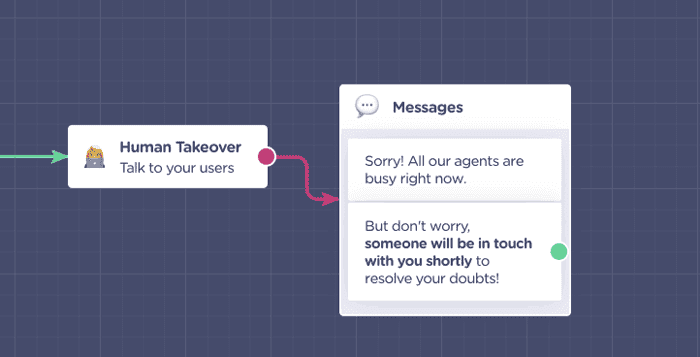
Since the conversation is happening on WhatsApp, the user doesn’t have to wait impatiently on the desktop, so a little waiting time is really not so inconvenient!
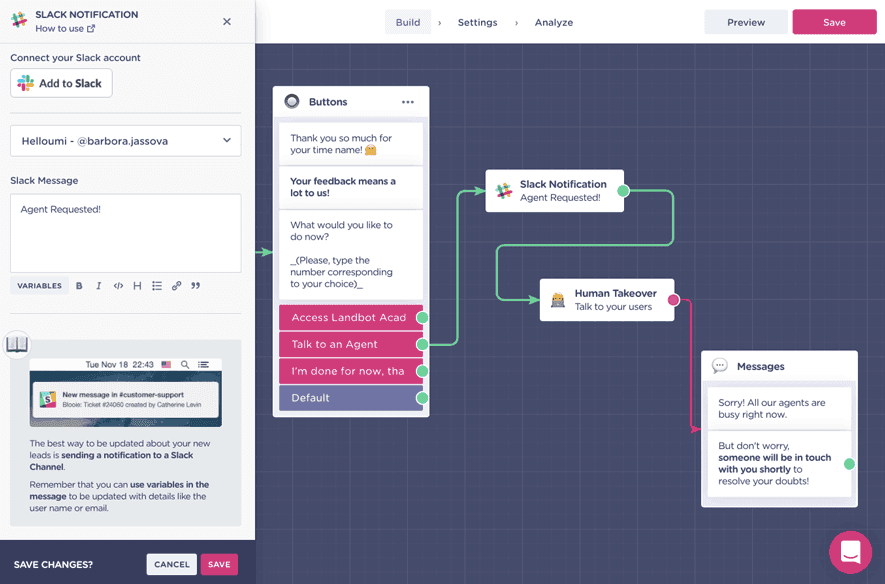
11. Set Up Slack Notifications
I have a little bonus up my sleeve!
If you don’t have agents sitting on the Landbot chatbot platform all day long you might want to notify your agents when someone wants to talk to them.
Luckily, Landbot can send notifications via the world's most popular business communication app - Slack.
You can use it for anything… notifying your sales team about every new lead, a new purchase, new subscription, or notifying agents about new live support tickets.
In our example, after the user indicates the need for live agent support, you can easily send a notification to the respective Slack channel:
- Break the green arrow connecting your “Contact Support” and “Human Takeover”
- Search for “Slack Notification” block
- (If not set up already) connect your Slack account to Landbot
- In the “Choose an Option…” field select an existing Slack channel or a specific person from whom you want to receive the notification
- In the field below, enter the message you want to appear in Slack
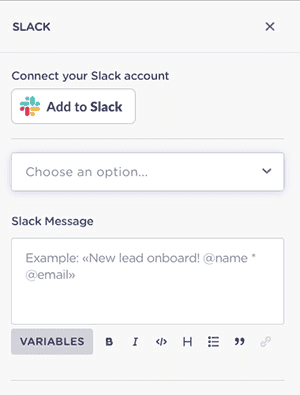
- Click save
- Connect the Slack block with “Human Takeover”
Once again, that is it!
Pretty simple right?
Right now, all I have to do is define a flow for the other two responses of the button choice question, but you already know the different features I could use, so I won’t waste space on it in the tutorial!
Let’s go straight to the best part - the testing!
12. Test Your Chatbot!
I am only testing my chatbot after I have built the whole flow.
But, to be honest, you can do it at any point throughout the creation process, as long as you save your progress by clicking the SAVE button in the upper right corner of the builder interface.
The testing feature is especially handy because it gives you an opportunity to review the final customer experience, check up on integrations, and catch possible errors before launching the bot to your customer base.
My integrations were successful as my spreadsheet updated with submitted answers:
And I received an email notifying me about the submission:
Landbot Customers Successfully Using WhatsApp Chatbots
A lot of Landbot's customers have seen great success in using WhatsApp chatbots, whether they were built to enhance customer engagement, streamline operations, or drive growth. Let's have a look at two examples from distinct industries that showcase the power of both the AI assistants and the no-code built bots.
Choices: AI-Powered Real Estate Appointment Scheduling
Choices is one of the UK’s leading Real Estate agencies. They already used WhatsApp as a communication channel due to its instant nature, and because it’s a more personal and friendly way to get in touch with customers, in this case, the landlords. However, they were still looking for a way to:
- Automate the lead qualification and appointment scheduling process on WhatsApp;
- Ensure lead information is accurate and that leads show up to appointments.
Using Landbot’s AI solution, Choices was able to automate their lead management process and make WhatsApp communication more efficient.
As a result, Choices saw an increase in the conversation rate from lead generated to appointment booked with landlords to 9%. Plus, in the 2 months since it’s been live, the AI WhatsApp chatbot has engaged with 230+ landlords.
Hotelbeds: A Self-Service WhatsApp COVID Response System Developed in 4 Weeks
Hotelbeds are global leaders in the TravelTech space, connecting and empowering businesses by facilitating bridges in the ever-changing and expanding travel ecosystem.
As the COVID pandemic hit and all travel came to a standstill, leading to a flood of cancellations and forcing Hotelbeds to communicate better with their customers and partners whilst reducing the mounting pressure on their customer service representatives. They found it in Landbot's no-code drag-and-drop builder. In under 4 weeks, Hotelbeds was able to launch a chatbot on WhatsApp (and Facebook) and link it to their website.
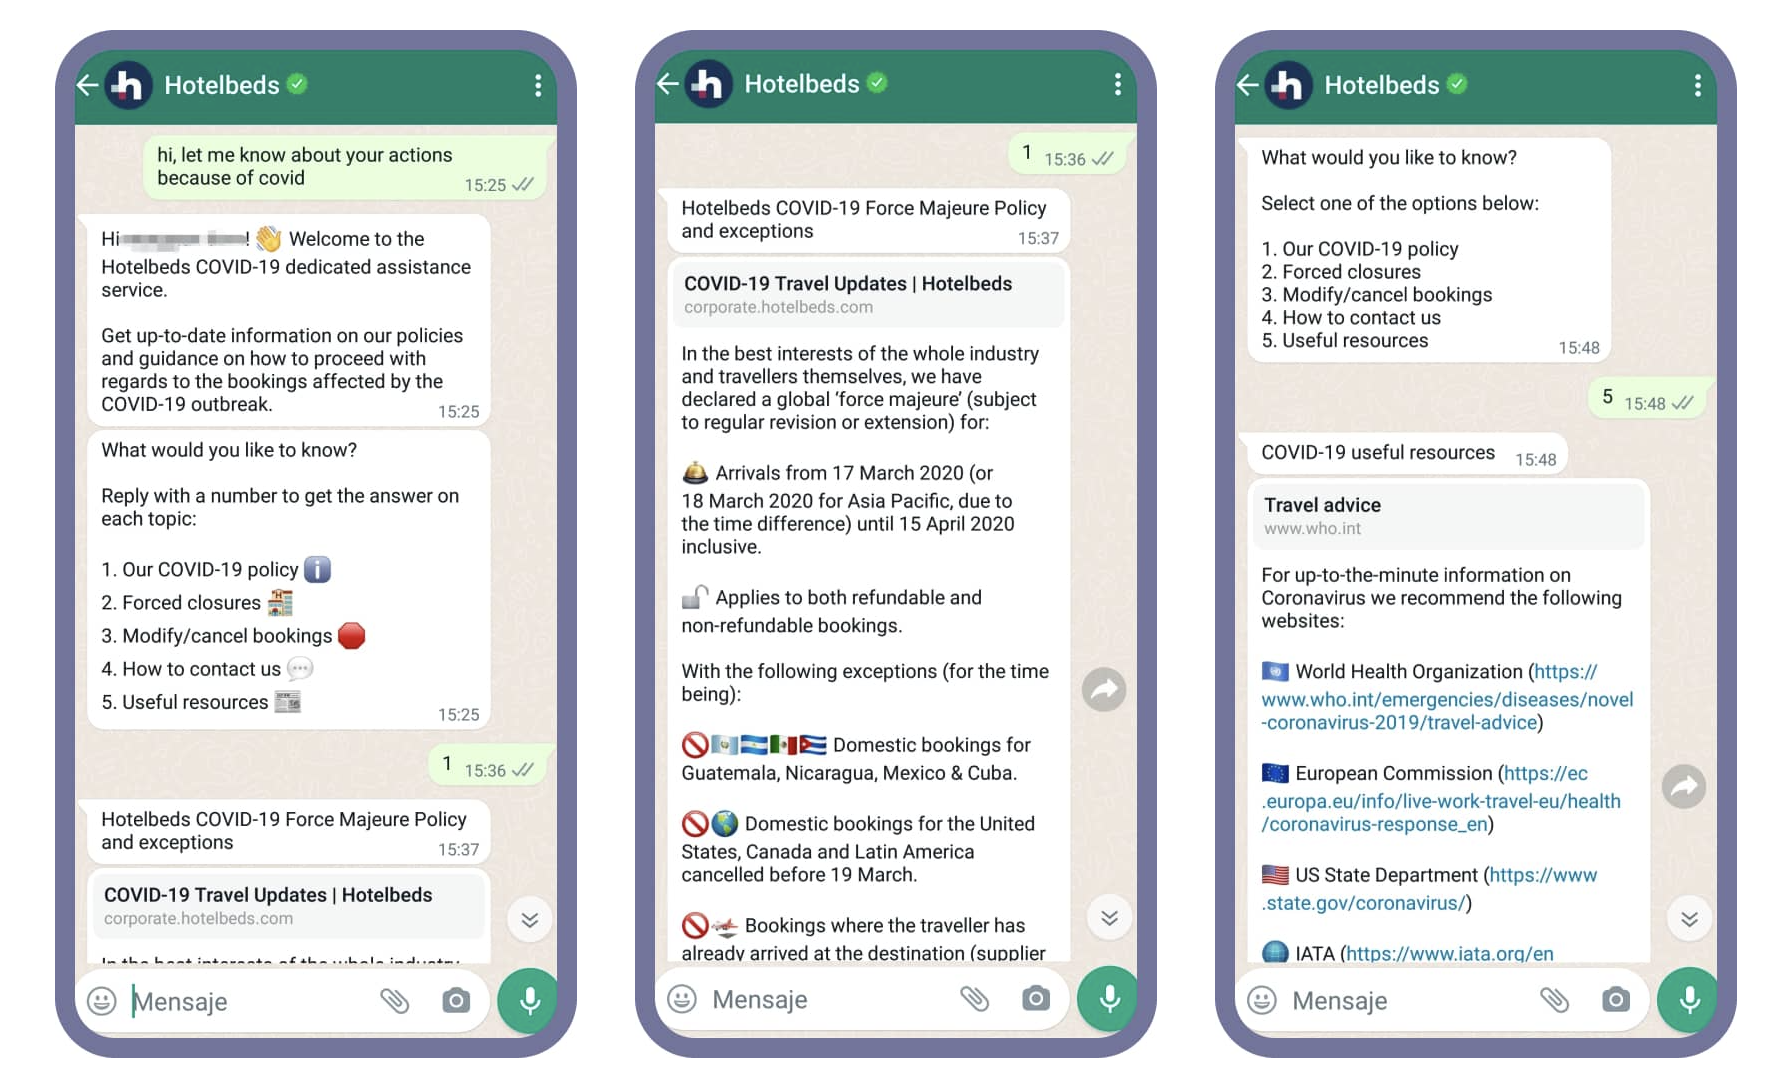
The chatbot served as a self-service solution for customers to get questions about their travel plans or cancellations answered. In total, the WhatsApp no-code bot engaged in 13.000 conversations and answered 350.000 user queries.
To Sum Things Up...
WhatsApp chatbots allow you to deal with incoming messages in real-time.
Thanks to smart solutions, learning how to create a WhatsApp bot doesn’t have to be rocket science nor does it have to involve any coding to be useful business-wise (check out some WhatsApp bot examples to see for yourself!).
If you are tired of relying on WhatsApp web for business, check out our WhatsApp Solution features or sign up and start shaping the future of chatbots with your own assistant today.
It's time to leave the programmable SMS marketing in the past and revolutionize conversations with customers with WhatsApp bots.
FAQs
Do I need coding skills to build a WhatsApp chatbot?
No, you don't need coding skills. Landbot offers a no-code, drag-and-drop builder that allows users to create WhatsApp chatbots without any coding knowledge.
How do I handle user opt-ins?
WhatsApp requires a double opt-in process. First, users express interest (e.g., by filling out a form), and then they confirm that interest through a WhatsApp message. This ensures compliance with WhatsApp’s policies.
What if I want to transfer a conversation to a human agent?
Thanks to its Human Takeover block, Landbot allows easy handovers from the chatbot to human agents, ensuring that every user query is addressed appropriately.
How do I train my AI chatbot?
Training an AI chatbot involves providing it with relevant data and knowledge sources and refining its responses based on user interactions. Landbot's platform facilitates this process, allowing continuous improvement of your chatbot's performance.
Does it support multiple languages on WhatsApp?
Yes, Landbot's platform supports multilingual WhatsApp chatbot creation, making interactions with users in various languages possible.
%20(1).avif)


.avif)

.avif)
%20(1).png)
.avif)


%20(1).png)


