


.svg)
Please note that 'Variables' are now called 'Fields' in Landbot's platform.
One of the major impacts of the pandemic on the marketing landscape was the renaissance of webinars. Overnight, this educational outreach strategy reached the “most wanted” status in the realm of digital marketing. However, with the renaissance of webinars came the urgent demand for improved webinar marketing. So, as mentioned in our Ultimate Webinar Marketing Playbook, this tutorial will teach you how to build a 1-click webinar registration chatbot.
What is a Webinar Registration Bot?
A webinar registration bot is a conversational software that enables user webinar registration with a minimal number of steps on part of the participant. Such chatbot can be deployed on the web, WhatsApp, Facebook Messenger, or other messaging app channels.
Why Opt For a Webinar Registration Bot?
Acquiring leads is no easy task.
Research has shown that speed and simplicity are absolutely essential when it comes to grasping and anchoring the prospect’s attention.
An acquisition chatbot can deliver both without putting too much on your already full plate.
☝️ One Solution For All
Chatbots are known for real-time responsiveness. It’s precisely this feature that allows you to create a single bot capable of catering to a variety of segments.
For instance, a registration bot can identify when a person is already on your mailing list and thus greet them by their name and proceed to sign them up without asking questions such as “name” and “email” all over again. However, if this information is missing, the bot will know to ask before going any further.
☝️ Advantages Beyond Registration
Another great advantage of a registration bot is its ability to multitask.
For instance, a chatbot can offer potential participants to learn more about you and your webinar before committing to signup. Those that crave more information will be satisfied and those that don’t won’t be bothered by it giving each group an experience based on their preference.
Showing this information on a static registration page or registration form can result in an unnecessarily cluttered interface. Furthermore, there is no space for real-time personalization.
☝️ Automation with a “Human” Touch
As your business grows, so does the need for automation of all processes including marketing. However, marketing automation often comes at the expense of personalization and human touch.
Chatbots have gained popularity mainly because messaging feels natural and, most of all, human while keeping step with automation requirements. That is, while your prospect is enjoying a conversation, behind the scenes the bot is creating new participants in Zoom, logging the info in your CRM, and tens of other tasks that would have otherwise delayed the process.
How To Build Your Own Webinar Registration Bot (Without Coding)
I am going to show you how to create a registration bot quickly and efficiently using a pre-designed webinar acquisition flow template in the Landbot chatbot builder.
So, without further ado, let’s get to it!
1. Sign Up or Access Dashboard
NOTE: If you don’t have a Landbot account yet, you need to sign up. It’s free (no credit card info required) and it comes with a 5-day free trial.
From the main dashboard, click “Build a Chatbot” in the upper right corner.
Next, select the designated channel – in this case, the web.
After that, you will be redirected to the templates library.
Instead of clicking “Start from Scratch”, turn your attention to the templates, find a template named “Webinar Acquisition” and click “Use This”.
NOTE: If you want to get an idea of how this template works, click on the eye icon to see a preview.
2. Familiarize Yourself with the Template
Once inside the builder, gain an overview of the template you will be customizing.
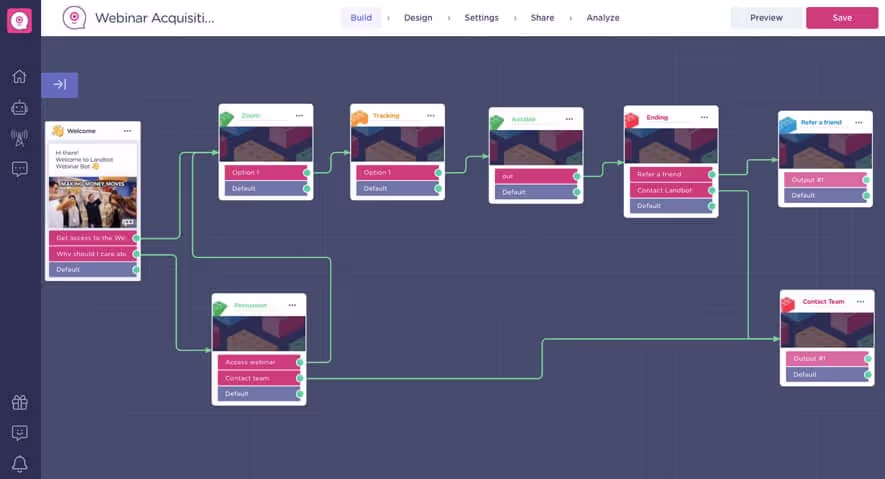
The webinar acquisition template is organized into bricks (clusters) for better oversight.
The main flow includes:
- Zoom registration
- GA tracking
- Airtable integration
- Finale
- Referral
While the supporting flow features two sections:
- Persuasion
- Contact team
Feel free to inspect inside the individual bricks to get a better understanding of the process. It will help you clarify your ideas, as well as determine whether there are blocks or bricks you won’t need.
3. Customize Your Welcome Message
Now the first customization step is quite simple.
Just personalize the pre-designed welcome block to fit your webinar scenario.
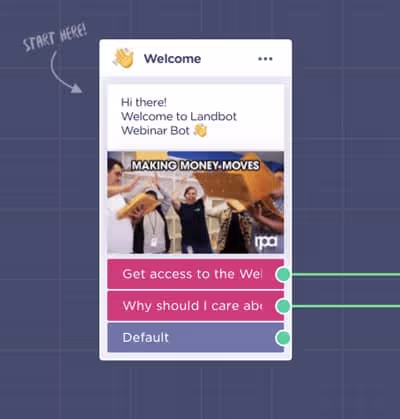
Also, if this your first time, the welcome message is a great way to learn more about the workings of the builder interface. See the example below:
In short, the welcome message can be as long or as short as you wish. It can include a gif, image, or even a video. It really depends on what will fit best with your target audience.
However, the basic information the welcome message of your webinar registrations bot should provide includes:
- Title of the webinar
- Time and date
- Price information (whether it’s free or not)
4. Set up Zoom Webinar Platform Integration
Hover over the Zoom brick to bring up the Edit button.
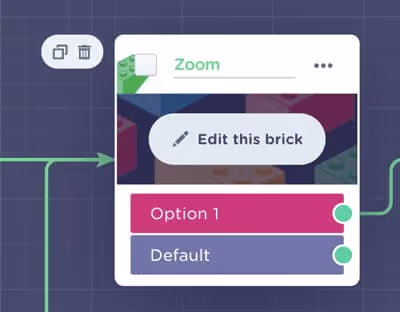
Click “Edit this Brick” to enter the cluster of blocks.
Once in, you will be able to see the anatomy of the Zoom brick:
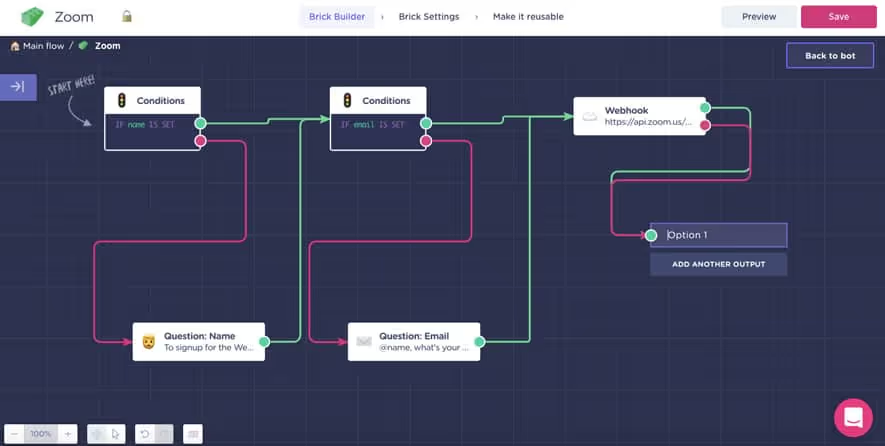
Notice the first blocks are Conditions.
These serve to differentiate between prospects whose details you already have and those that are entirely new.
In a nutshell, the first condition prompts the bot to check if you have the user’s name. If the bot notes that the name is missing, it goes on to ask the new prospect for this information.
The next condition once again prompts the bot to check if there is an existing email address for this user. If not, the bot proceeds to ask for it.
There is no need to modify the name and email question blocks. (That is unless you need to translate the text or adjust the tone to that of your audience.)
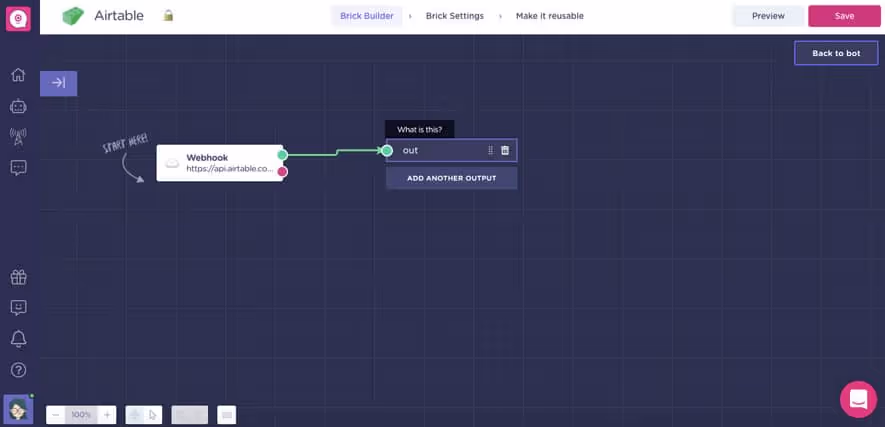
After the bot is sure to have both key pieces of prospect’s data, it continues to register the user for your webinar in Zoom using a webhook.
Now it’s time to interfere. You need to pair the webhook with your own Zoom account and webinar.
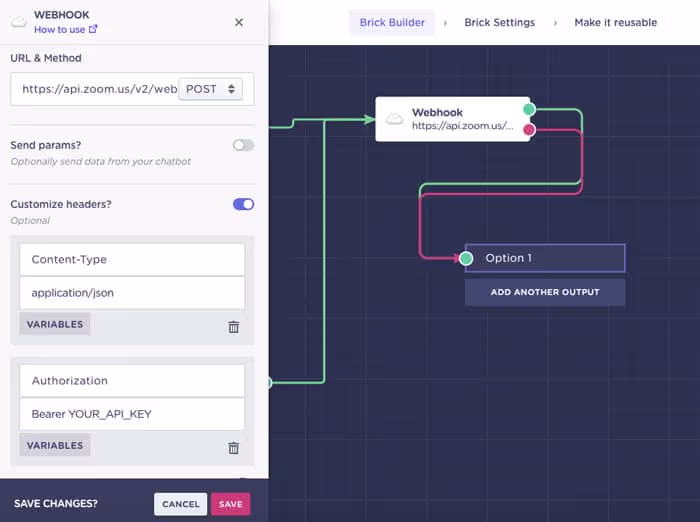
Firstly, you need to customize the URL in the URL & Method field.
When you open the webhook for the first time and inspect the URL, you will notice the format is as follows:
https://api.zoom.us/v2/webinars/webinar_ID/registrants
Here, all you need to do is go to your Zoom account and replace webinar_ID with the actual webinar ID:
- Go to your Zoom account
- Click “Webinars”
- Select the webinar you want to connect
- Copy the webinar ID into the URL replacing “webinar_ID” without spaces
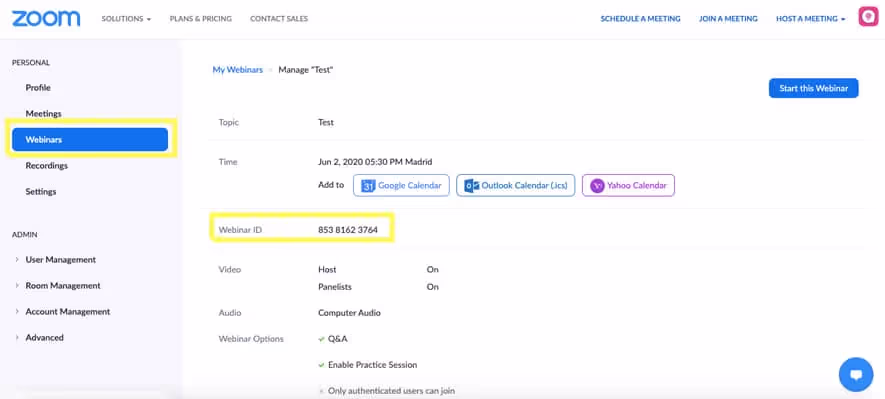
The adjusted URL will look like this:
https://api.zoom.us/v2/webinars/85381623764/registrants
Next, move on to the “Customize Headings” section of the webhook setup.
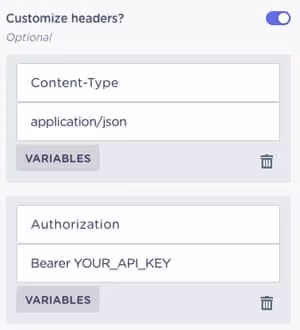
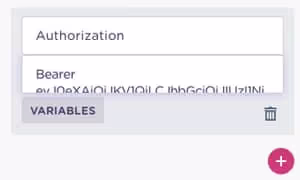
Leave the “Content-Type” field as-is. The field that needs your attention is the second “Authorisation” field where you need to replace “YOUR_API_KEY” with the actual API key.
To retrieve your Zoom API key. It might seem a bit complex, but if you follow these steps, it is pretty easy:
- Go to https://marketplace.zoom.us/
- In the upper right corner click “Develop” and select “Build App”

- If this is your first time setting up Zoom API, click “Create” in the JWT block; Next, in the “Information” section fill out at the very least the “Basic Information” and “Developer Contact Information” and click “Continue”
- Here, in the “App Credentials” section, you will be given access to your API data. Please disregard your API Key, API Secret, and IM Chat History Token. Instead, click “View JWT Token”
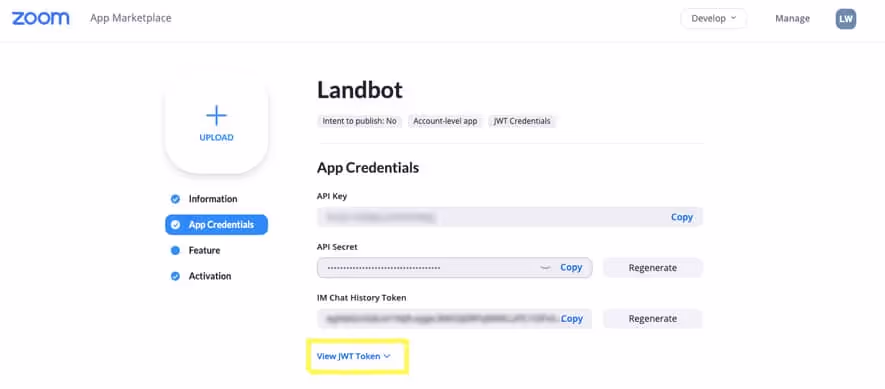
- First, select the expiration time for your token
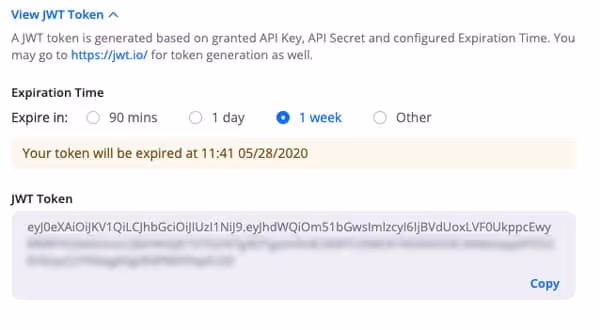
- Then, simply copy the token into Landbot webhook block replacing “YOUR_API_KEY” (keep the word “Bearer” followed by a space in front of the JWT, otherwise the webhook won’t work)
That is it in terms of the API access to your Zoom webinar. All that is left to do now, is test your connection.
As you scroll down the webhook editor, you will notice the “Request Body” and “Test Variable Values” are both already set. Hence, there is no need to touch anything there.

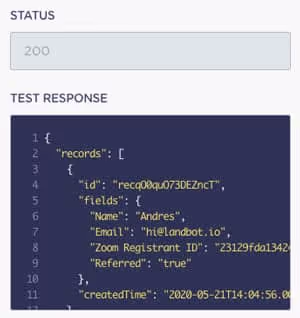
To test your connection, simply click the purple TEST button.
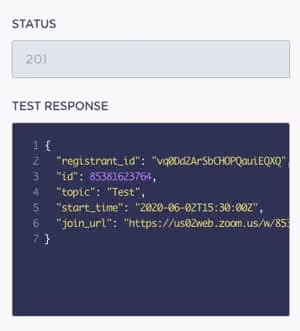
After you do so, you will see the test status and test response. In our test response, you can see the webhook is working as it created registrant ID and pulled the webinar information including:
- Webinar ID
- Topic (webinar name)
- Webinar start time
- And a unique Join URL
Save this setup and exit the brick by clicking “BACK TO BOT” in the upper right corner of the interface.
5. Configure Tracking
Now it’s time to set up your tracking.
Hover over the “Tracking” brick and click to edit.
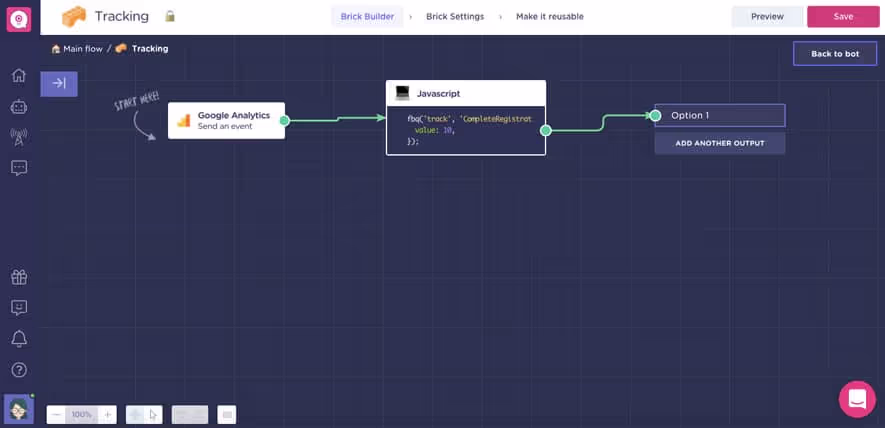
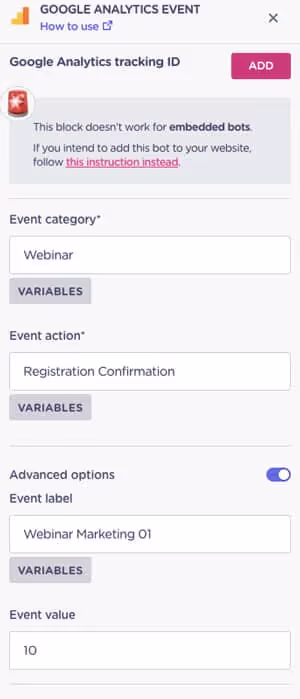
Once in, you will see the simple anatomy of the setup which includes the Google Analytics integration block and a simple pre-set code block track Facebook Pixel:
Google Analytics Tracker
Click the ”Google Analytics” block to open its editor.
Before anything else, you need to add the Google Analytics tracking ID to your chatbot. To retrieve it:
- Sign in to your Analytics account.
- Click Admin.
- Select an account from the menu in the ACCOUNT column.
- Select a property from the menu in the PROPERTY column.
- Under PROPERTY, click Tracking Info > Tracking Code. Your Tracking ID is displayed at the top of the page.
Once you have it, click “ADD” in the integration editor.
You will be redirected to a “Setting” section of your bot.
There, under “SEO & Tracking” paste your Google Analytics ID into the designated field.
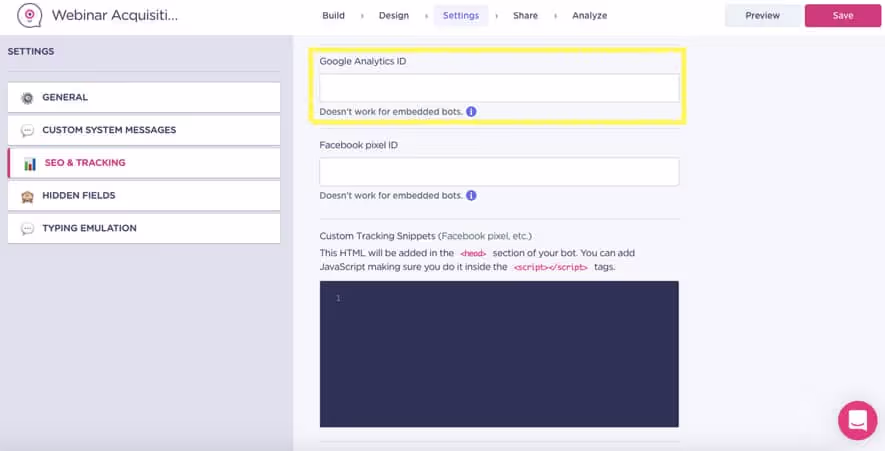
When you are done, make sure to press “Apply Changes” otherwise the ID won’t save.
If you are satisfied with the pre-set names of the Event Category, Event Action, Event Lable, and Event Value, you don’t need to change anything. Otherwise, you can update these fields to whatever makes sense in your tracking system.
Facebook Pixel Tracker
To set up your Facebook Pixel tracking, you don’t need to touch the Javascript code block (only perhaps to change the webinar registration value from 10 to whatever scoring you are using).
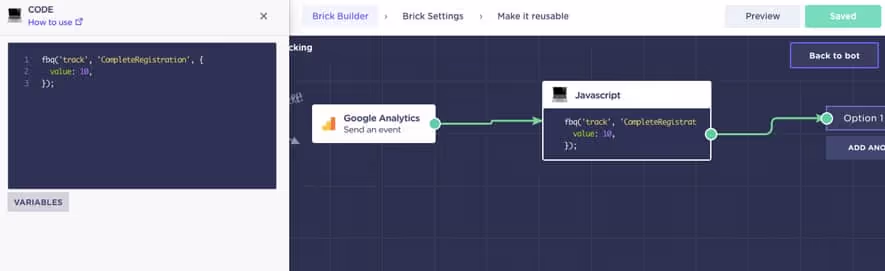
All you need to do is connect the pixel to your bot the same way you did with Google Analytics:
- Go back to the Settings >> SEO & Tracking
- Paste the Facebook Pixel into the designated field
- Click “APPLY CHANGES”
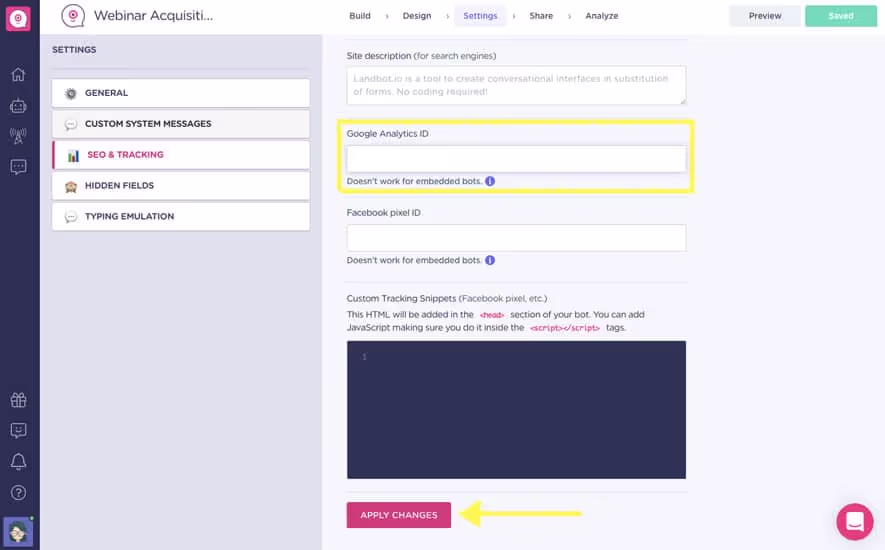
NOTE: You can find the Facebook Pixel in your Facebook Business Manager under “Events Manager”. If you haven’t created your Facebook Pixel yet, follow the instruction in the official Facebook Help documentation
That’s it. Exit the tracking brick and go to the main flow!
6. Set up Airtable Integration
Next on the “menu” is the Airtable integration. Airtable is SaaS offering a sophisticated spreadsheet mechanism. We are going to use it to log registrant data.
NOTE: If you don’t want to use Airtable, you can always substitute it for Google spreadsheet integration which is easier to set up and connect it to another CRM tool you are using.
Upon entering the Airtable brick, you will notice there is only a single webhook block to deal with:
Click on the block to open the webhook editor and set up the connection with Airtable. You will notice the setup process is very similar to the Zoom webhook.
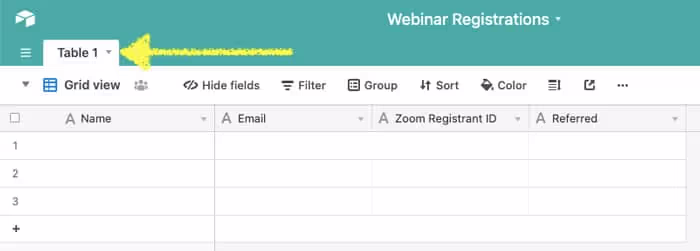
Before anything else, you need to create a dedicated spreadsheet (or as they call it “a base”) on Airtable:
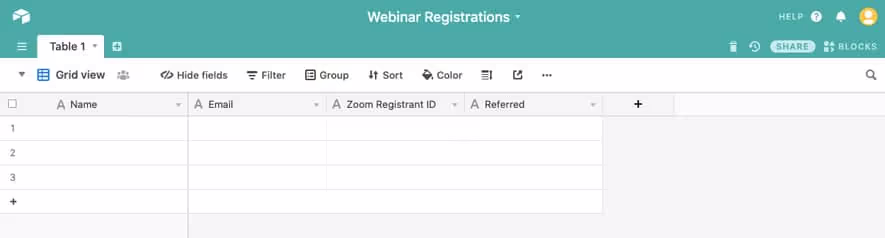
Crete fields for:
- Name
- Zoom Registration ID
- Referred
Now you are ready to set up the webhook.
As with the Zoom webhook, first you need to configure the URL in the URL & Method field.
The structure of this URL should be structured as follows:
https://api.airtable.com/v0/<app_id>/<nameofthebase>
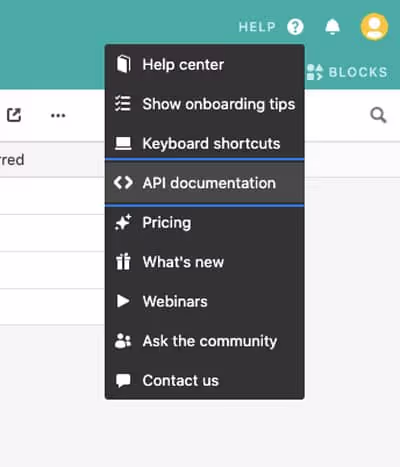
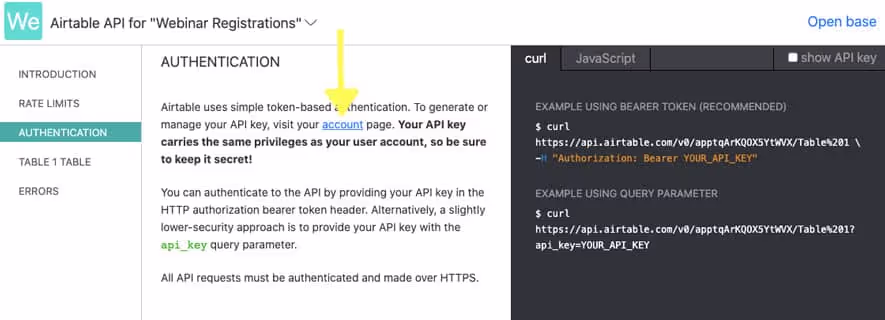
To obtain this URL, go to Airtable, click Hep in the upper right corner and then select API Documentation.
A new tab will load.
Select “AUTHENTICATION” in the side navigation menu and copy the URL under “EXAMPLE USING BEARER TOKEN (RECOMMENDED)”
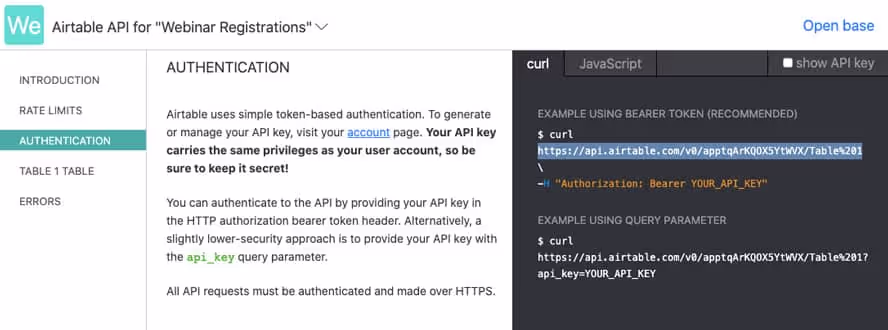
In our case that would be:
https://api.airtable.com/v0/apptqArKQOX5YtWVX/Table%201
- <app_id> equals appwz4ws9b6VDg2sp
- <nameofthebase> equals Table%201 (as based on the name of the Airtable sheet we created)
Copy-paste the URL into the URL & Method field and move on to the next step.
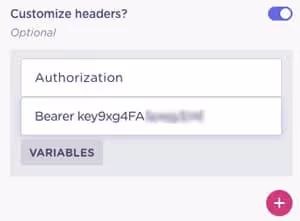
In the following “Customize headers?” section, you need to obtain an API Key (same as when setting up the Zoom webhook).
Go back to the Airtable API Documentation page.
Now, if this is your first time setting up an Airtable API, you need to generate the key in your account. Simply click on the “account” link in the first paragraph of the Authentication section.
And generate the API key:

If this is not the first time, just tick the “Show the API Key” box in the API Documentation and your API key will appear:
Copy the API key into the appropriate section as follows:
Scroll down to the “Customize body?” section.
As in the case of the Zoom webhook, the information to be sent to Airtable is already set up in an appropriate format, hence there is no need to change anything.
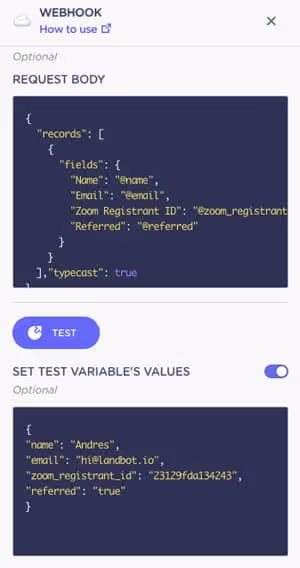
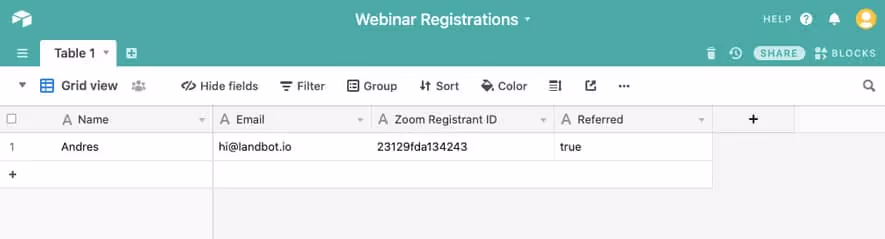
NOTE: You do need to ensure that titles of the columns in your Airtable spreadsheet are equal to the ones inside the request body, otherwise the webhook won’t know where to save the information. In this case “Name” “Email” “Zoom Registration ID” and “Referred”
Click “TEST”.
If everything is correct, the response status will be 200 and response as follows:
Alternatively, you can check your Airtable sheet. If all went well, the information will be updated there:
Save the changes and go back to the main flow!
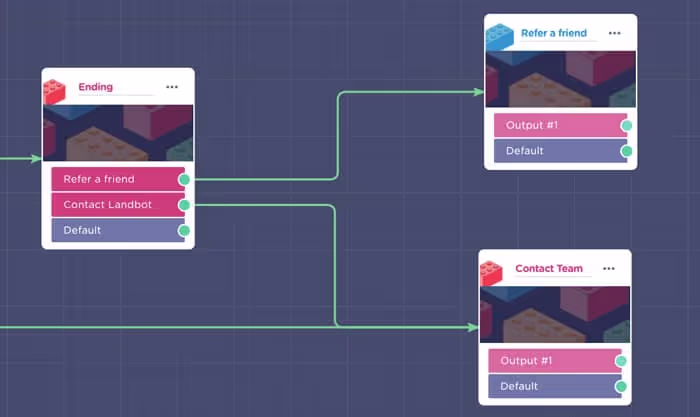
7. Ending Sequence
Next, enter the “Ending” brick.
Customizing this block will be more about adjusting the messages and questions to fit your brand and webinar scenario.
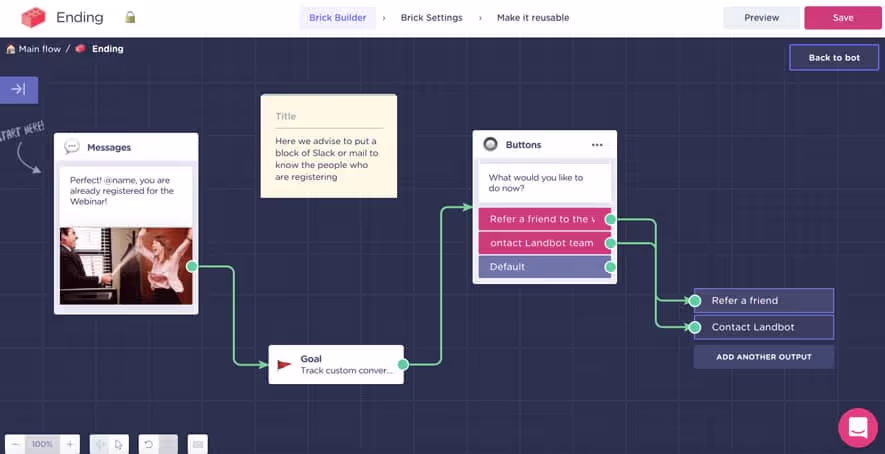
The first message, informs the user that the registration is completed.
The “Goal” block that follows keeps tabs on every user that reaches this point in the conversation. In other words, having a Goal block after specific questions enables you to easily track if the user has passed through a specific path in the flow.
You can check the Goal metrics in the “Analyze” section of the bot. There, you will find a Goal column, showing the percentage of users that chose the path of the flow where the block is located.
Whether or not to keep the goal block in your webinar registration process is up to you. If you think it’s redundant simply delete it and reconnect the remaining blocks or move it to another part of the flow where you think it will be more interesting in order to identify quality leads. (E.g. after the user decides to “refer a friend” in the following block.)
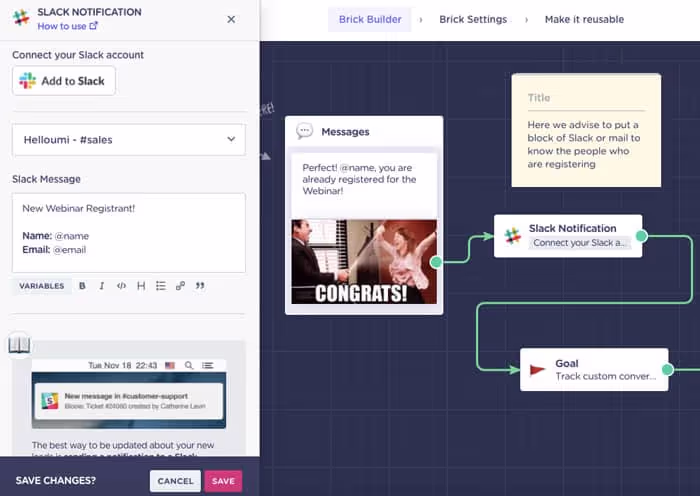
NOTE: You don’t need to rely solely on the Goal block to keep track of the chatbot lead generation process. The yellow sticky note inside this brick advises you to set up email or Slack notifications. It’s a quick and easy way to notify your marketing or sales team about new qualified leads.
After you are done adjusting the messages, questions, and event tracking/notification options, save your progress and go back to the main bot.
8. Offer a Referral Option
Enter the last brick in the main flow, “Refer a Friend”.
This brick is composed of a single block (so really doesn’t need to be a brick, it’s been arranged so to make to template self-explanatory and easy to follow).
That solitary block inside the “Refer a Friend” brick is the “GoodBye” block.
This block allows you to close a conversation with a fair!

Besides customizing the goodbye message, the most important thing here is updating the copy-paste and social media share links with the URL of your bot landing page.
To find out what’s your bot’s URL:
- Exit the brick
- Go to “Share” in the top navigation bar
- Select “Share with a link
- Copy the link to bring it back to the brick
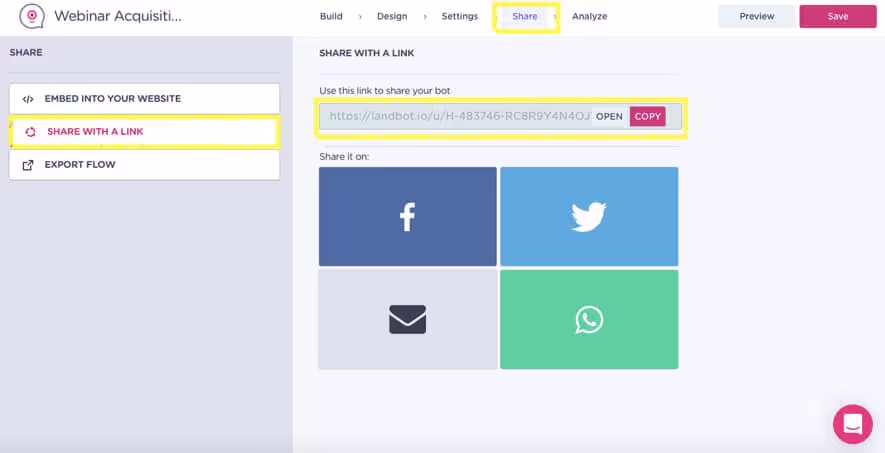
Both in the message and in social media share option, replace the “Link_to_your_bot” with the URL but be sure to keep the ?referral=true
In case you wondered, where ou would get the referral information from, this is it. Thanks to this hidden field inside the URL you can tell which webinar registrants registered using the referral link instead of the direct one.

Once done, click SAVE and exit the brick.
TIP: If you want to check out the final user experience, click “PREVIEW” in the builder. You will be able to see how the bot it’s going to look and interact on a desktop as well as mobile.
9. Provide an Option to Get in Touch
The second option offered by our “Ending” brick was a chance for the user to get in touch with us.
If you don’t wish to provide this option, simply delete the “Contact Us” button choice inside the “Ending” brick as well as the “Contact Team”.
However, if this is something that can bring you additional value, go ahead and click to edit the “Contact Team” brick.
Before you start editing, gain an overview of the flow to determine which paths and options are relevant and which are not.
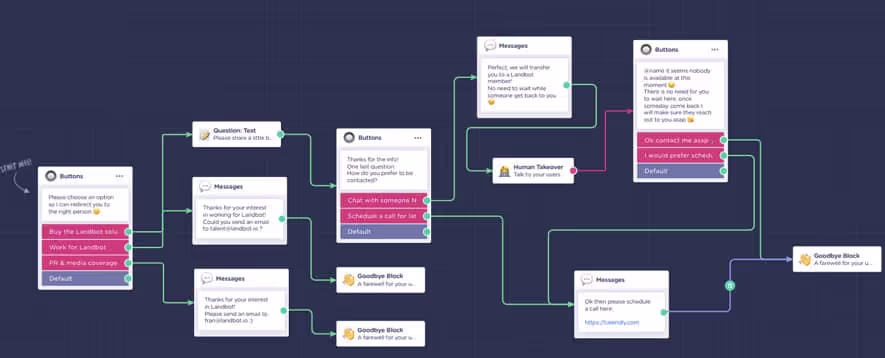
While the flow inside this brick is quite rich, it’s not complicated. There are no webhooks of other more complex setups.
Let’s start with the first block:
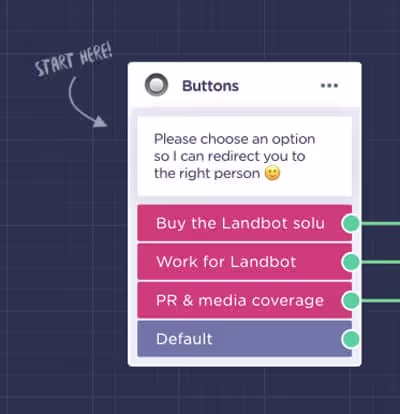
The block offers user three reasons for contacting:
- Buy our product or service
- Work for us
- PR & Media Coverage.
If any of these doesn’t fit your goal, delete that button option and the path will be disconnected.
Now, when the user selects either “Work for us” or “PR & Media Coverage” the bot offers up the email address to contact the appropriate department/person.
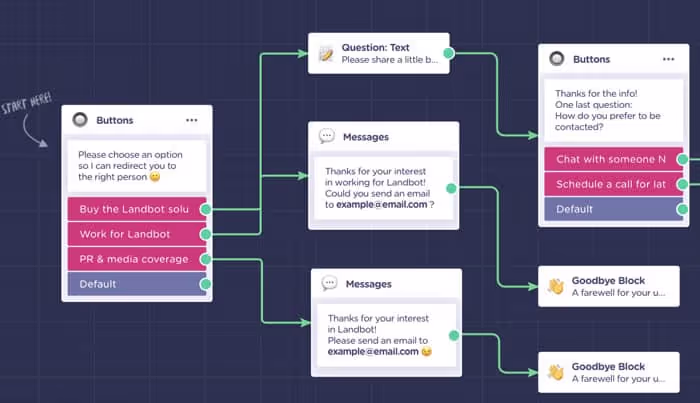
However, when it comes to the “Buy our Product or Service” option, the template proceeds to ask the user for a bit more information. Then, it presents the prospect with an option to schedule a call or chat with someone now.
Selecting the “Chat Now” option leads to a fun feature called “Human Takeover” which enables your agents to jump into the bot conversation and transform it into a live chat experience.
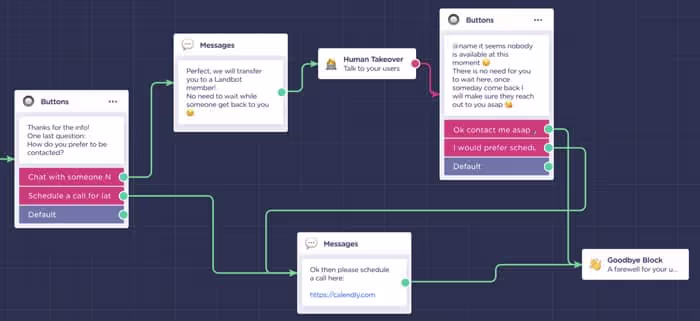
Setting up bot-to-human handoff with Landbot is pretty easy. All it takes is connecting the block to the rest of the flow. You can customize the takeover by assigning it (in this particular bot) to a particular agent or agents. If you don’t assign it to anybody the bot will automatically push the request to the person with the least amount of conversations in their queue.
The Human Takeover block has a PINK output. You can use it to design an alternative flow in case nobody is available or the user is trying to get in touch outside office hours.
The webinar registration bot template once again offers the user a chance to schedule a call or simply wait to be contacted.
Feel free to tweak this flow to your needs!
10. Persuasion: Sell the Idea of Your Webinar
Remember that at the beginning of our template the user had two options:
- Register
- Learn More
Well, the “Learn More” option leads to a so-called “Persuasion” brick which is a space for you to share more details about your webinar. In other words, persuade those that are still skeptical about registering.
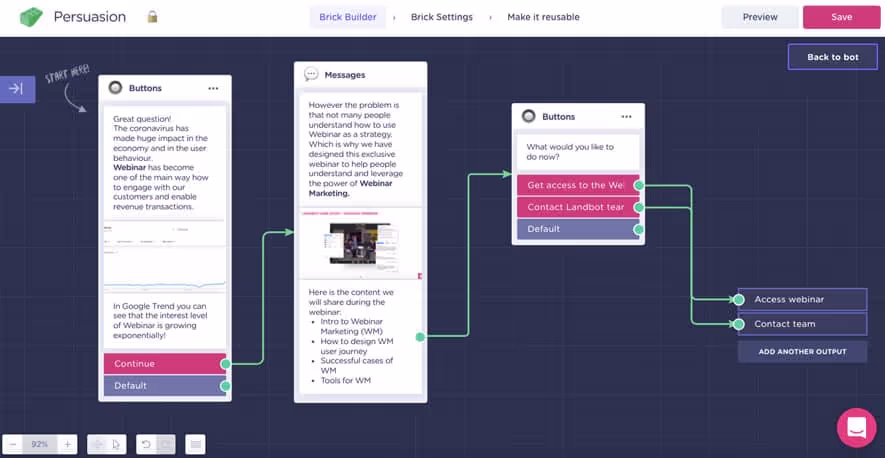
Click to edit the brick and use this space to make a pitch for your webinar. What is it about and why should the user care?
The two outputs from the brick lead to the webinar registration or the contact brick.
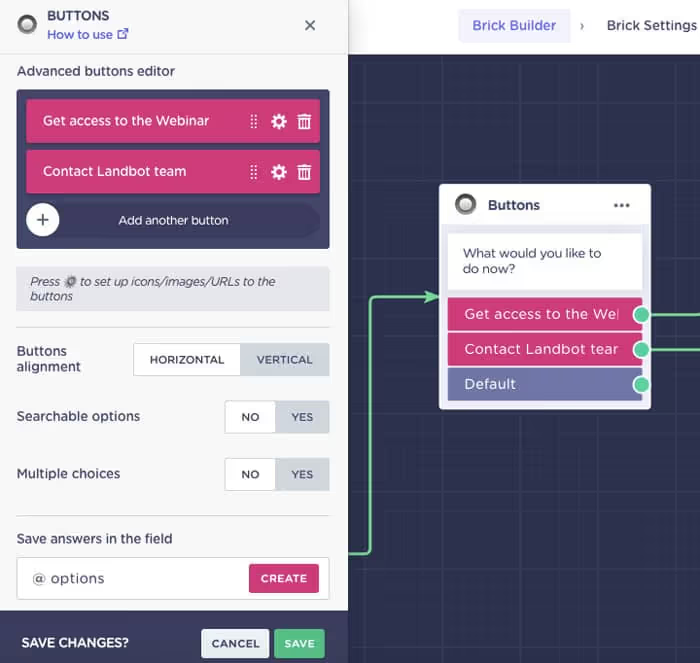
If you are not using the “Contact Team” you should still give your prospect an option, not just force them to go down the registration flow or close the bot. This kind of approach is not very conversational…
So maybe change the contact button to something like “No thanks, this isn’t for me” followed by a Goodbye block.
After you are done, save all your changes and that is it.
Your webinar acquisition template is FULLY optimized.
11. Hyper-Personalize your Email Marketing Campaign
In the title, this post promises to create 1-click webinar signup for prospects already on your mailing list.
Optimizing your bot to do just that with Landbot is pretty simple and it all revolves around hidden fields.
Hidden fields hide variables containing user information in the URL of the bot.
To configure hidden fields, click the “Settings” section in the top navigation bar.
Select “Hidden Fields” from the side menu:
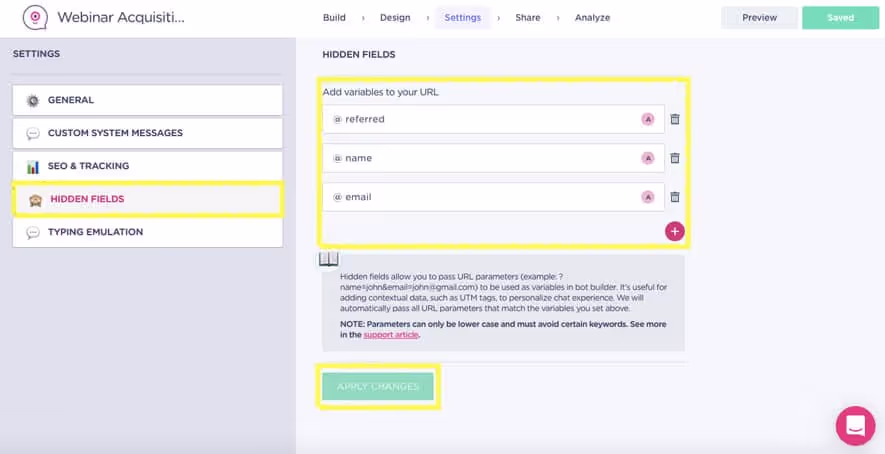
And, one by one add the variables you want the bot to know.
We included @referral because we are using this hidden field to track referral registrants. And, we also added @name and @email because these are the two pieces of information necessary to register for the webinar with Zoom.
You need to adjust the auto-generation bot URL by including these variables as in the case of @referral variable:
your-bot-url.io?referral=true
The added URL sequence always follows the structure:
question mark sign – variable name – equals sign – true value of the variable
For this system to work with your email marketing, you need the bot to pull the variable data from the database of your email marketing tool.
So, you need to complete the rest of the setup inside your email marketing system – we will be using Mailchimp.
Unlike in the case of @referral, the name and email values of the variable will always be different. However, you cannot just say ?name=@name because Mailchimp doesn’t recognize the same variable format as Landbot.
Therefore, to make sure Mailchimp (or any other email marketing tool) understands the request, you need to use the system the tool uses to store data.
TIP: If you are not sure how your tool tags their variables, simply google it or check out their help docs.
For instance, Mailchimp calls variable MERGE TAGS and uses a format with capital letters surrounded by separators and asterisks:
*|SAMEPLEFORMAT|*
To merge your Landbot variables with Mailchimp use the equal sign to tell Mailchimp that when the bot says @name it means *|FNAME|* and so forth. This way the system knows these data categories are the same.
In practice, the extended URL would look like this:
your-bot-url.io?name=*|FNAME|*&email=*|EMAIL|*
So, when you are designing your Webinar invitation email, add this modified URL to the CTA:
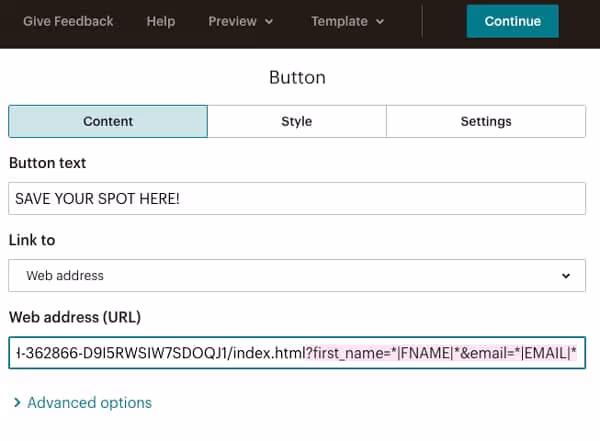
When a user clicks on this URL, the webinar bot will pull this info from MailChimp making their signup a 1-click event.
Watch this video for a step by step tutorial on creating hidden fields for your email campaign:
What’s Next?
Well, this is it!
The tutorial to building your own webinar registration bot to make generating leads a bit easier as well as fun.
At least for the technical part… now comes the fun part of customizing and designing the front-end experience! Landbot editor gives you the freedom to design a bot that fits your brand visually as well!
One thing is for sure, you will see some positive changes in your conversion rate!
Don’t believe us?
Well the only way to find out is to give it a try!
.avif)


.avif)
%20(1).png)
.avif)


%20(1).png)


