


.svg)
Please note that 'Variables' are now called 'Fields' in Landbot's platform.
Webinar marketing doesn’t stop when the live stream is over. Sure, you delivered the intended content but most leads need more to convert. Some need a bit more nurture, others are just waiting for an invitation to buy. Whatever the case, a carefully designed webinar conversion bot can take care of it.
Whats is a Webinar Conversion Bot?
A webinar conversion bot is an automated conversational software that helps you collect webinar feedback, qualify leads, and send them on nurture or conversion path accordingly.
It provides a great way to share the webinar recording, additional webinar materials, or special offers. Furthermore, the chatbot represents an easy way to get in touch with your team by transferring hot leads to a live chat or by enabling them to schedule a meeting.
The chatbot can work as a standalone landing page, popup, or a widget as well as be adapted to messaging app interfaces such as Facebook Messenger and WhatsApp.
Why Use Webinar Conversion Bot?
Conversion bot is a powerful tool able to boost your conversion rate on several different levels.
☝️ Keep the Conversation Alive
Conversion chatbots can help you keep the conversation alive after the camera turns off. It shows webinar attendees that even though the core event is over, you are still open to listening, talking, interacting, and sharing.
Unlike a static email or a landing page, a bot requires input from the side of users and so, gives them a sense of control over their experience.
☝️ Qualify Leads
An email or a static page can offer a call to action to purchase your product. While this works for converting the leads who were ready to purchase, the strategy makes you miss out on those prospects who needed just a little bit more nurturing to do the same.
One of the most important characteristics of the conversion bot is its ability to qualify leads in real-time. Thanks to its interactive nature, the chatbot can easily determine which leads are ready to buy or talk to your sales representatives and which ones still need a bit of time to think it over.
☝️ Share Relevant Content & Convert
Based on the qualification process, the conversion bot can then direct the leads down a conversion path that results in purchase or, at the very least, one-on-one sales meeting or down the nurturing path which supplies the prospect with further information.
This way, each of the groups is able to access the kind of information they feel ready to receive. Hence, those who are ready to buy don’t feel like they are losing time while those who are not can access other materials such as case studies, ebooks, and stats without feeling pressured to buy.
How to Build A Webinar Conversion Bot From Landbot Template
So far, we have shown how to build a webinar registration bot to generate leads more effectively and a webinar engagement bot to kept the registrants engaged and interacting before and during your webinar. Now, it’s time for the webinar conversion bot to help you recognize qualified leads and increase conversions.
NOTE: If you want to follow along with the tutorial and don’t have your Landbot account yet, be sure to sign up for free!
1. Access Bot Template from Dashboard
Once you land on the main Landbot dashboard, click the pink “Build a Chatbot” button in the upper right corner of the interface.
When a channel selection window pops up, select the web channel for your bot.
Next, you’ll be redirected to the Landbot template library.
In the list of templates, locate the one called “Webinar Conversion”.
Now, if you want to have an idea of the final user experience the bot delivers, click on the eye icon to see and interact with the bot in a preview mode. Otherwise, click “Use This” to begin.
2. Gain Webinar Conversion Bot Template Overview
After selecting the template, you’ll be promptly redirected to the builder. Before starting to make changes, take some time to gain an overview, and familiarize yourself with the flow of the template.

The template is neatly organized into bricks (clusters of blocks) for easier management. Each brick represents a specific action in the conversion process:
- Webinar NPS – Gathers attendee feedback
- Lead Qualification – Qualifies leads
- Convert Lead – Schedules a sales meeting
- Nurture Lead – Offers further material
- Contact Team – Opportunity to get in touch with talent, marketing or sales department
3. Adjust the Welcome Message
The place to start your template personalization journey is with the Welcome message. After all, it’s the first thing your prospect sees when interacting with the bot.
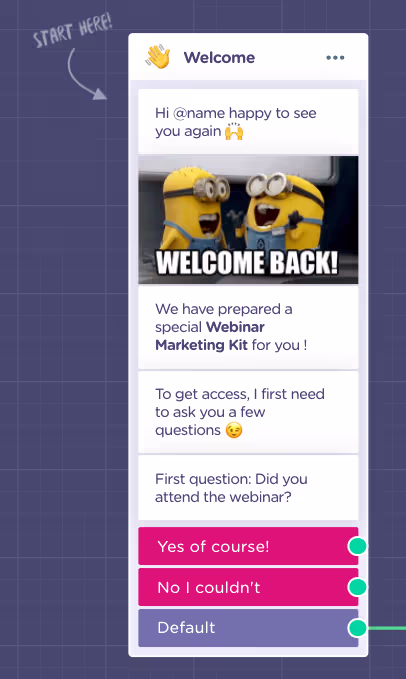
NOTE: The idea is for the bot to already know the user’s name and email. Since the bot is to be emailed to the prospect, it can access this information via hidden fields in the URL. Check out the process of how to set up hidden fields in the first article of the series “How to build a Webinar Registration Bot” linked above.
The default message welcomes the user back and, right off the bat, introduces an incentive in the form of the “Webinar Marketing Kit”.
The conversion bot is using the prospects for attention not just to provide feedback but also to help you identify their stage in the customer journey. Hence, offering something in return for that attention only seems fair.
What could you offer besides the webinar recording? You can share a webinar topic related eBook, a series of tutorial blog posts, or a white paper answering the questions you didn’t have time to address in the short Q&A session. It’s really up to you and the goal you are trying to achieve.
This is the time for your content marketing to shine.
Modify the tone of your bot, the rich media, and the incentive. Though, do leave the initial question in place. Just because someone didn’t attend your webinar, doesn’t mean they are not a valid lead. Asking about attendance in the welcome message will make all registrants feel equally welcome.
4. Webinar NPS
Hover over the “Webinar NPS” brick and click to enter and familiarize yourself with the flow inside it:
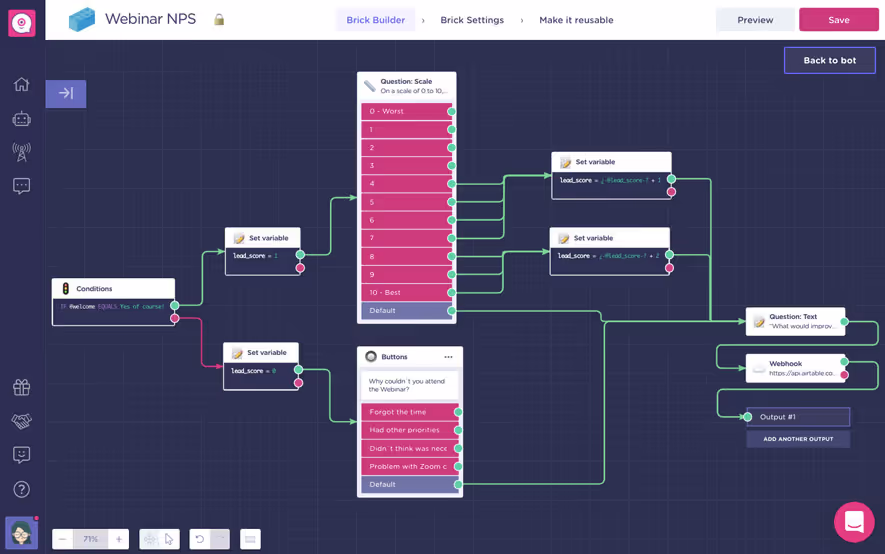
The flow starts off with a condition: IF @welcome EQUALS “Yes of course” in which @welcome variable represents lead’s answer int he welcomes message.
Establish a Scoring System
The purpose of this is to split the flow not just to personalize the experience but also to kick-off the lead qualification process as the bot starts the scoring based on that answer using the “Set a Variable” block.
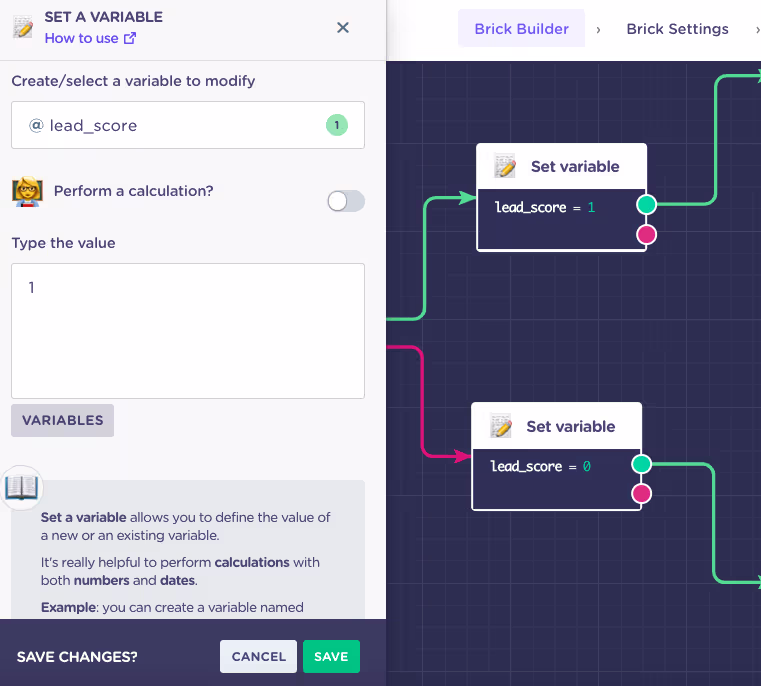
NOTE: If you are OK with the numeric representation of the lead scores, you can move on. Otherwise, feel free to adjust the scores to reflect the scoring system with which you are more comfortable.
Registrants who did participate in the webinar are next asked to rate the webinar experience on a scale from 1 to 10.
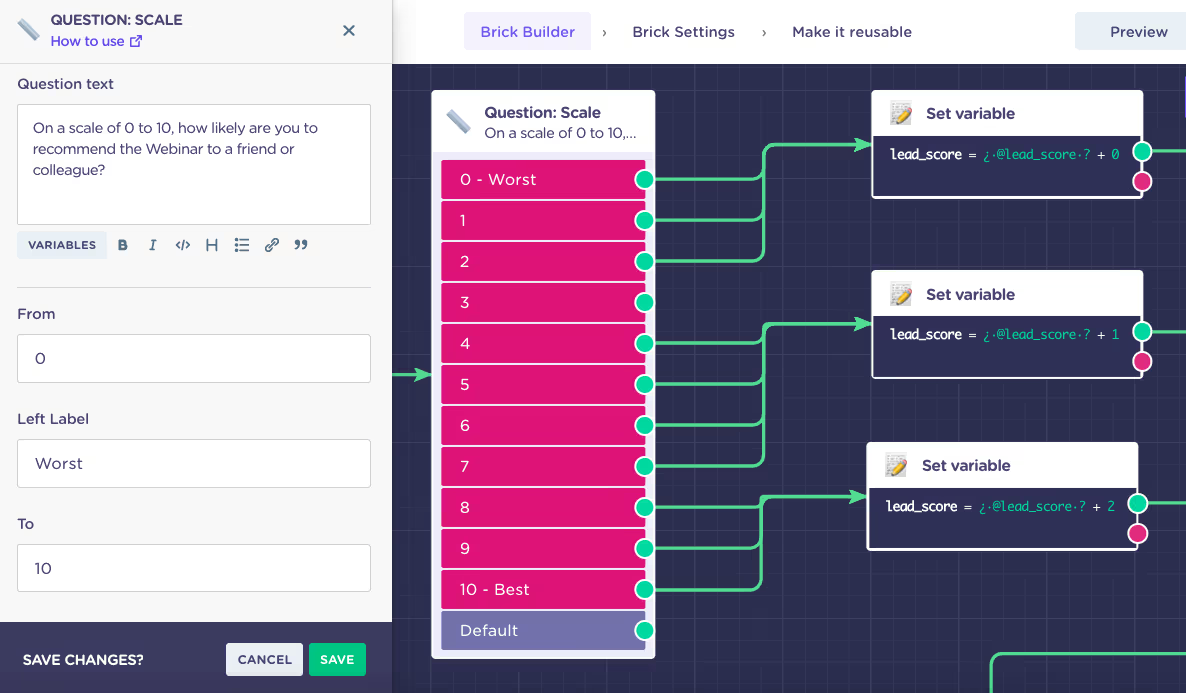
Their response is then allocated lead score points using the “Set a Variable” block but this time using its “Perform a calculation” mode:

On the other hand, registrants who didn’t attend the webinar are presented with a question asking for the reason why:
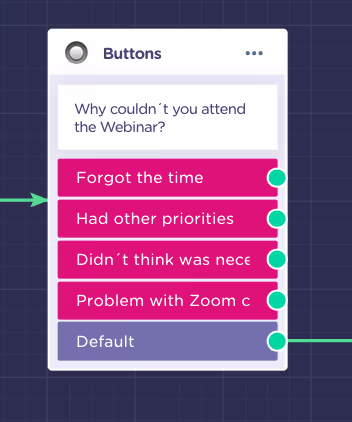
Naturally, no scoring applies here.
Next, both paths unite in a question block asking for a free user input about what improvements could be made to the overall webinar experience.
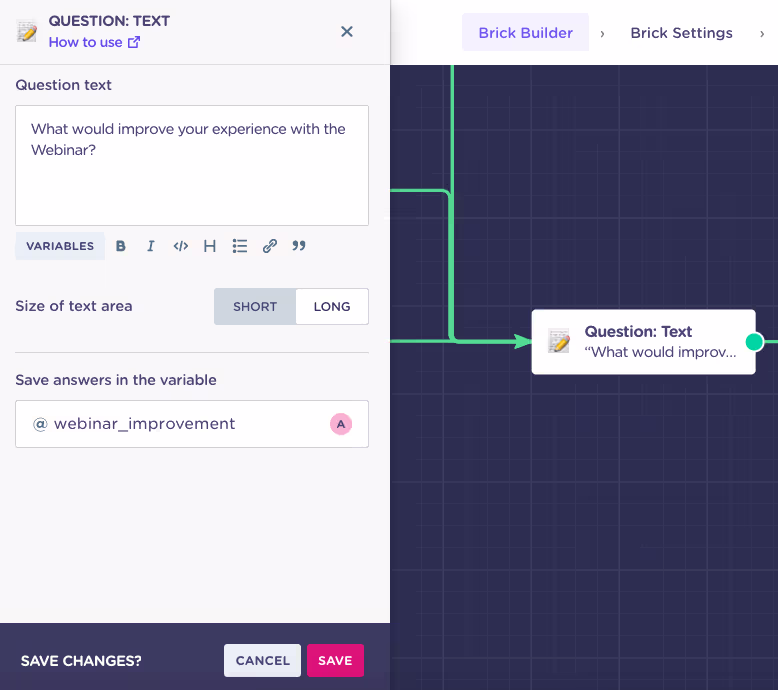
In this case, both attendees and non-attendees can offer useful feedback.
Before the NPS block wraps up, it uploads gathered data to an Airtable sheet using a webhook.
Upload Data to Airtable
To set up a webhook you need to connect Landbot with your Airtable account so this will be a first block where your intervention is needed YES or YES.
If you haven’t done so yet, go to Airtable and create a new base or a new sheet within an existing base:
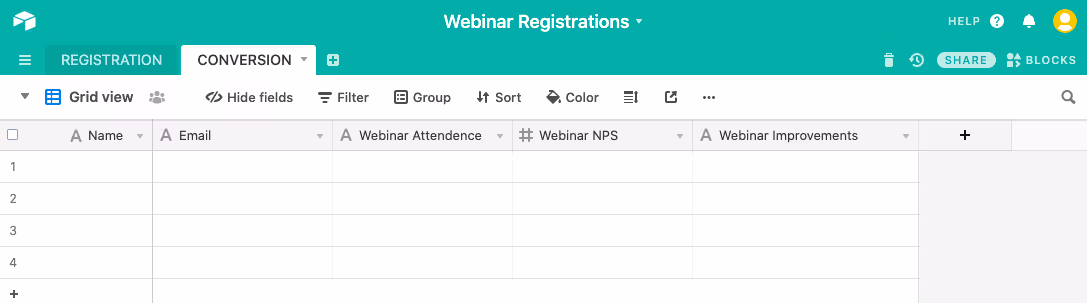
For now, create fields:
- Name (Format: Text)
- Email (Format: Text)
- Webinar Attendance (Format: Text)
- NPS (Format: Numeric)
- Webinar Improvements (Format: Text)
Now you are ready to set up the webhook.
Go back to the builder and click on the “Webhook” block to open the advanced editing field on the left
Firstly, configure the URL in the URL & Method field. It should be structured as follows:
https://api.airtable.com/v0/<app_id>/<nameofthesheet>
To obtain this URL, go to your Airtable base, select “Help” and then select API Documentation:
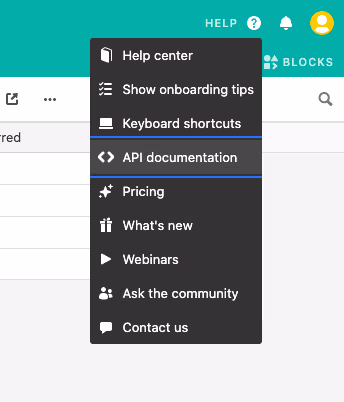
A new tab will load. Here:
- Click “AUTHENTICATION” in the navigation menu
- Copy the URL under “EXAMPLE USING BEARER TOKEN (RECOMMENDED)”
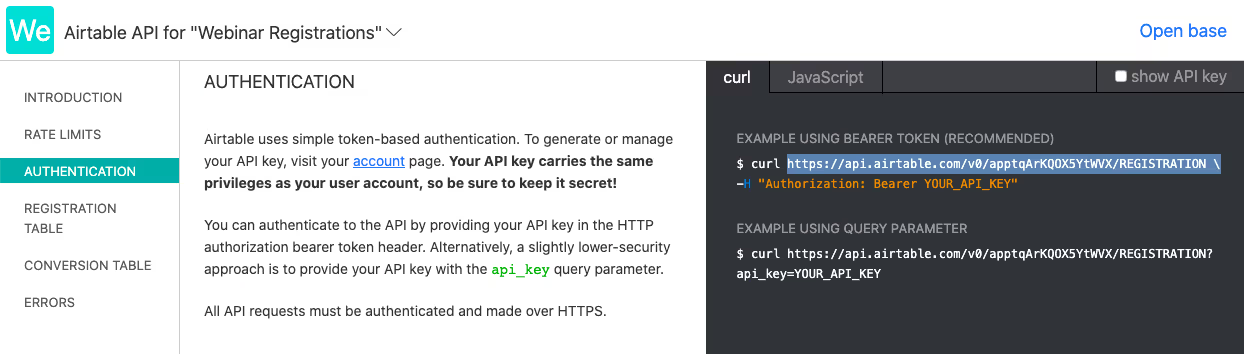
NOTE: If you are using another sheet within a base instead of a new base, make sure to update the <nameofthesheet> in the URL to the sheet you want to update. The API documentation automatically generates the URL with the name of the first sheet of the base:
https://api.airtable.com/v0/apptqArKQOX5YtWVX/REGISTRATION
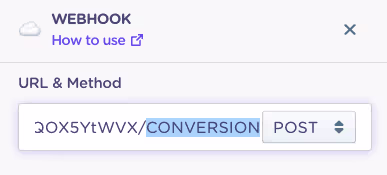
So, if you want to connect other than the first sheet of the base, be sure to update its name in the URL:
https://api.airtable.com/v0/apptqArKQOX5YtWVX/CONVERSION
Copy-paste the URL into the URL & Method Field and move on to the next step.
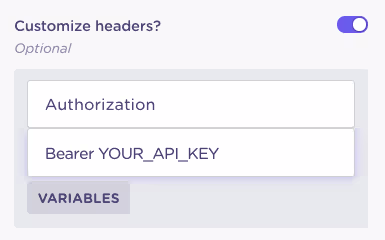
Next, turn your attention to the following section: “Customize headers?”
This is the place to copy-paste your Airtable API Key.
To do that, go back to the Airtable API Documentation page. Tick the “Show the API Key” box in the and your API key will appear:
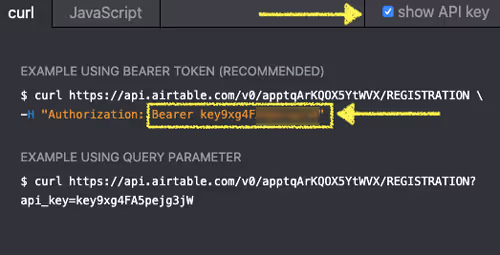
Copy-paste the key to the Landbot webhook under “Authorization:
Now the “hard” part is done. All you need to test the connection.
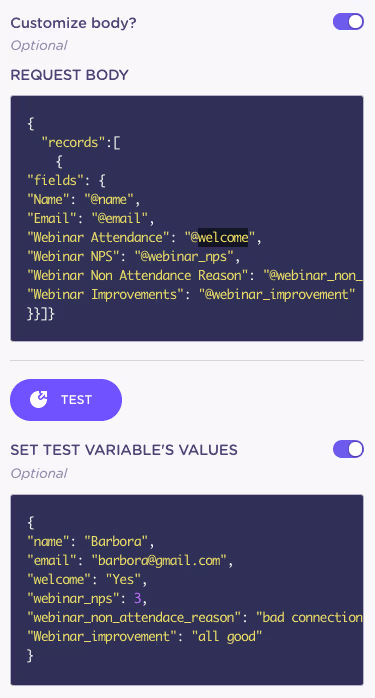
Scrolling past the “Authentication” section “Request Body” includes the data you will be sending to Airtable associating each variable with an appropriate column title on the spreadsheet.
The “Set Test Variable Values” field below includes test values to help you check the connection.
Click the purple TEST button.
If all went well, you’ll see the test “Status” at 200 and the “Test Response” showing each variable was matched with a column title successfully. Also, if there was a problem, “Test Response” is the field that will tell what it was so you can fist it.
You will also see the test data actually go through and log into the Airtable sheet:

This is it on your part for now.
Though, before you go, save this ID from the test response somewhere- you will need it later to run another test!

When you scroll down the webhook editor all the way to the bottom you will see the bot is saving this ID under @id_conversation. It’s an automatic ID created by Airtable which the bot will use as a reference later to update more data into the same row.

That’s all for the NPS brick.
Click SAVE and go back to the main flow.
5. Lead Qualification
Enter the lead qualification brick and gain a general overview of the flow.
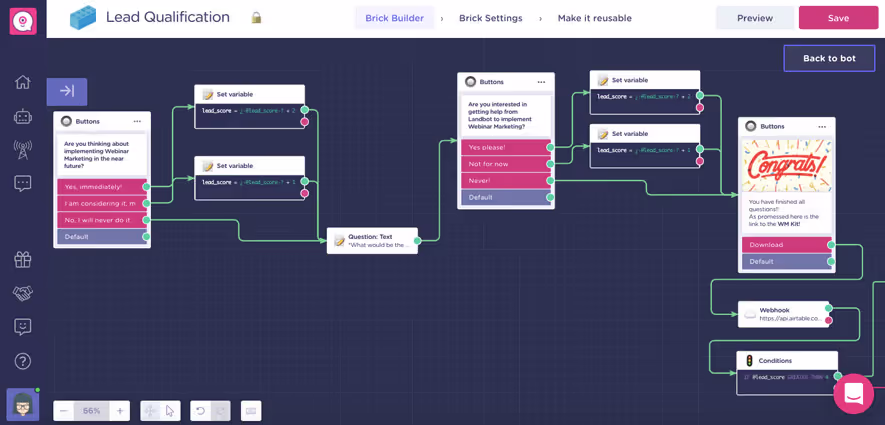
The flow in this brick features two main lead scoring questions and one in-depth question answers to which are uploaded to the Airtable sheet along with the score, and before letting the user out, uses conditional logic to split participants based on their score.
Thus, when it comes to customizing this brick, it’s more about changing the questions and answers to fit your business scenario and goal.
Customize Scoring Questions
Pick scoring questions that help you determine participants position in the customer journey:

And combine them with in-depth qualitative questions which might not help you score the lead but they help you understand the prospect’s situation and pain points:
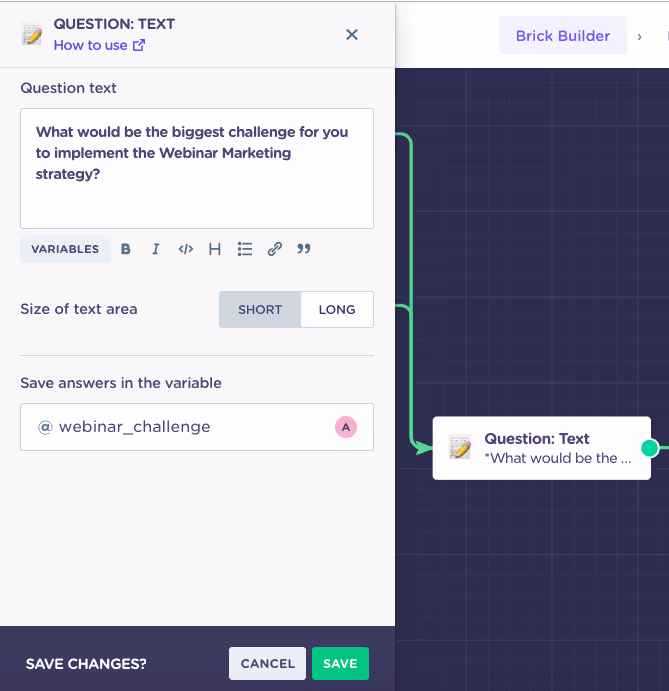
Also, when changing the questions, remember to update the @variables under which to save the answers if necessary.
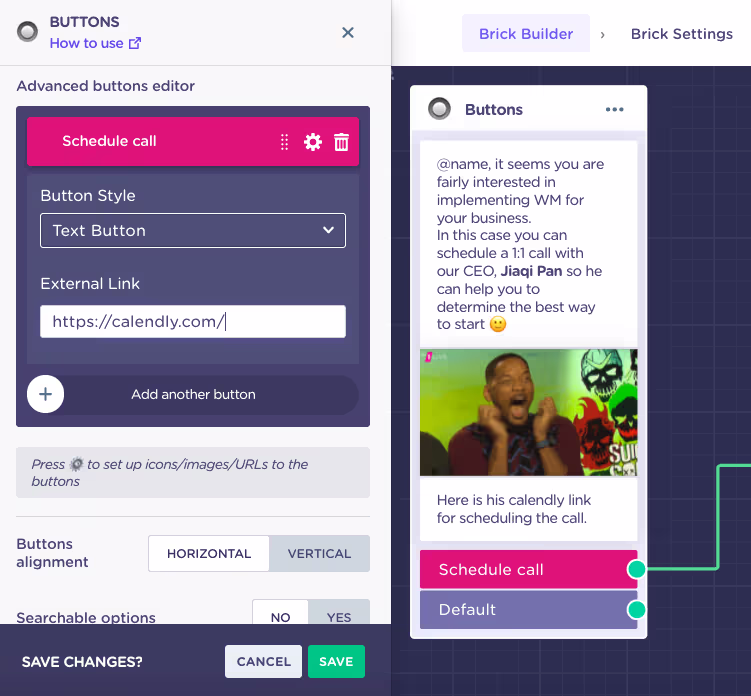
For providing the answers, the user is rewarded with a downloadable webinar kit.
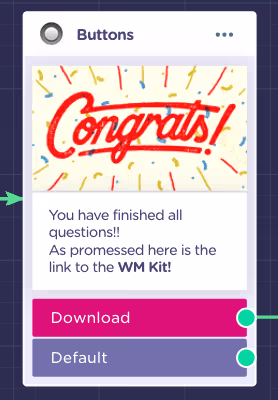
Normally, a button choice just pushes the conversation forward, however, if you use the advanced Buttons block editor you can link that button to an external link to create the in-conversation “download” experience:
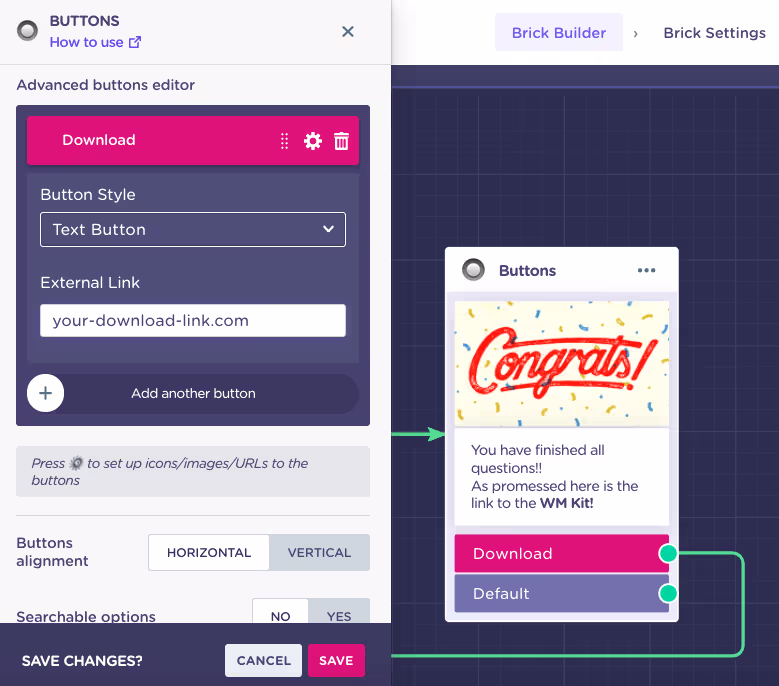
Click on the settings icon of the button in question to visualize new editing options:
- Buttons style (text, icon, emoji, image)
- External link
Add the New Data to Airtable
After the download, the bot proceeds to upload the collected data to the Airtable.
In order to customize the Airtable webhook follow the same procedure to update the URL and the Authorization API Key as before.
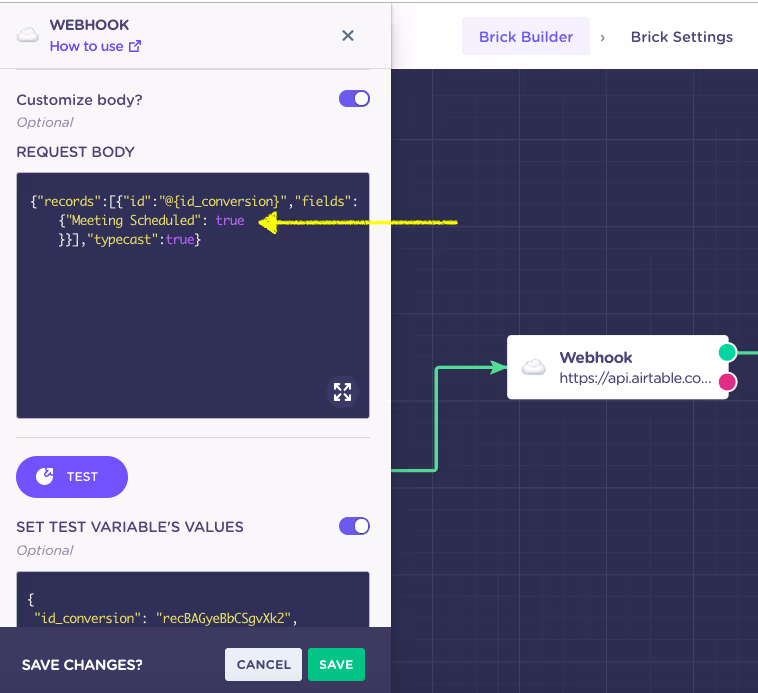
Next, scroll down to the “Customize Body” section.
This section is pre-set. However, if you changed the questions and the variables associated with these questions, you will need to interfere here.
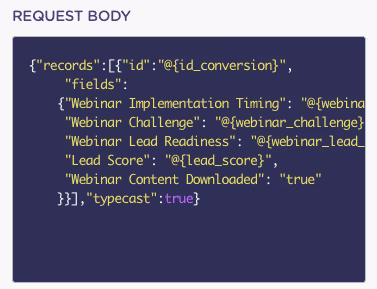
In the template, you can see we are updating the newly collected data:
- Implementation Timing – @webinar_implementation_timing
- Challenge – @webinar_challenge
- Lead Readiness – @webinar_lead_readiness
- Lead Score – @lead_score
- Webinar Content Downloaded – true
The bolded text represents the titles of the columns which we added to our Airtable. Each of them is associated with a specific variable.
In case you are making changes, do follow this format and make sure the names of columns in request body fit the actual column titles perfectly:
{
"records": [
{
"id": "@id_conversion",
"fields": {
{"Question 1": "@variable_1_name",
"Question 2": "@variable_2_name",
"Question 3": "@variable_3_name",
"Lead Score": "@lead_score",
"Webinar Content Downloaded": true
}
}
],
"typecast":true
Once you adjusted the information to be sent to Airtable to fit your use case, scroll down to the “Set a Test Variable Value” field and paste that ID you saved from the first webhook test:

Once done, click TEST. If everything is OK, you will recessive 200 status response and no new row will be created in the sheet as the information will be updated to the existing test row.
Click SAVE and move on.
Divide Leads Based on Score
Next, there is a conditional logic block. This is where you decide which participants continue to the conversion brick and which ones to the nurturing brick.
If you maintained the same scoring system, there is nothing to change there. Though if you made changes, you must adjust the condition to reflect your idea of a qualified and unqualified lead.
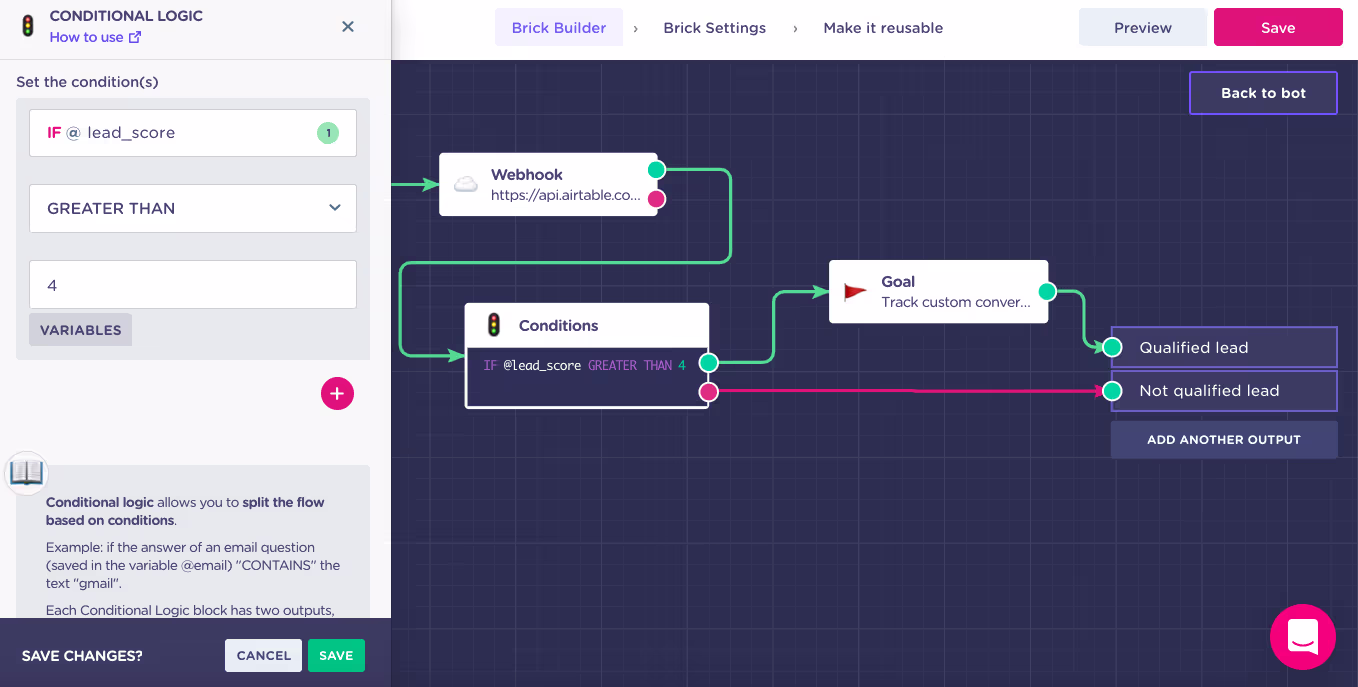
NOTE: Notice that when a lead is deemed qualified, there is an extra “Goal” block which will help you to track how many users passed through this path in the internal Landbot analytics.
Now it’s time to move on to the next brick!
6. Convert Lead
Enter the “Convert Lead” brick.
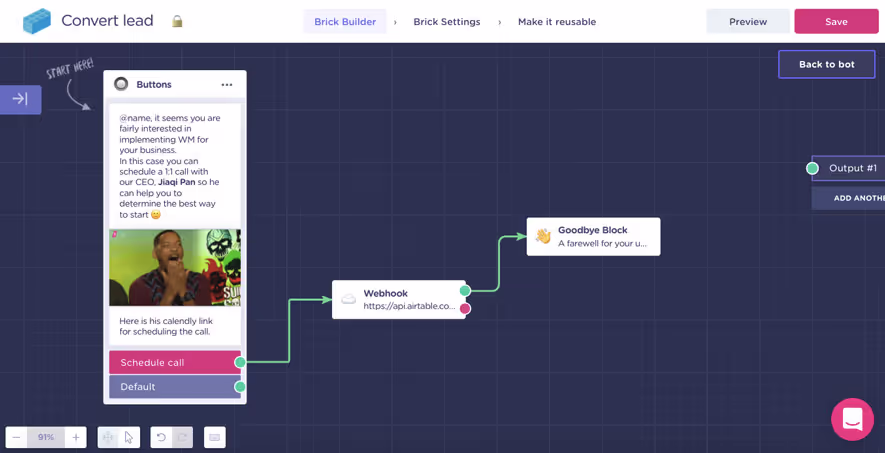
The template features one main buttons block that entices the qualified lead to schedule a meeting. If this is the main goal of your conversion process, simply adjust the message and edit the “Schedule Call” button to link to a calendar (e.g. Calendly) which allows the user to book a slot.
TIP: If the end game for you is an actual transaction, you can improvise and use the Stripe integration which allows the user to complete a purchase without leaving the conversation. The Stripe integration is SCA-ready and supports the 3-D Secure protocol so it’s completely safe.
After your lead completes the key conversion action, the Airtable webhook following it ensures the action is logged into the database. To optimize the webhook, follow the same steps as before.
Change details in the request body only if the conversion action is different from the “Schedule Meeting”.
Either way, do remember to:
- add this column (“Schedule Meeting” or otherwise) to your spreadsheet
- Update the test ID in the “Set Test Variable Values” field for the test to work
Last but not least block in the sequence is the goodbye block.
Click on it to access the editor and decide how it is you want to say goodbye to your new customer.
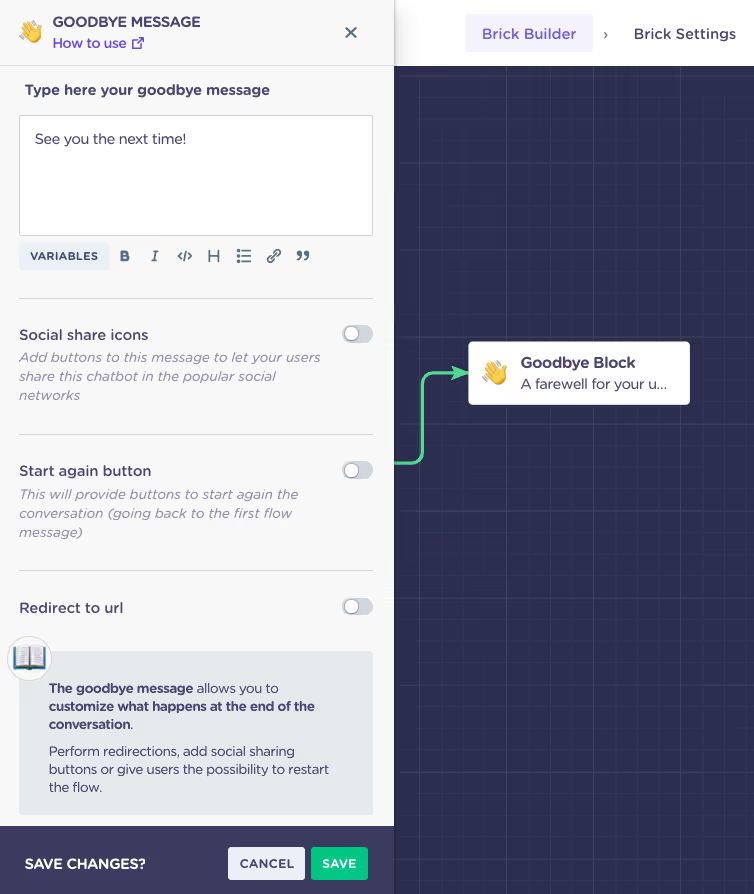
In the Goodbye block, you can:
- Customize the Goodbye message
- Include Social Media Share Icons
- Activate the “Start Again” button (maybe bot applicable in this situation)
- Automatically redirect the customers to a URL
The limit is your imagination!
7. Nurture Lead
Next, turn your attention to the “Nurture Lead” brick.
As you can see the flow inside is pretty simple.
The reason?
Nurturing can widely differ from business to business.
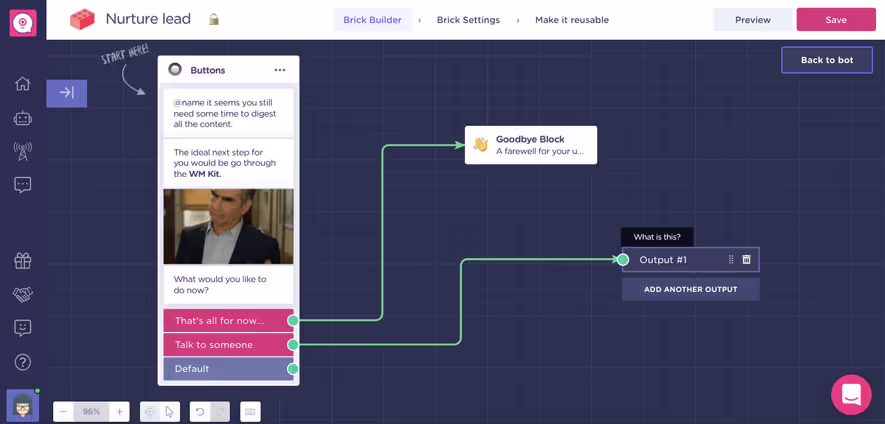
The template suggests the lead to review the WM Kit and then proceeds to inquire about what the lead would like to do next:
- That’s all for now
- Talk to someone
If the user chooses the first option, he or she is directed to a Goodbye message which you can customize according to your needs:

The other option leads the prospect out of this section of the flow to the “Contact Us” brick.
You can keep the nurturing brick as is only adjusting the copies or take the opportunity and apply your own nurturing sequence. For instance, you can:
- Share more educational material
- Offer a free demo/sample
- Export the email to your nurturing mailing list using Mailchimp integration
- Offer users to opt-in for updates via WhatsApp or Facebook Messenger bot and thus giving you direct & instantaneous communication line
- Export lead details to Salesforce using direct Salesforce integration
- Etc.
Once you are happy with your nurturing setup, move on to the last brick (if you want to keep it that is).
8. Contact Team
The “Contact Team” brick is the same as used in the webinar registration and engagement bots.
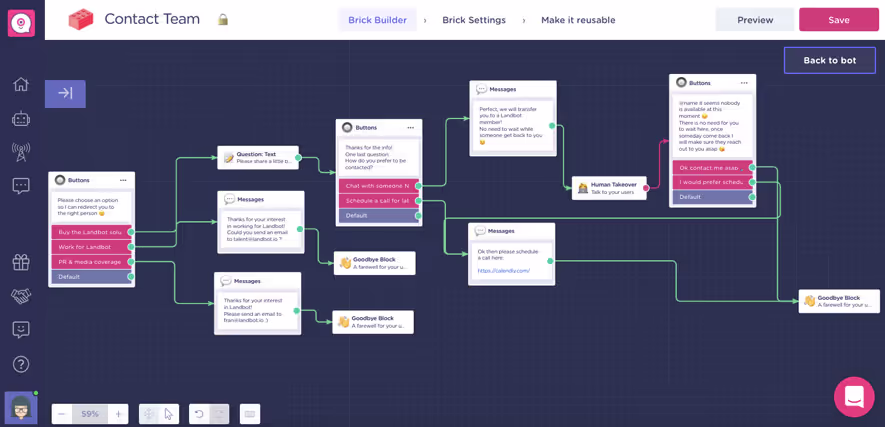
In essence, it helps you narrow down the reason for getting in touch and in doing so directing the lead to the right person instead of sending them from one department to another in frustration.
Go through the flow and adjust it to fit your content procedures. You can take advantage of the bot-to-human handoff, offer to schedule a call, introduce a WhatsApp opt-in for the user to be contacted later via the messaging app, or just offer an email address for a specific department or person within the department.
9. Review & Preview
Before you run the share your webinar conversion bot, make sure to review, preview, and test every branch of the flow. Ensure that there no dead ends, awkward sentences, and that all integrations work as intended:
This is it.
Now it’s your turn 😉


.avif)
%20(1).png)
.avif)