


.svg)
Please note that 'Variables' are now called 'Fields' in Landbot's platform.
2020 kicked off with great AI hype as the stats place it among the top marketing strategy priorities. But happens away from the graphs and charts of carefully compiled research papers? Is AI actually able to affect your marketing reality today? This article leaves the theory behind. See for yourself… Dive into a step-by-step guide to building an AI lead generation chatbot without writing a single line of code.
What Will You Learn Here?
- Build a conversational AI lead generation chatbot without coding
- Analyze natural language inputs in Dialogflow
- Retrieve data from natural language inputs
- Use follow-up contexts in Dialogflow
- Validate email through API (without coding)
- Store data via Google Sheet integration
- Receive qualified lead notification through Slack integration
- Improve the response rate with targeted Human Takeover
- Set up conversational WhatsApp Opt-in

Lead Generation - 2020 AI Expectations
The more saturated the market grows, the greater the consumer demand for personalization. Indeed, marketing challenges are getting ever so though. Email marketing, social media marketing, video marketing, influencer marketing... are all trying to keep up through automation but that only works to a certain extent.
Thankfully, in the dawn of the pressure to deliver customized experiences in real-time, marketers call out to Artificial Intelligence (AI) for rescue.After all, AI is the newest, hottest trend out there!Or is it?
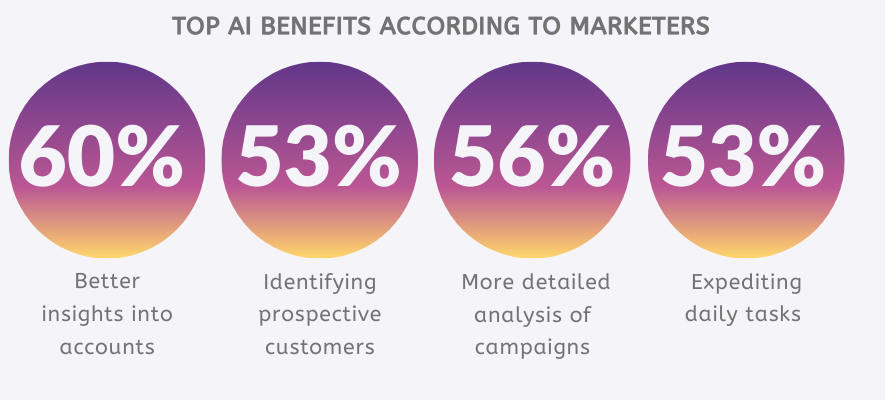
A survey conducted by Demandbase at the end of 2016 revealed that marketers already believed there and then in the potential of AI to personalize customer experiences. Among the top expected advantages, they listed better insights, access to more detailed analysis, prospective client identification, and the streamlining of daily tasks.
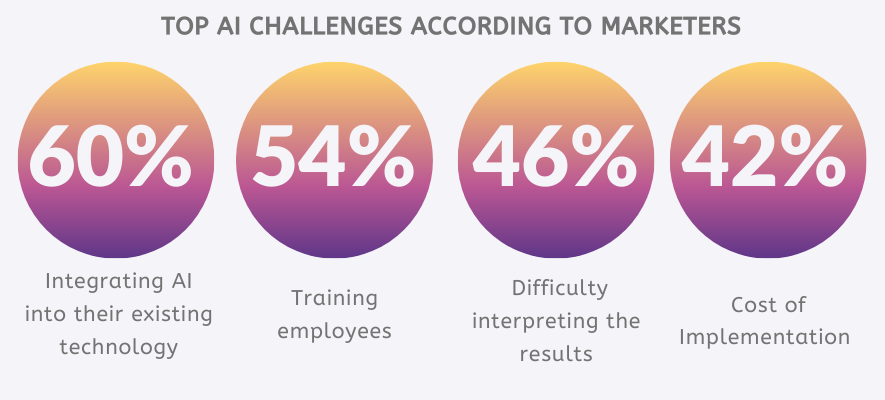
On the other hand, the most feared challenges marketers expressed in that same survey featured integration the AI into the existing technology, training the employees, experiencing difficulty with processing and interpreting the results and, lastly, the cost.
Even in 2020, many small and medium businesses, freelancers, or marketing agencies shy away from AI in fear of overwhelming cost and complexity that will eat away from ROI.So why the fuss?
What if I said that the answer to “How to use AI for lead generation?” is no longer a question of painstaking coding? What if I said that building a conversational lead generation bot has to be neither costly nor time-consuming?
Thanks to incredible advances in no-code tools, AI technologies are becoming financially and skill-wise accessible to a wider pool of marketing professionals, especially when it comes to virtual assistants. And so when it comes to marketing and lead generation process, the prevailing 2020 AI hype and fuss is pretty justified.In other words, any marketer, freelancer, or advertising agency can independently, and in a timely manner create and launch campaigns driven by an intelligent chatbot for their company or client.
And I - a content marketer with zero to no coding experience - am going to show you how to build a conversational AI lead generation chatbot that not only engages potential customers but also helps you generate leads by personalizing and streamlining the communication.
How to Build an AI Lead Generation Chatbot without Coding
No-code tools like Landbot empower marketers and freelancers to create intelligent bots for the web or WhatsApp and in doing so enabling them to compete against companies with significantly greater resources. Naturally, some level of learning is necessary to understand the concept of conversational design and dialog structure as well as the features and capacities of the marketing tool in question. Still, the control and flexibility gained in the process are priceless.
So, here we go!
1. The Basics
Before we get started it’s important to clarify the role of AI in chatbots.
When we talk about conversational AI, we really talk about Natural Language Processing (NLP). NLP is only a small subdivision of Artificial Intelligence, a division dealing with linguistics and natural language. Thanks to NLP, the bot can break down, process, and identify the intent data behind natural language inputs. A higher level of AI in NLP includes sentiment analysis which is particularly important for bots handling conversations where emotions play a key role such as customer support.
Next, an NLP bot may but doesn’t necessarily have Machine Learning (ML). If it does, the only difference is, it’s able to learn from its own experience. However, most NLP bots require reviewing and “manual” training.
2. The Tools
Well, to build our AI, or better said, NLP lead generation bot we will make use of two tools: Landbot (visual chatbot builder) and Dialogflow (Google’s NLP solution). Natively, Landbot allows users to build no-code rule-based chatbots that take users through a structured dialog tree and don’t leave much space for improvisations. While this kind of bots can’t really be called “smart” they are incredibly effective and allow for a great deal of personalization through the use of conditional logic, keyword recognition and more.
👉 How To Create a Chatbot with Landbot: No-Code Tutorial
Dialogflow is a natural language processing engine that allows you to train agents to analyze and recognize user intents written in their natural language. You train the agent by introducing so-called “training phrases” which are, essentially, phrasing variations of asking a specific thing. While it’s great for processing natural language, it lacks a comprehensible interface and to launch a bot knowledge of code is necessary.
👉 How to Create a Chatbot with Landbot's Dialogflow Integration
That is unless you use Landbot Dialogflow integration thanks to which you can have the best of both worlds: visual builder with NLP functions. Plus, Dialogflow is free if you don’t need the sentiment analysis - which you don’t, to be honest.
3. Landbot: Click to Create a New Bot
First of all, you need to sign up (or login) to access your Landbot dashboard. Once there, click to create a new bot from scratch.
You will be taken to Landbot’s no-code builder interface.
4. Landbot: Setup Welcome Message
The interface will welcome you with a default welcome block. This is where we get started.Information is the Welcome block is what the user sees when he or she opens the bot. It’s a great opportunity to set the “rules” of the conversations and manage user expectations.
We will be building a B2B NLP-based lead generation bot that collects key qualifying information from every visitor who is interested in a service and wants to get in touch to either learn more about the product or make a purchase/subscription.
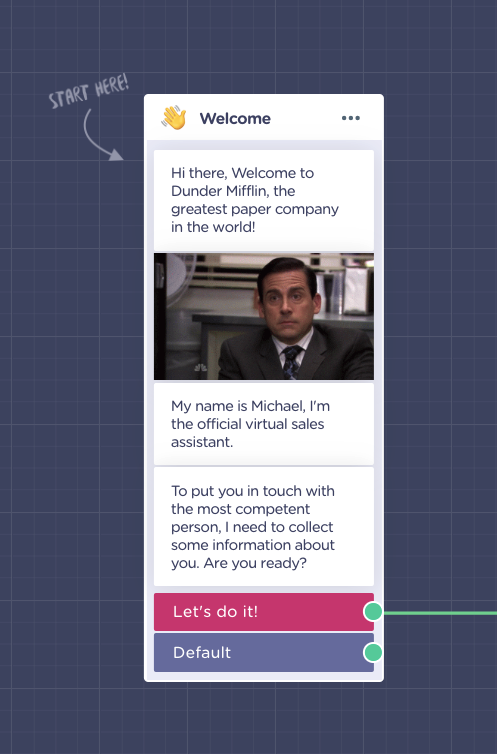
In the first round of conversational exchange, I offered a simple button response to get things started without any confusion.
5. Landbot: Start the Conversation on Your Terms
Next, draw up an arrow to create the following block, in this case, “Name” block to ask for the user's name.
Even if I am using NLP to decipher natural language inputs, I still want to remain in charge of the conversation and serve the customer as quickly as possible.
So, create the "Name" block BUT change the existing @name variable and create a new one with a more generic name such as @user_input. Since the user has the freedom to write freely, they might respond in a full sentence or not provide all the information you need. Hence, saving this under a general variable will enable us to send it to Dialogflow which will break down the input and send us clean data back.
6. Landbot: Setup Dialogflow Block
This is where things get interesting.Draw an arrow from the Name block to finally set up the Dialogflow integration block.Once you do that, you’ll notice that to start configuring the block you first need to upload a JSON Key.
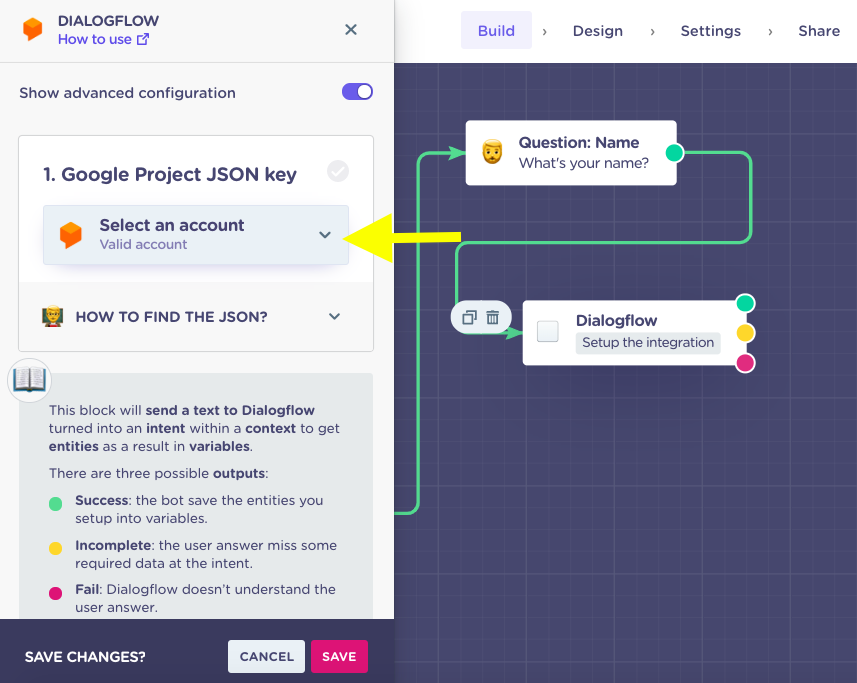
JSON key is a data file that enables Landbot to communicate with a specific Dialogflow agent. It’s pretty easy to set up.
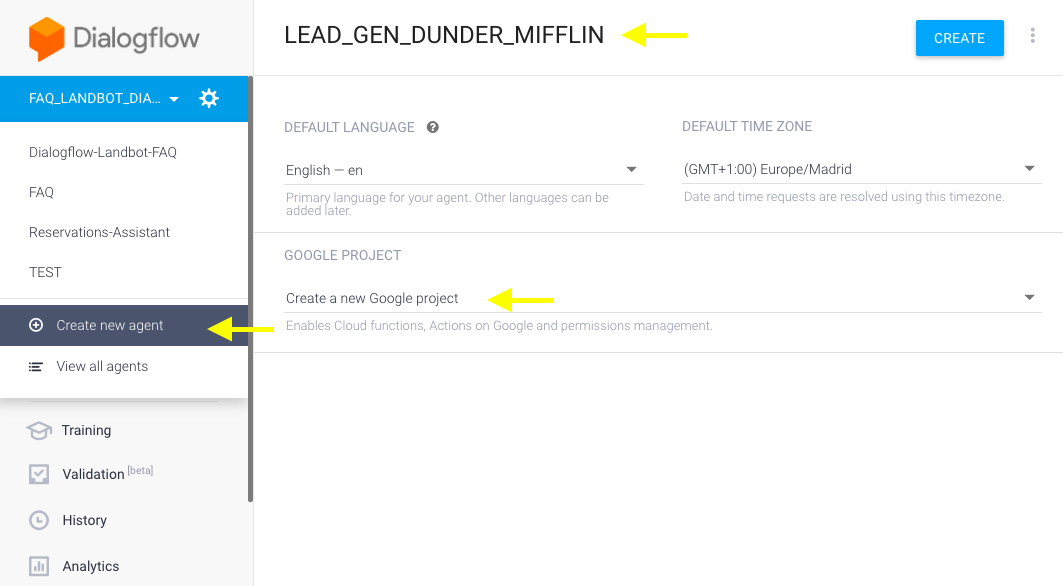
7. Dialogflow: Create New Agent
To retrieve a JSON file, you need to login to your Dialogflow account. If you don’t have one, you can set it up for free. (Credit card info is required just make sure you are a real person but no charges will be taken.)
An agent in Dialogflow is basically another word for a chatbot. So click "Create a new agent". Then, fill in the name and associate your agent with a new Google project.Click “Create” to confirm.
8. Dialogflow + Landbot: Download JSON Key & Upload it to DF Block
Now, to retrieve JSON, select the settings of your newly created agent and click on the link in the Service Account field.
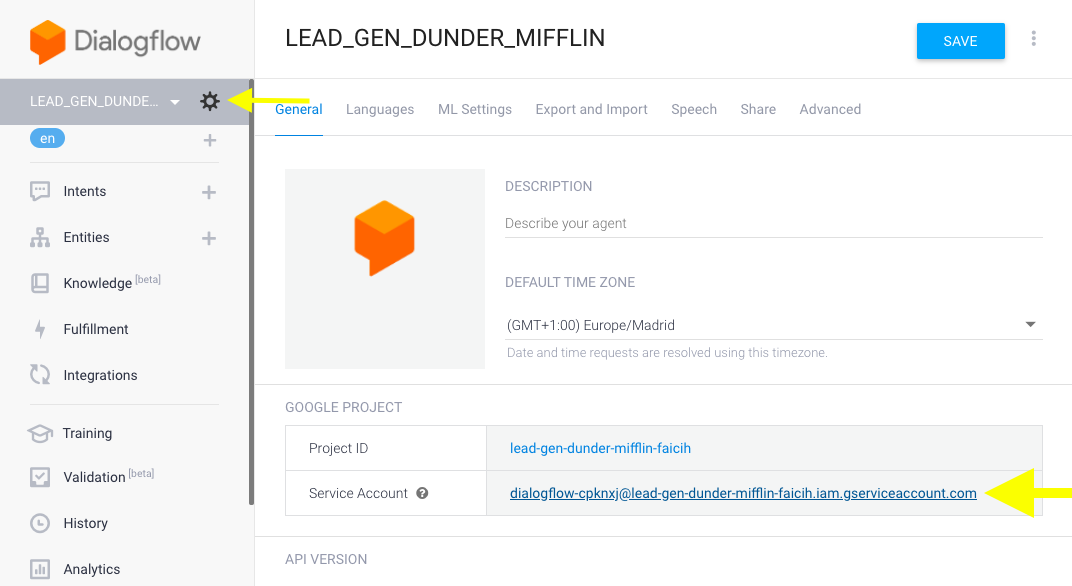
You will be taken to Google Project where you can download the JSON as follows:
Then simply go back to the Landbot builder interface and upload the downloaded file to your Dialogflow block:
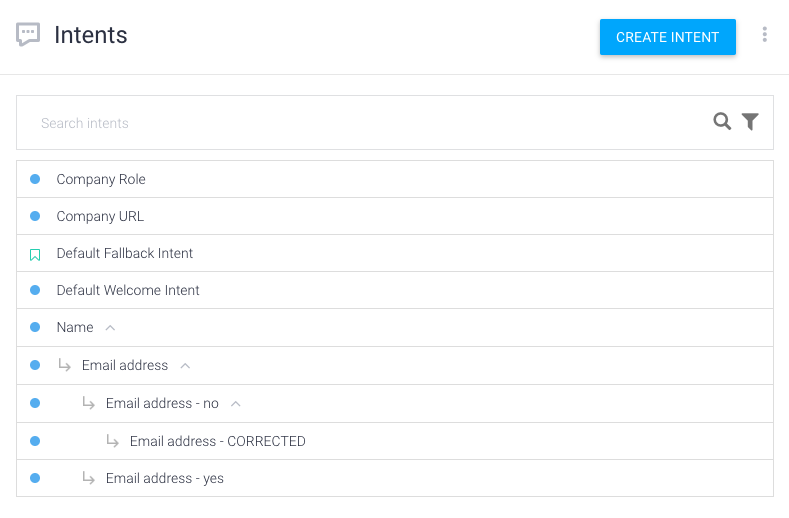
9. Dialogflow: Create Intents
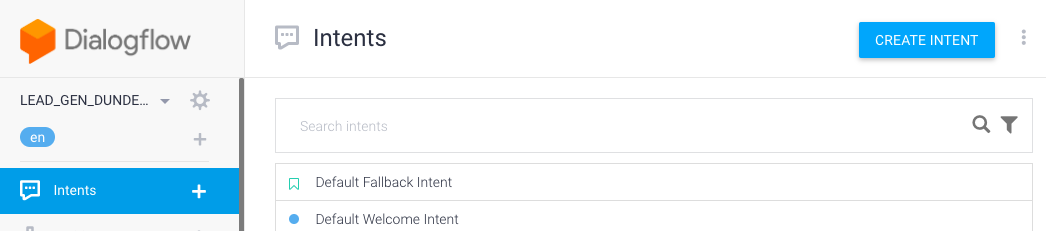
Intents are subsections of your agent that help it identify what the user is saying. Dialogflow gives you two predefined intents: welcome and fallback. Welcome intent responds to pleasantries and fallback intent is activated when the agent fails to identify the intent - you can edit and improve them as you please.
So, since my first question was to ask for a name, that will be the first intent I’ll create.Normally, an agent would identify users' questions or requests. But since I turned the process around by asking the question first, I’ll use user responses to help me identify the intent and move on to the next question. So, each chatbot response will include the next question - it makes the process much more straightforward.So, what helps the DF agent to identify the intent are the training phrases. In other words, different ways you can ask or say the same thing.
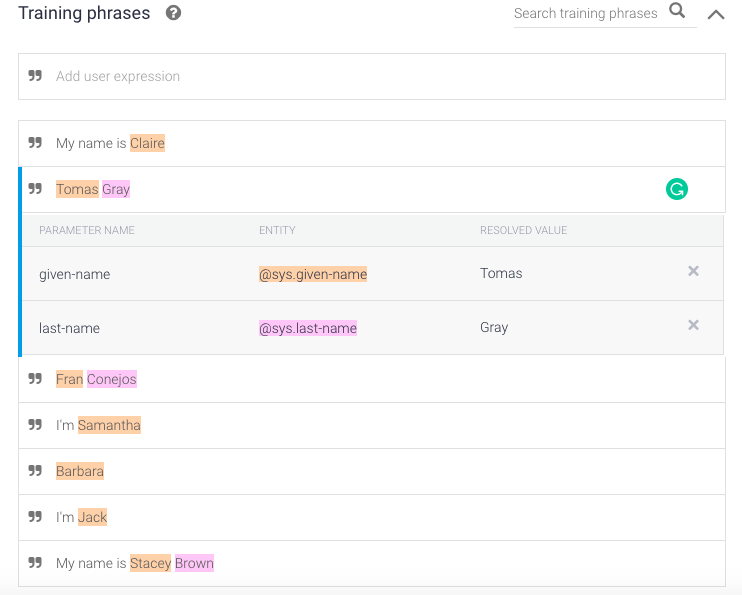
I want my agent to identify and differentiate between persons first and last name and not let the conversation proceed without obtaining both.
Hence, using predefined Dialogflow system entities, I train the bot to capture first and last name separately. Since this is a system entity, I don’t need to teach it all the names. The agent will recognize them automatically.
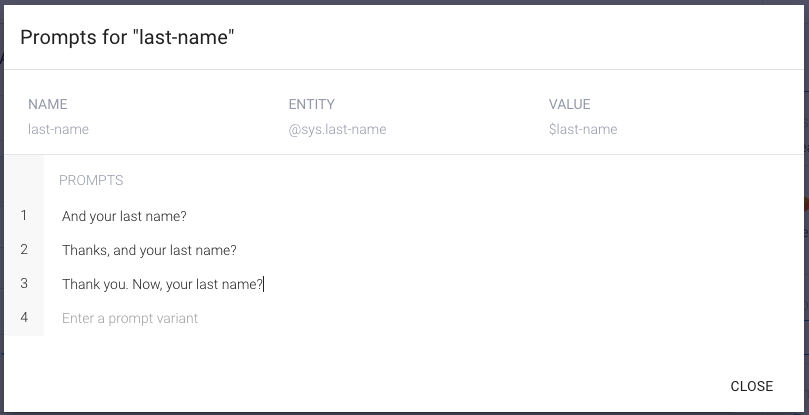
Note: The system entity only recognizes common English names so, if you expect leads from other countries you can always add new values (names) to expand the scope of the system entity. Next, to ensure the user won't move on with the conversation before the bot has his or her first as well as last name, mark the two as REQUIRED.

And in case the information is not submitted on the first try, defined prompting phrases:
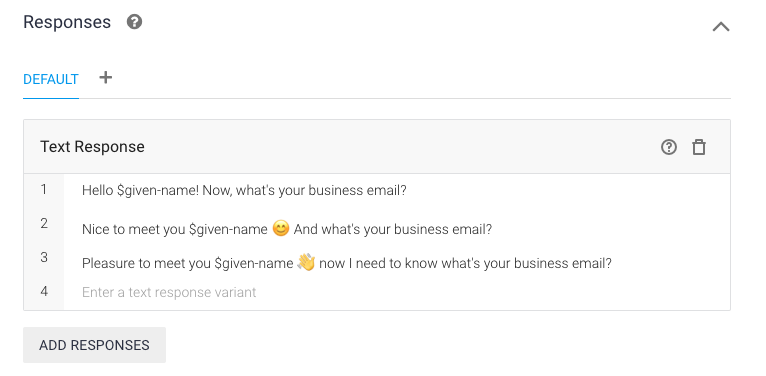
Last but not least, we identify the agent's final response - response after all the required entities have been collected.I wanted to acknowledge the submitted information while moving on to the next bit of data. Therefore, I trained the agent to call the user by name as well as propose the next question:
On the right side of the Dialogflow interface, you can check if the training worked.
Remember, this way you are not only getting clean data but also weeding out low-value requests where no real name or last name are provided.
10. Landbot: Setup the Rest of Dialogflow Block
Now that we have something to work with, we can set up the rest of the block and test the interaction in the same environment as the end-user.
Don’t worry, we are going to create more intents to make things more interesting but for the sake of setup, it’s better to show you this right away, while it’s all fresh in your brain.In section number 2 of the DF block (Setup the request), the only thing you need to do is define the Intent Text. Remember how we changed the @name variable to @user_input?Well, this is why!
You send it in as user input and get it back as nice and clean @first_name @last_name without any of the unwanted extras of the natural language.

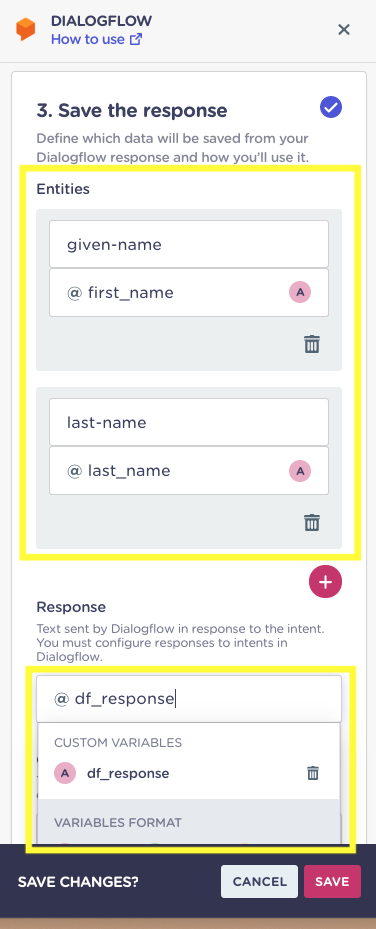
In part 3 of the DF block (Save the Response), you need to primarily define which entities you want to bring back to Landbot AND create a variable to pull the agent responses you defined in Dialogflow console.a
Ok.. these are the basics… but lead generation efforts are about more than just getting the first and last name. So, let’s collect a bit more info.
11. Dialogflow: Email Intent (Custom Followup)
Contexts allow your agent to remember entered data for a specified number of exchanges within the conversation. E.g. imagine you ask:What’s the weather in New York right now?
The bot answers and then you ask “And time?”For the bot to remember what you are talking about it needs to work under a context - in this case, the city context. The same goes for booking a meeting. The bot needs to understand that pieces of information such as at what date and what time and with whom - fall under the same context of booking an appointment.
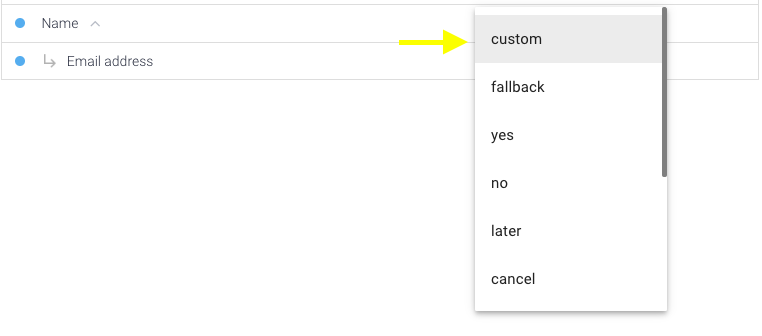
There are two ways to create a context - you can define the context within each individual intent or create a “follow-up intent” that links to its “mother” intent.To create a follow-up, click on the text that appears on the right side of the main intent.

Select the form of the follow-up. Choose “Custom” if you wish to build the follow-up from scratch.
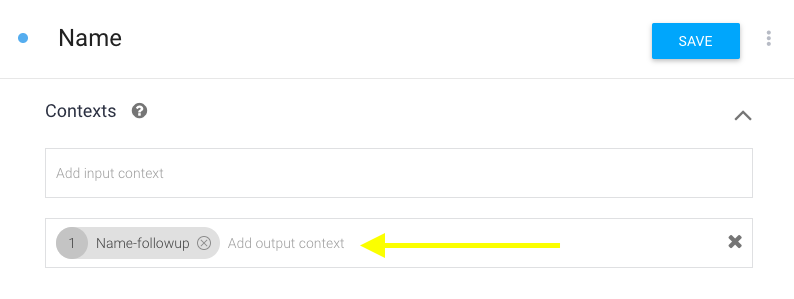
When you click create, Dialogflow automatically assigns an OUTPUT context for the main “NAME” intent:
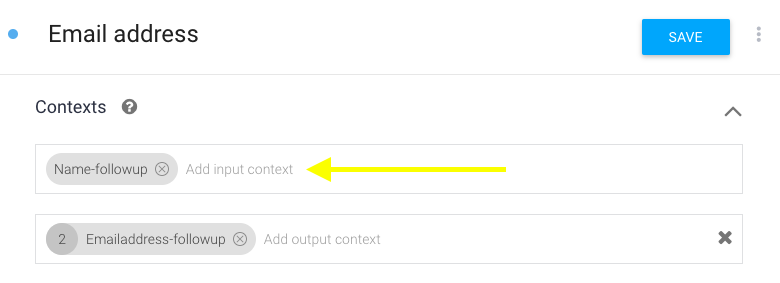
And INPUT context for the newly created “Email address” follow-up intent:
Next, you proceed as usual, defining training phrases, training the agent to capture the email address entity. Again, Dialogflow has a system entity for this, so no need to create one by yourself.

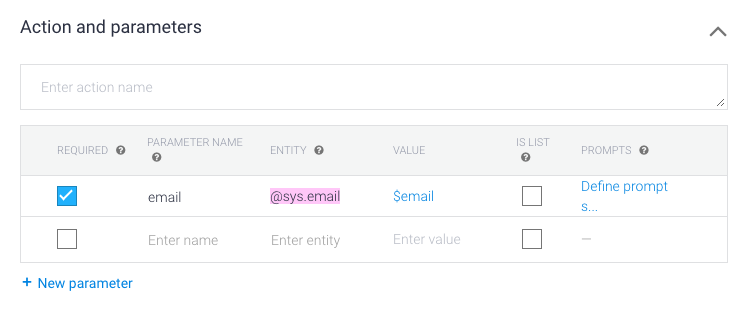
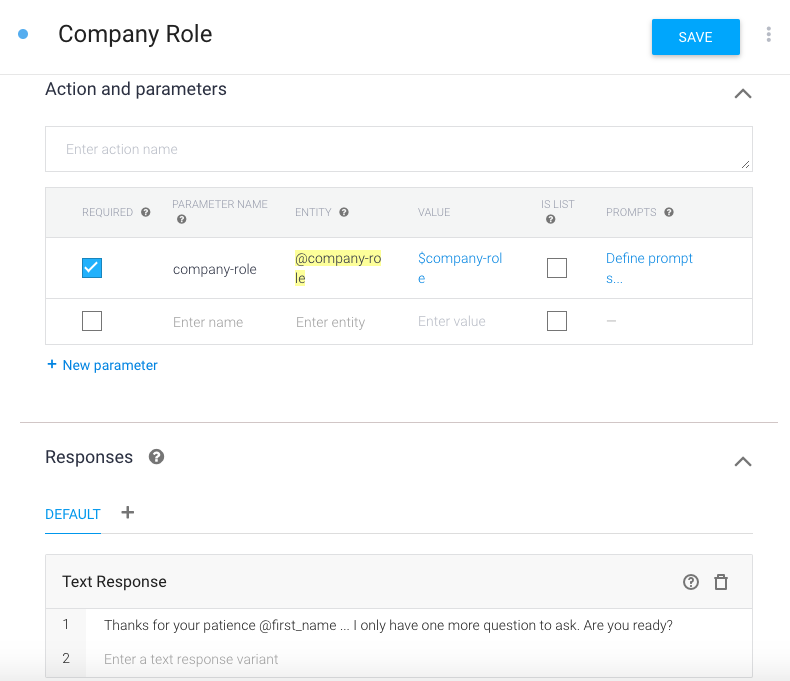
Define the email entity as required in Action and Parameters section:
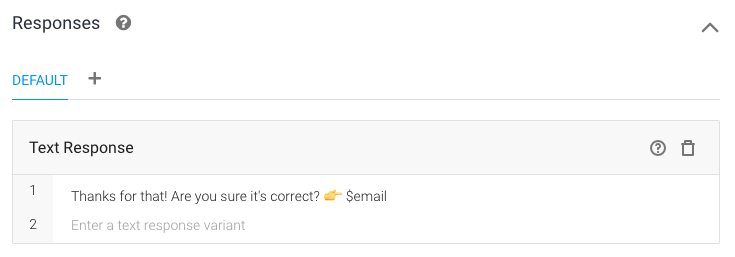
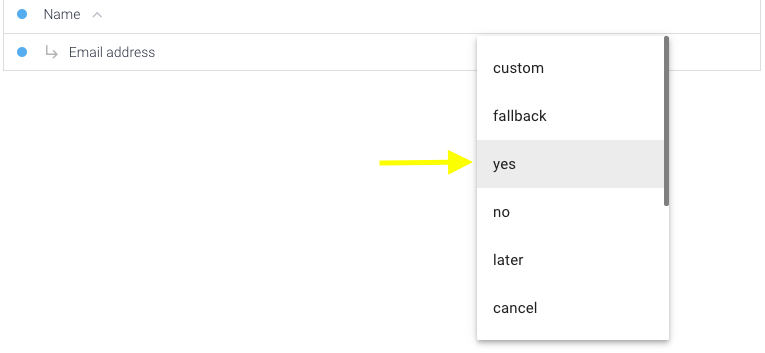
And, at last, define responses… I wanted to give users the option to make sure their email is correct. Here the user can answer YES or NO which gives us an opportunity for another
12. Dialogflow: Offer the Chance to Correct the Email (YES & NO Follow-ups)
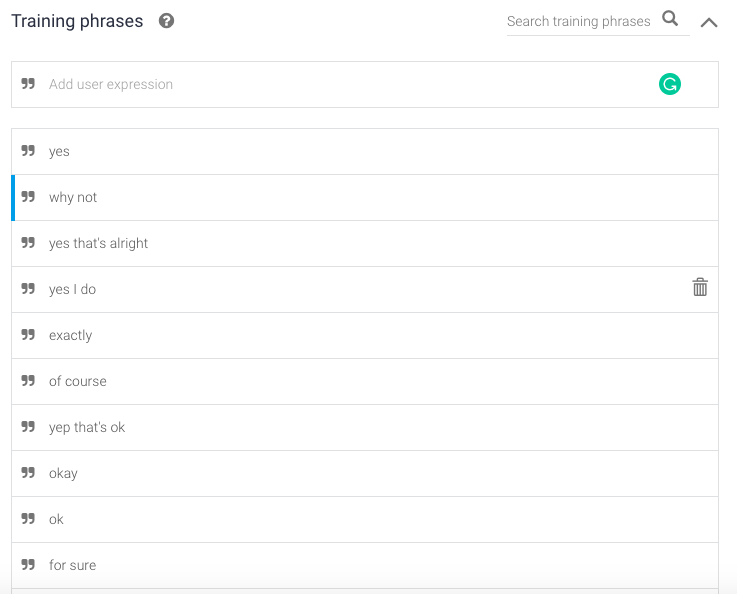
The same way I created the follow-up for “Name” intent, you can create a follow up of the followup to allow the user fix the email address provided.As mentioned before, follow-up intent can be only activated if its main, let’s say “mother” intent, has been activated. So, if a person doesn't provide the name and email first the yes-no confirmation intents cannot be activated accidentally.So, I created follow-up YES and NO intents for the Email Address intent.
The advantage of using these specified follow up intents (apart from the “custom” one) is that they come with predefined training phrases, saving you a great deal of time!
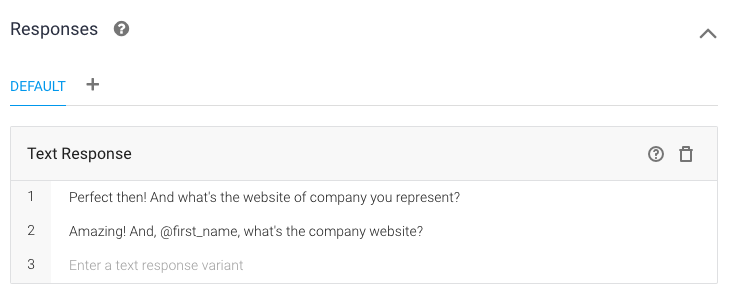
With a positive confirmation, the user will be prompted to answer the next question.
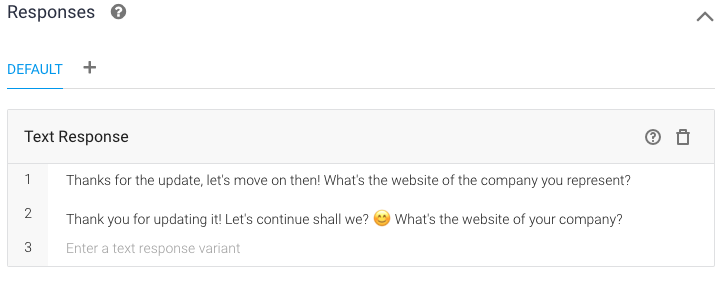
But what happens when the users answer “No, I made a mistake….” and activates the no-followup?Our agent will ask the user to retype the email. In the backend, it means we need to create another followup for the “No” branch on the conversation that accepts the corrected version of the email and only then asks another question.

Once again, I trained it to recognize email address as an intent trigger and designed a response that prompts the conversation further
13. Dialogflow: Create Your Own Entity
In a lot of cases, you won’t need to create your own entities but still, the option will come extremely handy in others. You can create entities that represent product or price groups, product sizes or quantities... anything really.
Our final intent in Dialogflow will be asking for the user’s role/position within the company. So, we need our agent to be able to recognize when someone shares their role.Click on the “Entities” section in the left side menu.

Next, click “CREATE ENTITY”.On the top, you’ll need to define the entity name in low caps and without spaces.I selected to define synonyms for the entities as well as to activate fuzzy matching.
Synonyms mean you can group various answers under the same entity value. In our example, we are not interested in the precise role of the user but rather his or her level of responsibility within the company.So, whether the user enters that they are a CEO or a CMO, the bot will classify it as “C-Level”.
Note: If you prefer to identify each value separately, simply de-select the synonym option and just write down all the possible values you want to consider.
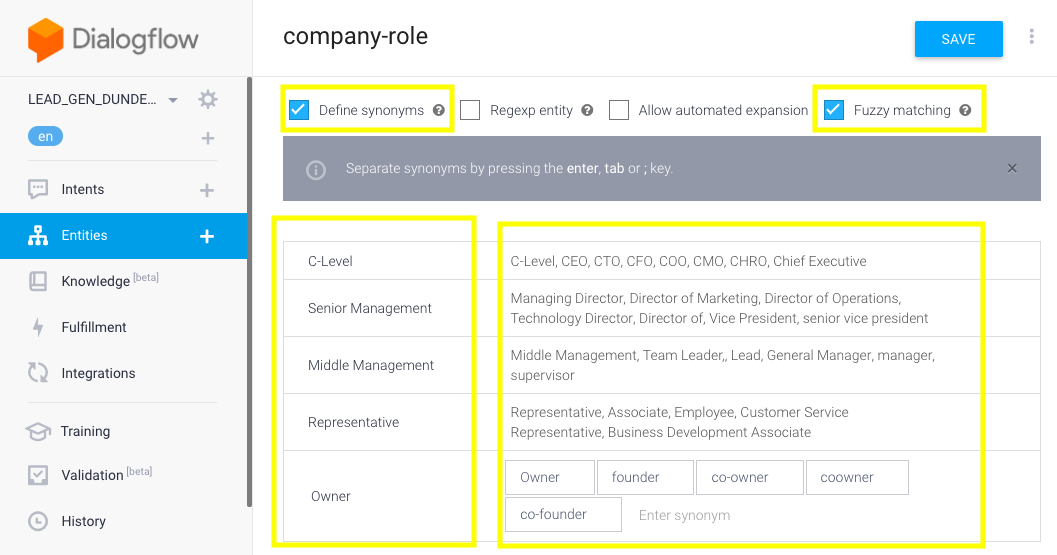
Enabling “Fuzzy matching” let’s the bot recognize words despite typos. Hence, if someone types “managr” the bot will know it means “manager”.
Now, it’s the time to take the party back to Landbot builder… I know, I did end the last intent with a question, that’s because I have one more question, but that one is better handled in Landbot with button responses.To give you an overview, our final set of Dialogflow intents for our lightweight no-code AI lead generation bot includes:
14. Landbot: Make Sure DF Responses Appear on Landbot Interface
Dialogflow block in Landbot has three different outputs: Green, yellow and pink.To make the two tools cooperate, you need to draw an arrow from each of them and create the “Questions - TEXT” block.
First, substitute the question in the “Question text” field with the variable we chose to represent Dialogflow responses - @df_responseSecond, update the “Save answers in a variable'' field with @user_input to ensure every user's new input is sent back to Dialogflow for analysis.
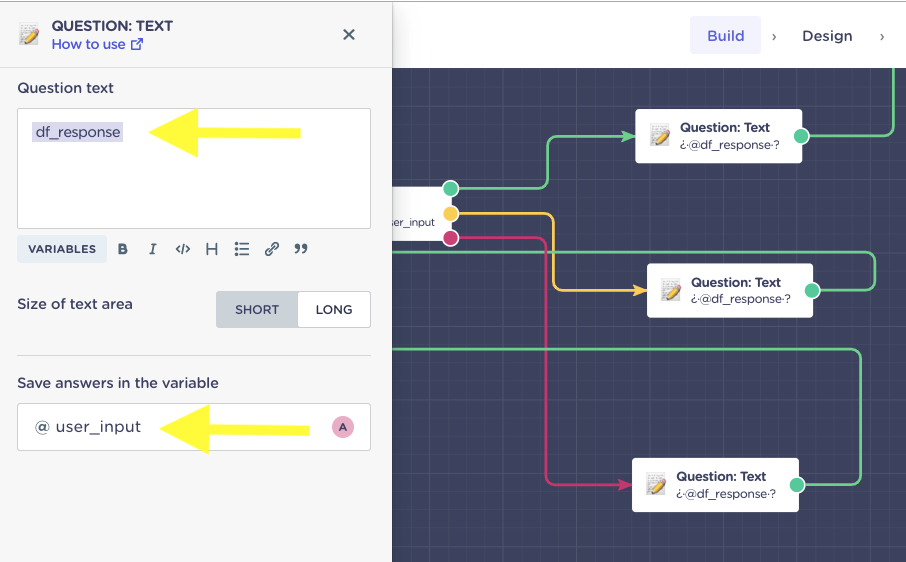
Why do you need to do it three times?When the bot takes the:
- Green route, it means the intent was identified successfully and @df_reponse corresponds to the final intent response
- Yellow route, it means the intent was identified correctly but some of the required entities are missing and @df_reponse corresponds to one of the predefined prompts
- Pink route, it means the agent failed to identify the intent and @df_reponse correspond to one of the responses defined in the “Default Fallback” intent
15. Landbot: Set Up Email Validator
Before moving on to that last question, it’s good to make sure that the email address you are getting is real and valuable.
Under normal circumstances, it would require an experienced coder to create an API connection with a 3rd-party database to achieve email validation. However, that’s not the case with Landbot.All you need to do is:
- Open the menu on the left side of the builder
- Select the “Bricks” option
- Type “Validate Email” into the pop up that will appear on the screen
- Select the relevant Brick and click IMPORT
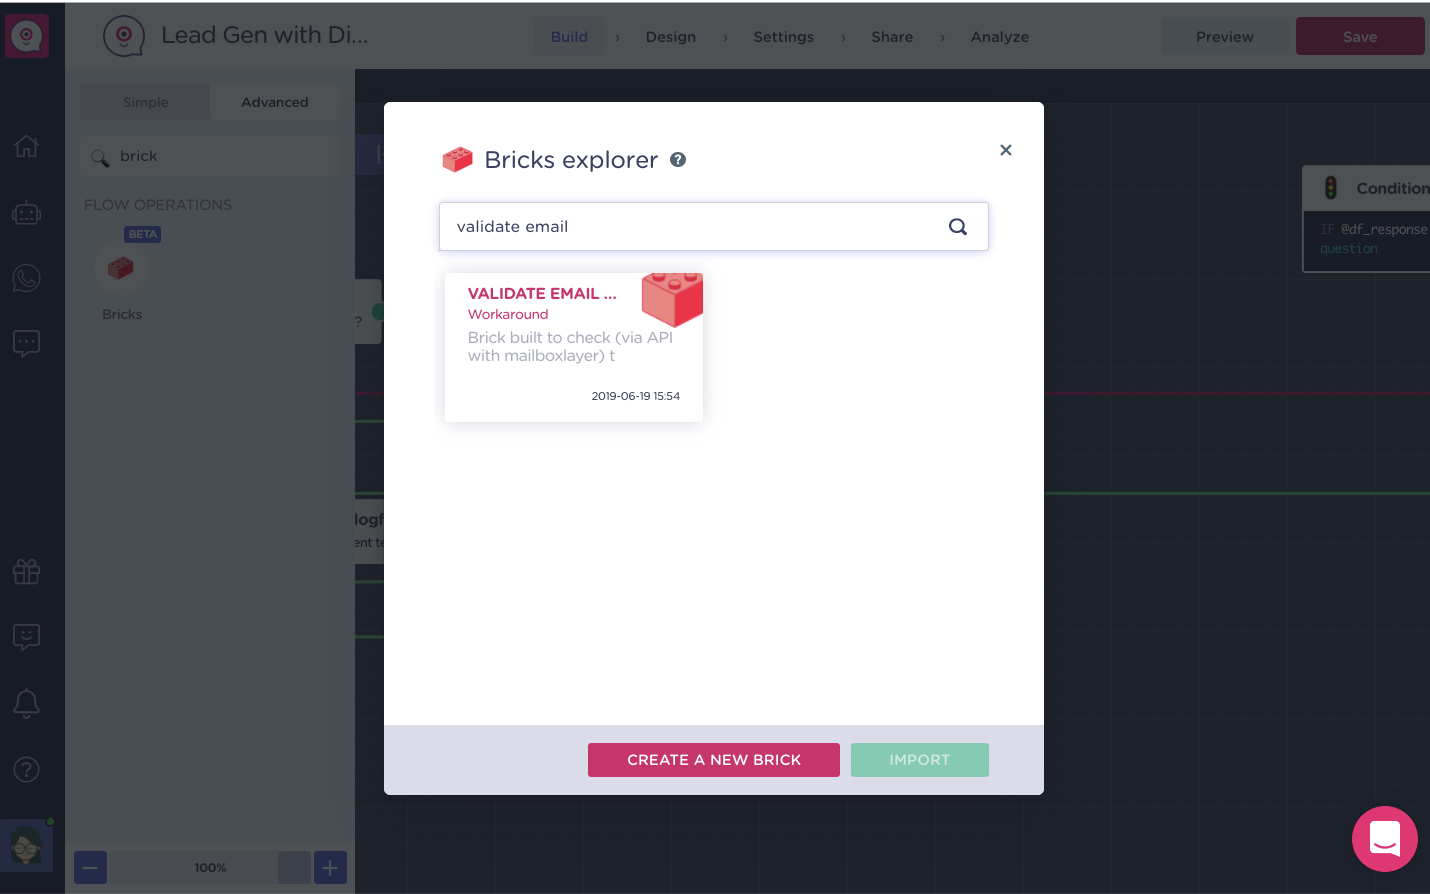
Now, a brick (a collection of landbot builder blocks) will appear in your builder.
Get inside. (If you feel like having a look around, there are some helpful explanatory notes available.)
BUT
We don’t need the whole shebang…
- Tick the “Webhook” and the “Conditions” block;
- Click COPY in the top menu that popped up;
- Exit the brick;
- Right-click anywhere in the main builder and PASTE the two blocks.
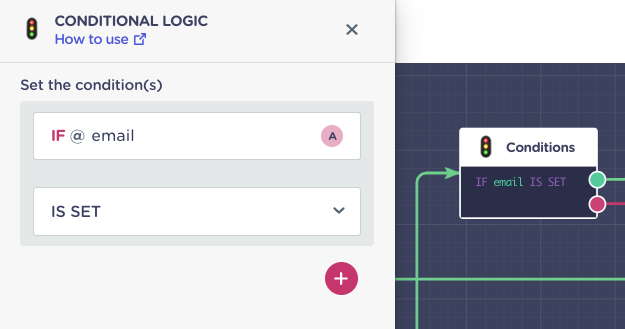
Now that we have all the building materials, let’s bring them together!So instead of looping the conversation back to Dialogflow directly, draw a green arrow and create a new CONDITIONS block and set a simple condition for the instance Dialogflow has retrieved an email address from the natural language input.
Only now link the imported WEBHOOK block to the conversation flow.The webhook is completely configured. All you need to do is make it yours:
- Go to https://mailboxlayer.com/
- Create a free account
- Copy the unique API access key from the dashboard
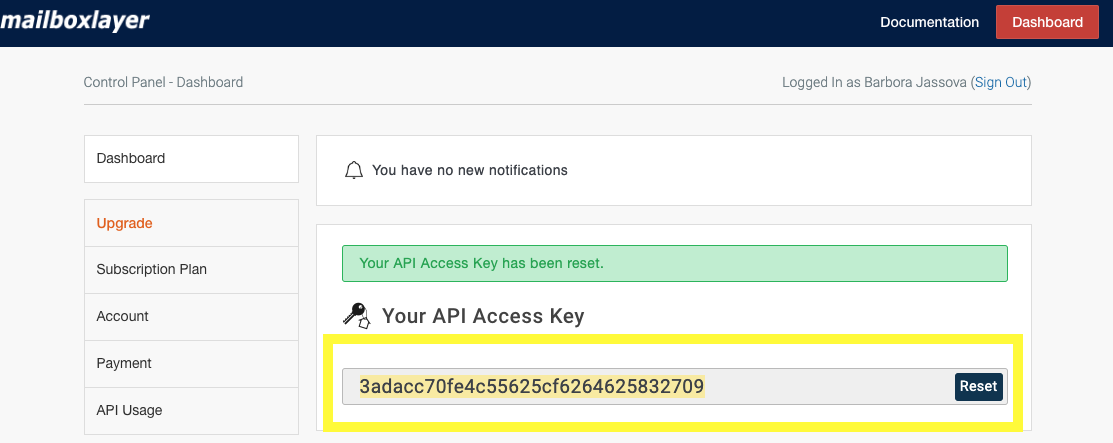
- Paste the key into the designated field in the Webhook block
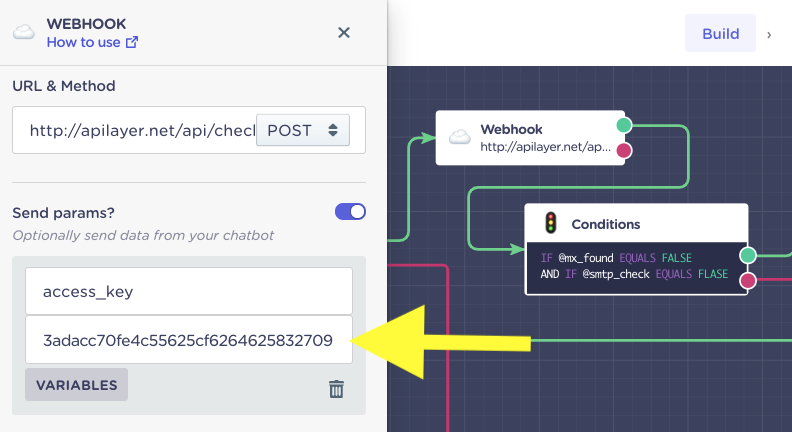
- Scroll down and run a test (The webhook will test using the email tied to your Landbot account).
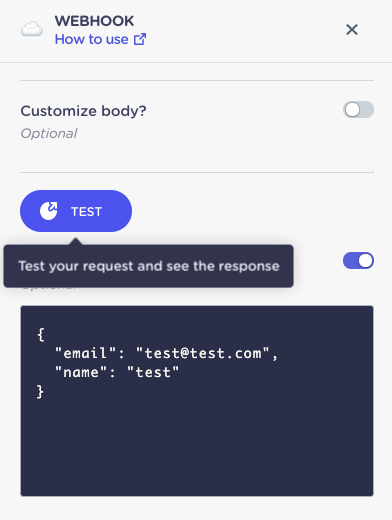
The test response will appear just below allowing you to see the kind of values you can obtain from the validation.
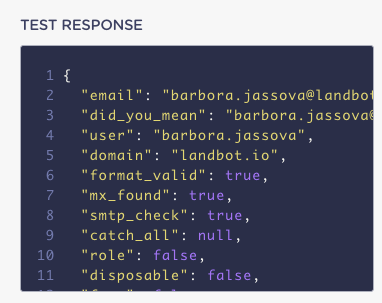
The webhook has been preset to collect almost all of these values that show in the test. It’s up to you which ones you consider crucial to your validation process.In the Save Response section create variables for those you want to keep track of and click save:
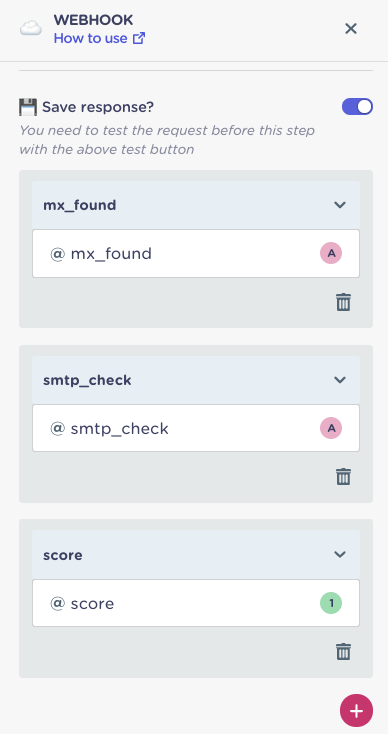
By far, the most important values are mx_found and smtp_check because if these two come back FALSE the email is worthless and doesn’t exist.Hence, right after the WEBHOOK block comes that imported CONDITIONS block.
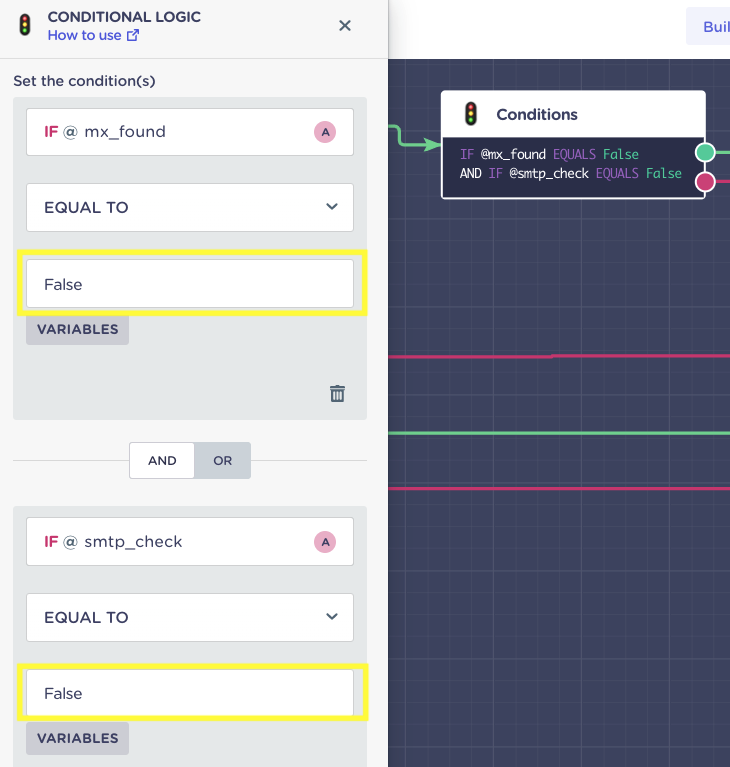
If the @mx_found and @smtp_check come back as False, we will let our visitor politely know that the email they provided is 💩.

This is how it will look in practice:
If the @mx_found and @smtp_check are true the user can continue the conversation.
16. Landbot: Ask that One Last Question (Offer Rich Response)
So, what about the last question?
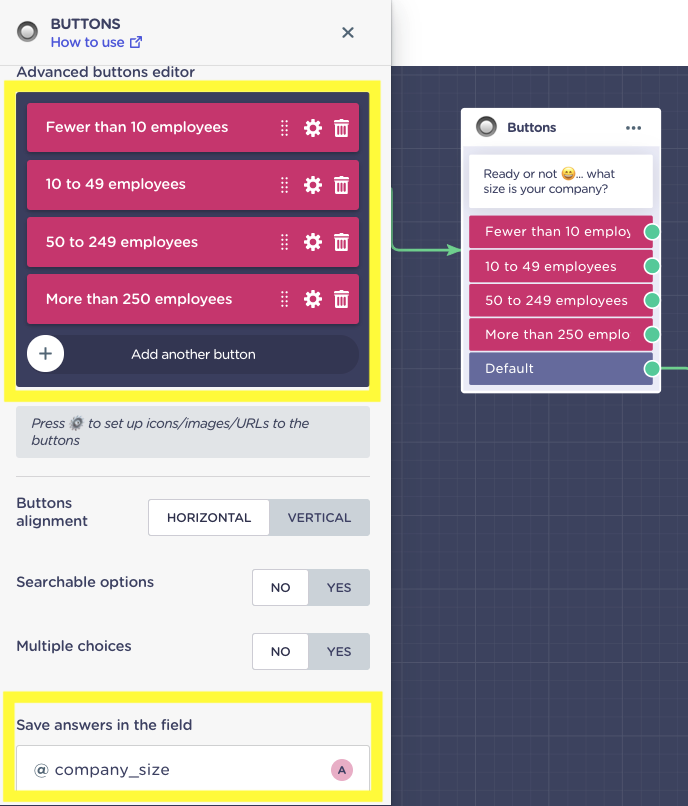
I wanted to ask about the size of the company the user represents. However, since people are likely to respond to this kind of inquiry in a million different ways, it’s better to give them some structure.In such a case, we will add one more condition that will eventually break the Dialogflow NLP loop.
So, IF the email is not yet set (when asking for the user’s name) or if the validation parameters are TRUE, we check one more condition:
IF @df_reponses contains the words “one more question” we KNOW the user has gone through all the intents in Dialogflow and so can now proceed.
The false (pink) outcome of the condition will loop back to Dialogflow conversation BUT the true (green) outcome will continue to a simple rule-based BUTTONS block.
To set up button answers and create a variable to store this type of answer the same way we created variables for DF entities in the Dialogflow bot.
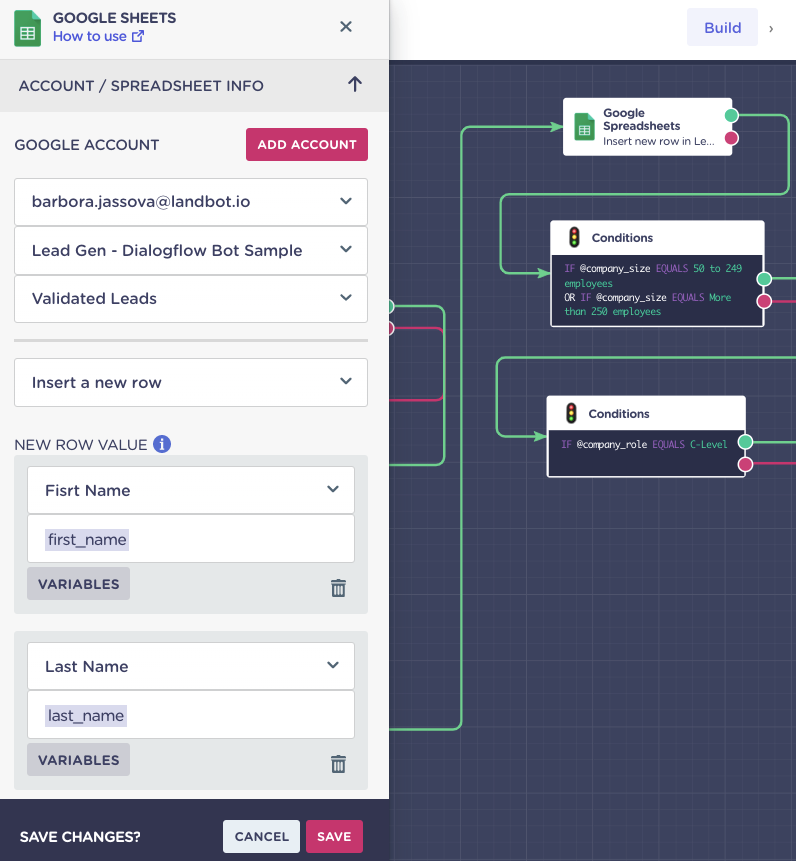
17. Landbot: Store Data on Google Sheets
What else could we do to make this conversational AI lead generation bot rock? Well, we give it more “not-so-smart” features one of which is simple but POWERFUL Google Sheets integration.
- Create a Google Sheet with all the columns you want to collect on your Google drive
- Link it to the Landbot block
- Select “Insert a new row” action
- Assign @variables to corresponding columns
- Done
Below, you can see how the data appears on the spreadsheet:
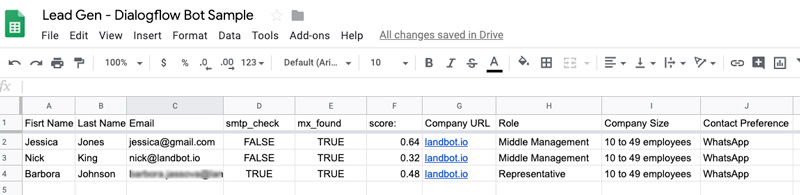
You can see that instances when both smtp_check and mx-found were both FALSE, do not appear on the list. Also, while the mx_found value is TRUE because Gmail and Landbot.io are both legitimate domains, the smtp_check shows that those particular email addresses don't exist or are not configured to receive emails (not active) saving you time trying to contact them.
On the other hand, if a user selected WhatsApp as a preferred mode of contact and passed the phone number validation, their details will be automatically added to your WhatsApp Business Manager lead database.
18. Landbot: Get Slack Notification about Top Leads
How fast you respond to your potential leads heavily influences your conversion rate.
Therefore, to make your NLP lead generation bot ever more efficient, you can create further conditions to pick out the best quality leads and give them special attention.
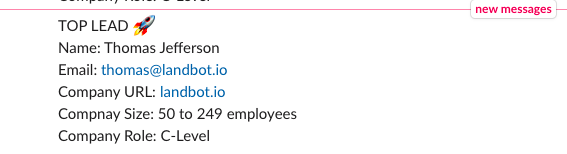
In the case of our sample bot, I set up a condition to diverge on a separate path leads that represent companies with 50 employees or more and the person contacting us is a C-Level decision-maker.
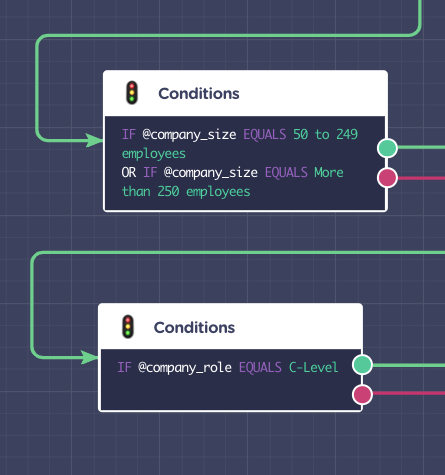
Hence, in an instance a lead of these qualities converses with our bot, I will receive an instant SLACK notification!
Setting up Slack alerts is as hard as setting up the Google Sheet integration - so, not at all.
- Click “Add to Slack" to Connect your Slack Account
- Select person or channel where you want to send the notification
- Configure notification message
- Done

This is how the notification will look in Slack:
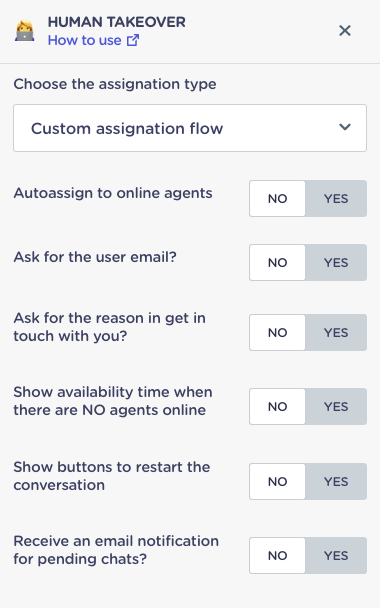
19. Landbot: Arrange Human Takeover for Top Leads
Top leads deserve the immediate attention of your marketing team or sales team.Immediate attention equals setting up a chatbot-human handoff trigger!Draw up an arrow and select the “Human Takeover” block.
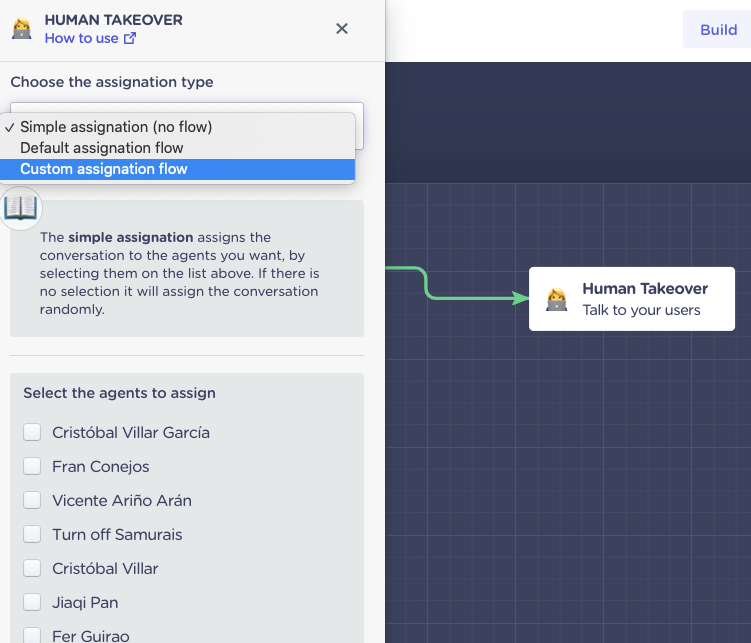
When the block menu opens up you can use the default assignment flow or create your own.
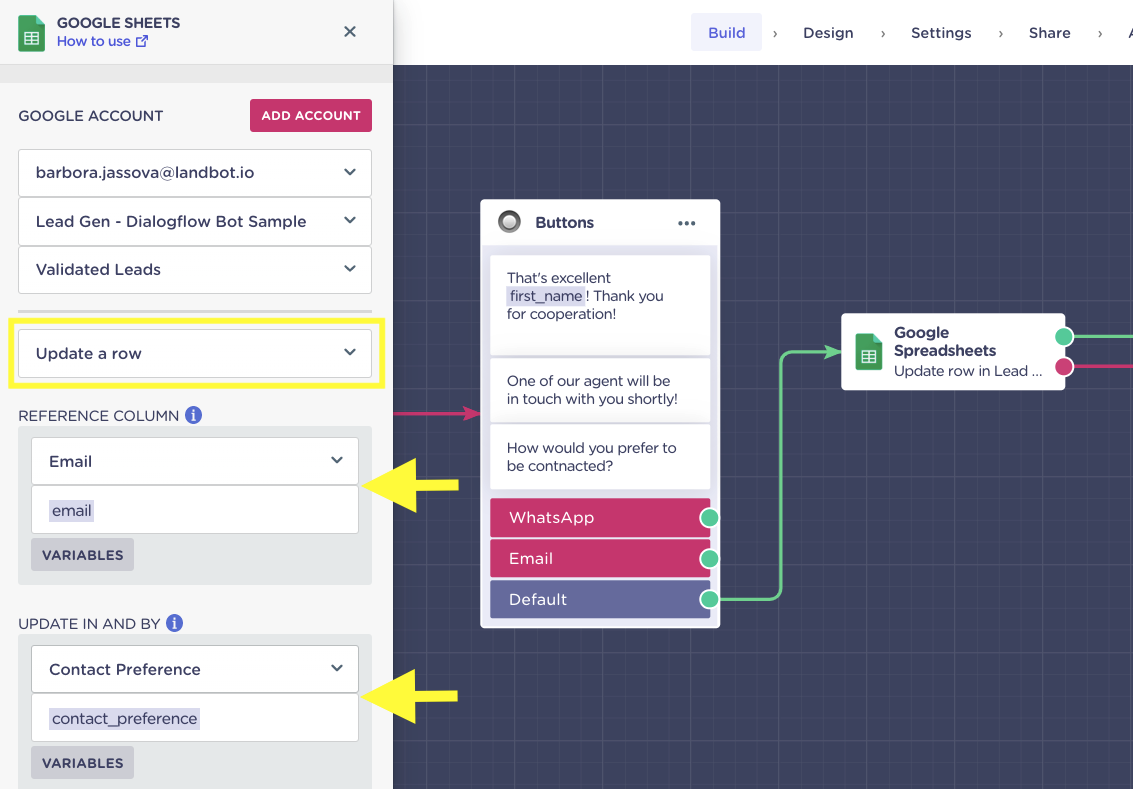
20. Landbot: Ask for Contact Channel Preference
If you don’t have time to offer live support even to the selected few - or you simply want to ensure your leads don’t feel like their request will be forgotten under a pile of virtual dust - you can ask how they prefer to be contacted.It shows you care and improves the experience significantly.
For instance, the leads who didn't qualify as TOP in my funnel will be greeted by a further “button” choice and indicate whether they prefer to be contacted by mail or WhatsApp.
Upon decision the information will be updated in the Google Sheet:
- Select “Update a Row” action instead
- Then pick a reliable reference column and its variable
- And the column and variable you wish to update
The bot will search the email column and in the row where the email corresponds with the user it will update the “Contact Preference” column with their choice.
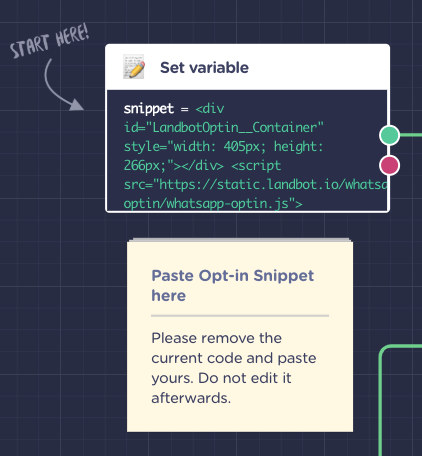
21. Landbot: Set up WhatsApp Opt-In
What about those leads that selected WhatsApp?Don’t you need special permission for that?
Indeed you do!And in Landbot it will take you around 5 seconds to set it up.If the user’s @contact_preference is email, he or she will get a message that one of the representatives will be in touch with them shortly.
If, however, the preference is WhatsApp, you will need the user to opt-in officially.
All it takes is importing the “Opt-in WhatsApp” brick. The opt-in process is all set up along with phone number validator.
The only thing you need to do is to go to your Landbot WhatsApp Business Manager and copy the auto-generated code for your WhatsApp snippet and connect it to your flow. That’s done.
Upon the opt-in, the user will receive a welcome WhatsApp message template you have set up for them which can be connected to another bot or a live agent. This will be the result:
To Sum Things Up
Both B2C and B2B lead generation is a challenge and it will continue to be si in 2020.
However, no code tools that make AI and NLP might help you connect and create an interactive rapport with your website visitors from the start of the sales funnel. After all, of all lead generation strategies and trends, personalization is the one that doesn’t seem to go away.
Do take this bot just as a small example of what you can create. You can make AI bots the guardians of gated content, sales reps who are willing to search for the most suitable products 24/7, friendliest lead filers, engaging companions, booking assistants, and much much more. There really is no limit!
Whether you work in sales or marketing arena, it’s time for you to explore some AI lead generation options - best those that don’t require coding.


%20(1).avif)
.avif)
%20(1).png)
.avif)