


.svg)
Please note that 'Variables' are now called 'Fields' in Landbot's platform.
The devastating blow of the world pandemic ignited a wave of digitization that rippled through the virtual world all the way to brick and mortar businesses. In fact, 2020 has shown that chatbots are as useful to offline businesses as they are to the online ones. Take, for example, a restaurant chatbot…
The restaurant industry has been traditionally slow to adopt new technology to attract customers. However, the COVID-19 crisis changed that. It forced restaurant and bar owners to look for affordable and easy-to-implement solutions which, thanks to the rise in no-code platforms, were not hard to find.
What is a Restaurant Chatbot?
A restaurant chatbot is a conversational software that, for example, allows customers to book a table, see the bar/restaurant menu, make food orders, offer delivery status information as well as complete purchases, provide receipts, and even ask for feedback. A restaurant bot can exist to fulfill one or several of these functions.
How to Use a Restaurant Chatbot?
Before the pandemic and the worldwide quarantine, common use of the chatbots by restaurant owners included online booking or home delivery services. Today, its application options are much wider.
For instance, given the need for social distancing and elimination of high-risk processes (such as passing around menus from customer to customer), many restaurants started to use QR codes their customers can scan to access the menu online. The issue here is that few restaurants provide a satisfactory online experience and so looking up an (often lengthy) menu on a mobile can be quite frustrating. Once again, bigger businesses with more finances and digital infrastructure have an advantage over smaller restaurants.
However, it doesn’t have to be that way.
The most natural mobile user interface is chat. It not only feels natural, but it also creates a friendlier experience offering conversational back and forth. A menu chatbot doesn’t just throw all the options at the customer at once but lets them explore category by category even offering recommendations when necessary.
Plus, such a food ordering chatbot can not only show the menu but also send the orders to the waiter or the kitchen directly and even process the payment to avoid handling money or cards.
What is the Best Channel for Your Restaurant Chatbot?
When it comes to bots, there is a huge hype around messaging apps. Depending on the country of your business, you might be considering WhatsApp or Facebook Messenger. However, these two channels, while attractive, pose some problems. WhatsApp API that enables bots, for instance, is still too expensive or not so easily accessible to small businesses. And while having a Messenger bot your Facebook Page is free, you might have heard Facebook took a step back on the whole bot business recently, significantly limiting what businesses can and cannot do.
The moral? While messaging apps have a lot of users, they take the reigns of control and all you can do is follow their whims. Thus, if you are planning on building a menu/food ordering chatbot for your bar or restaurant, it’s best you go for a web-based bot, a chatbot landing page if you will.
Why?
- Website chatbot gives you full control over the content, behavior, and design of the chatbot
- They offer more freedom and flexibility when it comes to interactive conversational app elements that boost user experience such as carousels, buttons, transactional interfaces, etc.
- The customers are already in your restaurant so the selling point of WhatsApp’s and Facebook’s user base is not really important here.
- You can still easily engage in lead generation by asking for an email to send the customer their receipt after payment.
How to Build a Restaurant Chatbot: Step by Step No-Code Tutorial
In this tutorial, I will show you how to easily put together a restaurant menu chatbot that can be adjusted for both in-house and at-home orders using our no-code Landbot builder. Some of the key features you will learn to apply in this tutorial include:
- Hidden fields (so you can hide data in the bot’s URL)
- Persistent menu for easier navigation
- Rich interface features including image-enriched buttons and carousel
- Calculating order total
- Data export to Google Sheets
- Stripe online payment
Here is a sneak peek into the final user experience:
The good news is, Landbot GUI is extremely easy to grasp so even if you have no previous experience with bot-building, you won’t have trouble keeping up!
SIGN UP FOR FREE TO BUILD ALONG WITH THE TUTORIAL
NOTE: If you are interested in making a bot with booking or reservation functionality instead, you might want to take a look at our time-slot booking chatbot tutorial
or... check out our restaurant table reservation template!
So, without further ado, let’s get to it!
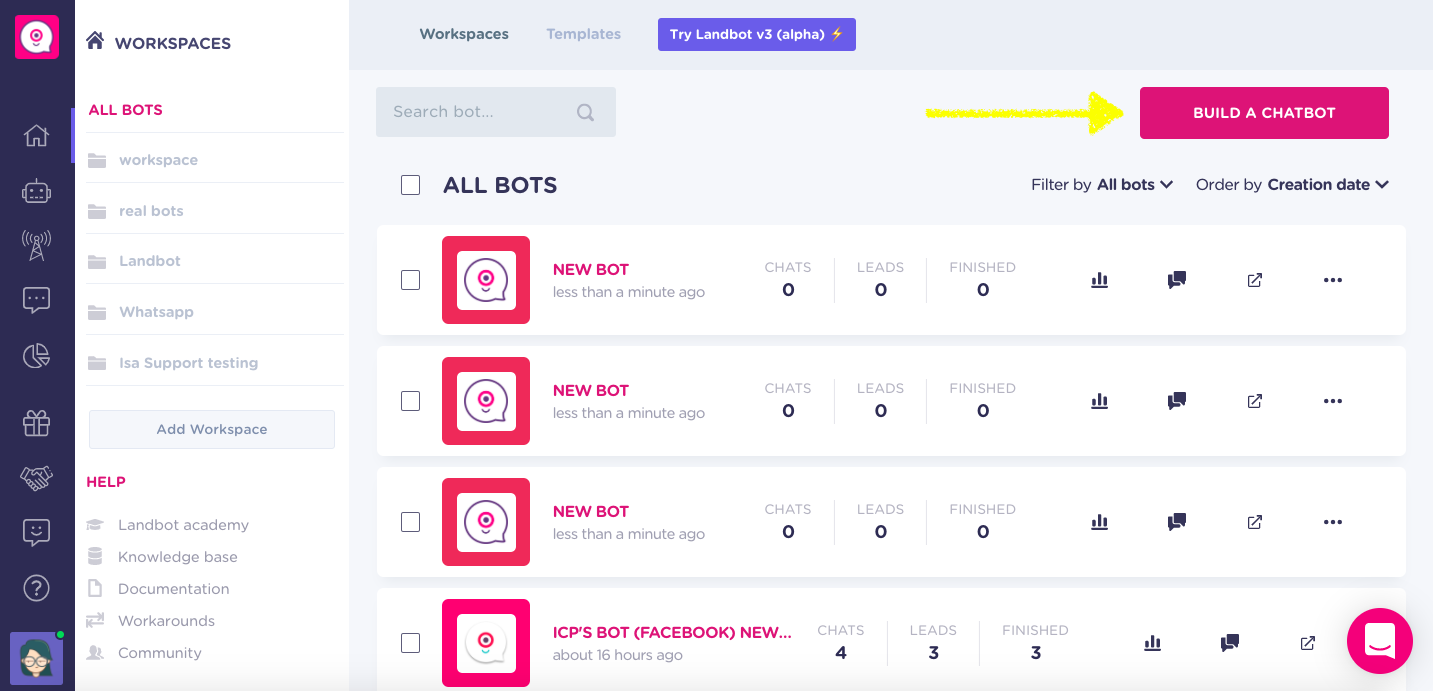
1. Access Landbot Builder
First and foremost, access the Landbot builder dashboard. From here, click on the pink “BUILD A BOT” button in the upper right corner.
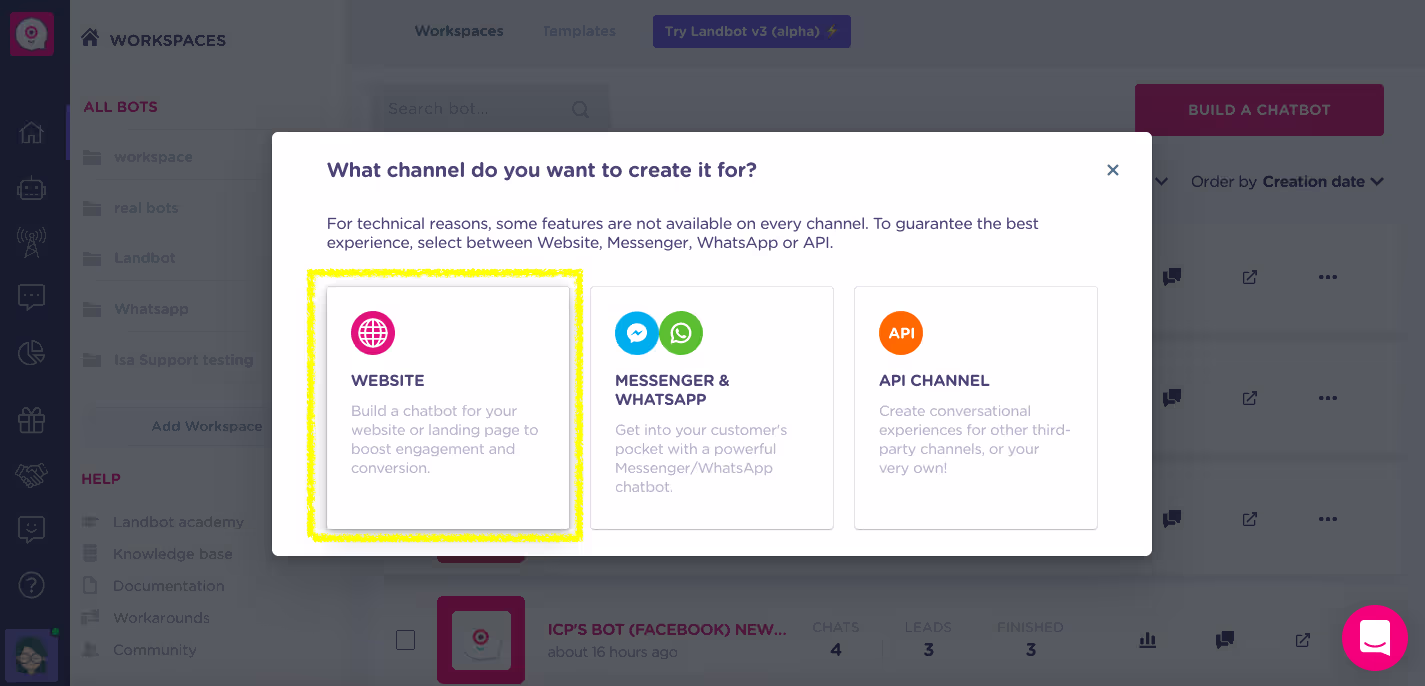
A pop-up will appear prompting you to choose a channel. We will be creating a bot for the bed as it’s the most accessible and flexible option:
Next, you will be redirected to the template library. However, we will be building our bot from scratch:
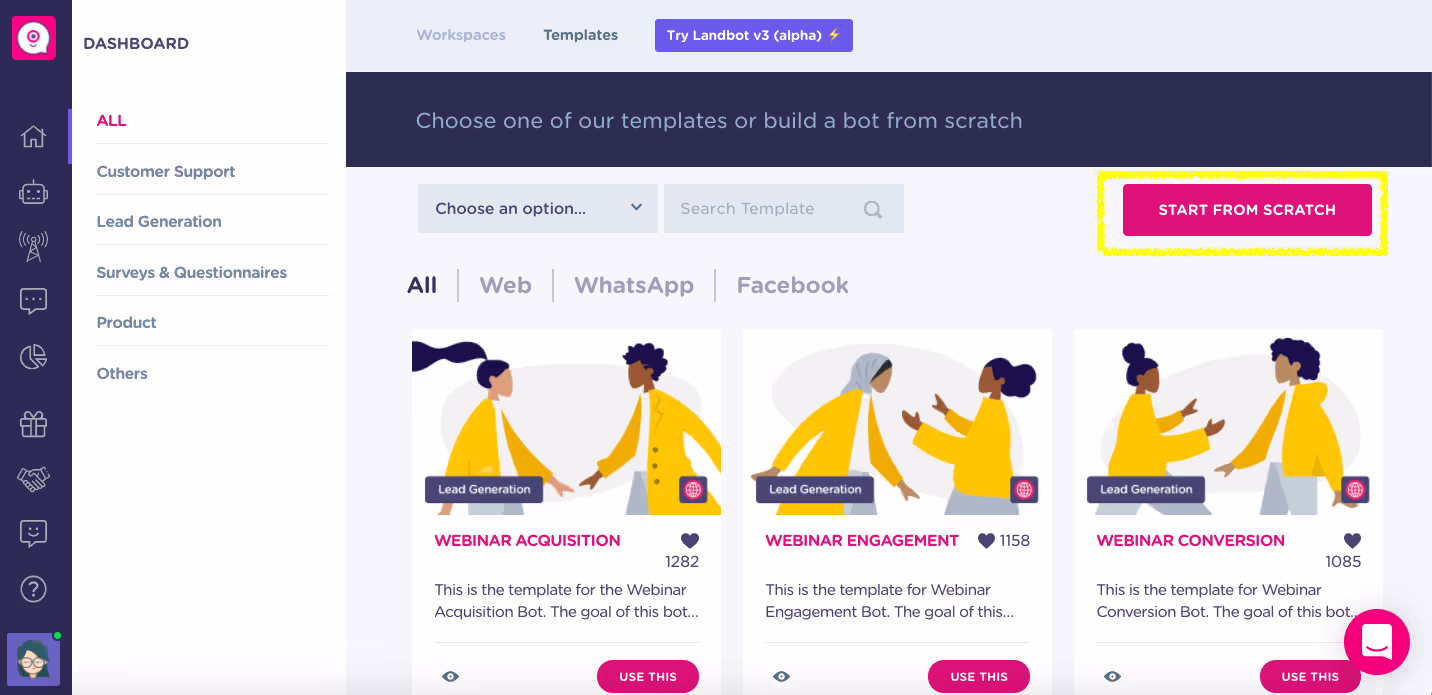
After clicking the “START FROM SCRATCH” button you will, at last, access the builder:
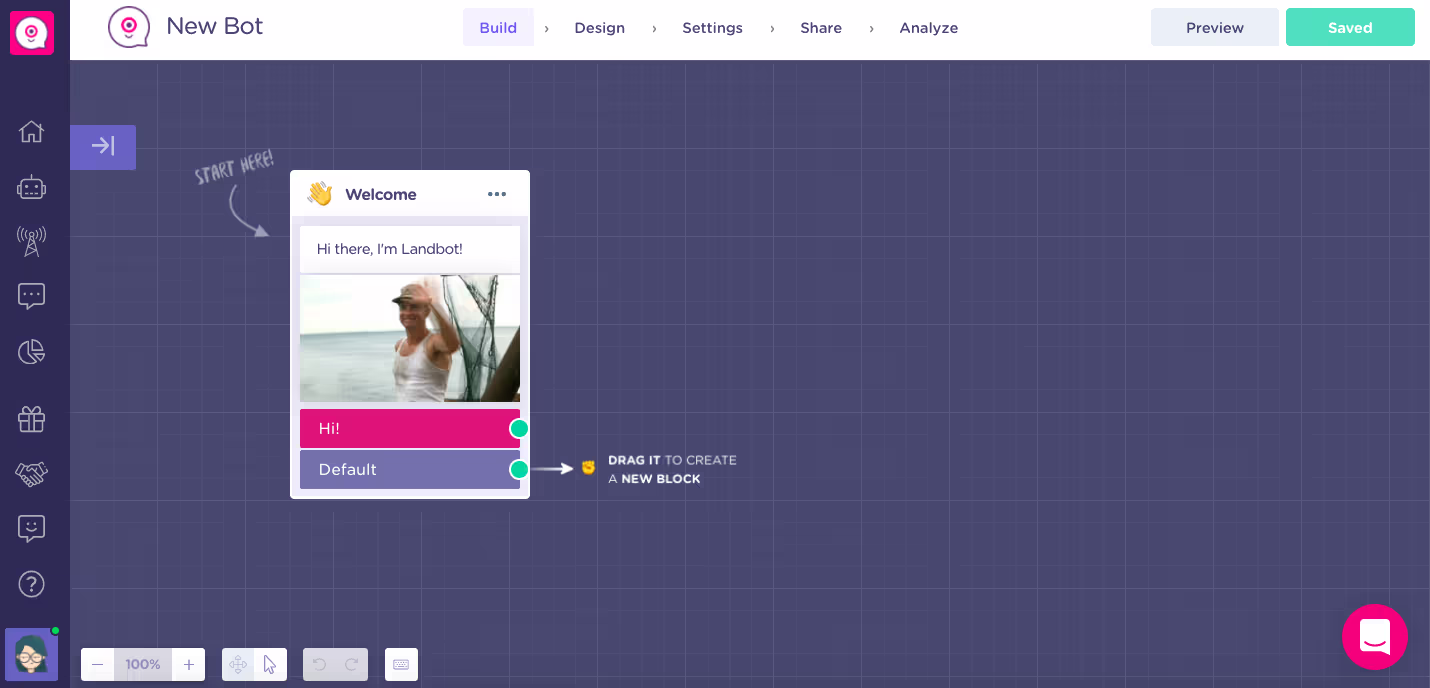
2. Determine Your Welcome Message
Start your bot-building journey by adjusting the Welcome Message which is the only pre-set block on your interface.
Customizing this block is a great way to familiarize yourself with the Landbot builder. As you can see, the building of the chatbot flow happens in the form of blocks. Each block represents one turn of the conversation with the text/question/media shared by the chatbot followed by the user answer in the form of a button, picture, or free input. These types of blocks are the ones that appear on the front end. However, there are other blocks visible only on the backed. These ones help you with a variety of operations such as data export and calculations… but we will get to that later.
Now, the Welcome message is quite important as it is the first thing your customers see. Likewise, it’s the main indicator of the capabilities of your bot. For instance, you can create a single bot that takes care of ALL the possible customer-restaurant interactions:
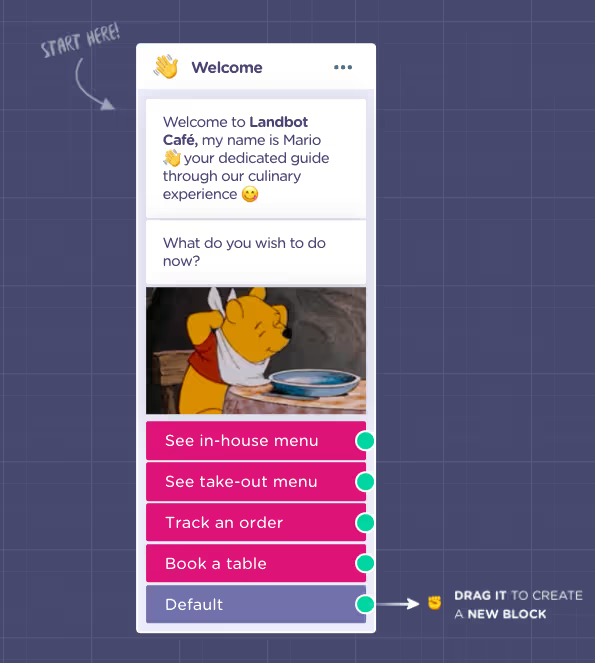
So, whether the customer finds this bot on your website or gets to it by scanning a QR code on a table inside your restaurant, they are able to access the service they need quickly and efficiently. You can even make a differentiation between menu items you only serve in the restaurant and those you offer for delivery with two different menu access points.
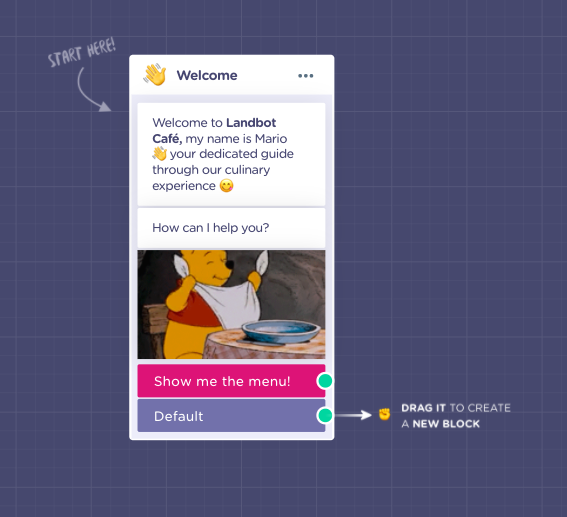
Though, for the purposes of this tutorial, we will keep things simpler with a single menu and the option to track an order. (As mentioned, if you are interested in building a booking bot, see the tutorial linked above!).
3. Set Up Total Tracker
Before you let customers access the menu, you need to set up a variable to track the price total of your order.
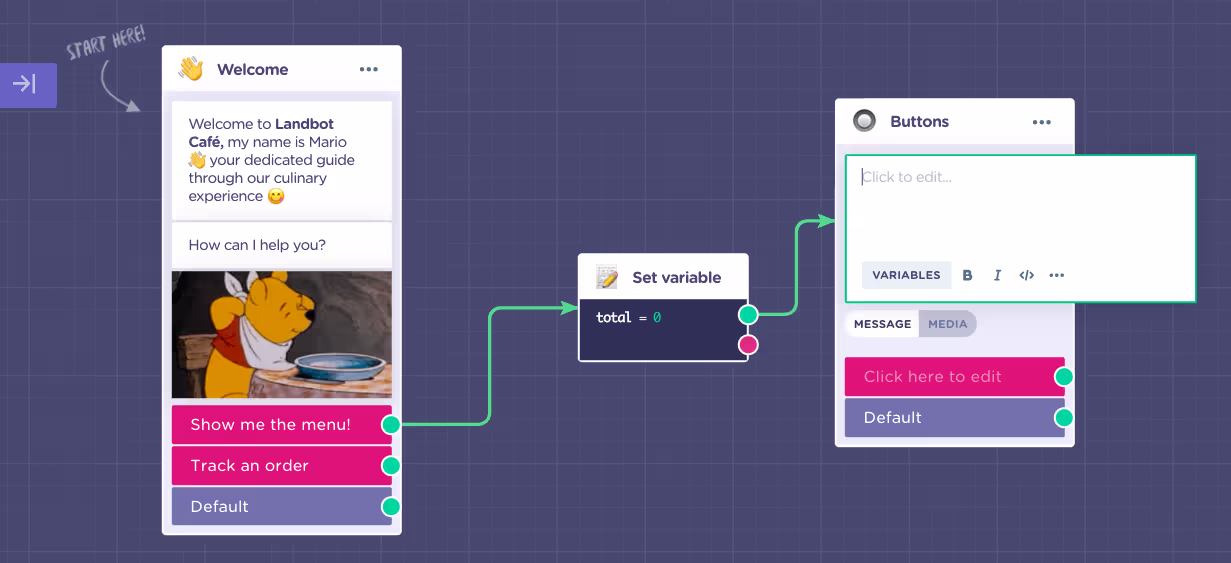
To do so, drag a green arrow from the green corresponding to the “Show me the menu!” button and when a features menu appears, select the “SET VARIABLE” block. This is one of those blocks that are only visible on the backend and do not affect the final user experience.
Focus on the first field “Create/select a variable to modify”.
There are some pre-set variables for the most common type of data such as @name and @email. However, there is no variable representing bill total so you will have to create one.
Simply type the name you want to call your variable and set its format. In our case that would be @total in a numeric format:
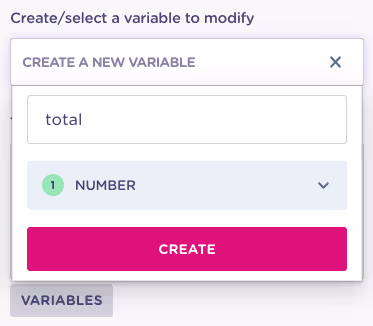
After you click create be sure to set the initial value to 0:

Please do note that this step is only necessary if you want to calculate and bill the total using the bot. If not, you can go straight to creating the menu!
4. Structure Your Menu
Continue by dragging a green arrow from the green dot output of the “Set Variable” block. Then, when the feature menu appears, select the “Buttons” block:
Depending on how varied is your menu, you will want to categorize it for simpler navigation:
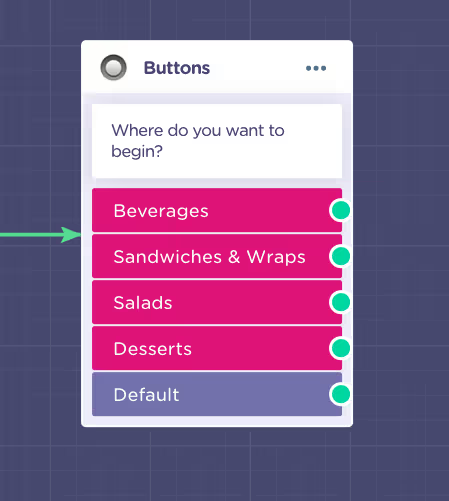
The above is just one of many alternatives. Just create the categories you have on your menu. For instance, the categorization can reflect dietary restrictions:
- Vegan
- Paleo
- Vegetarian
Or navigate customer based on courses
- Drinks
- Starters
- Mains
- Deserts
It really just depends on the organization that best suits the style of your menu.
5. Build Menu Categories
You can imagine that if each of your menu categories fully expanded on our little canvas it would end up being a hard-to-manage mess.
Thankfully, Landbot builder has a little hack to help you keep control of the flow and make it as easy to follow as possible.
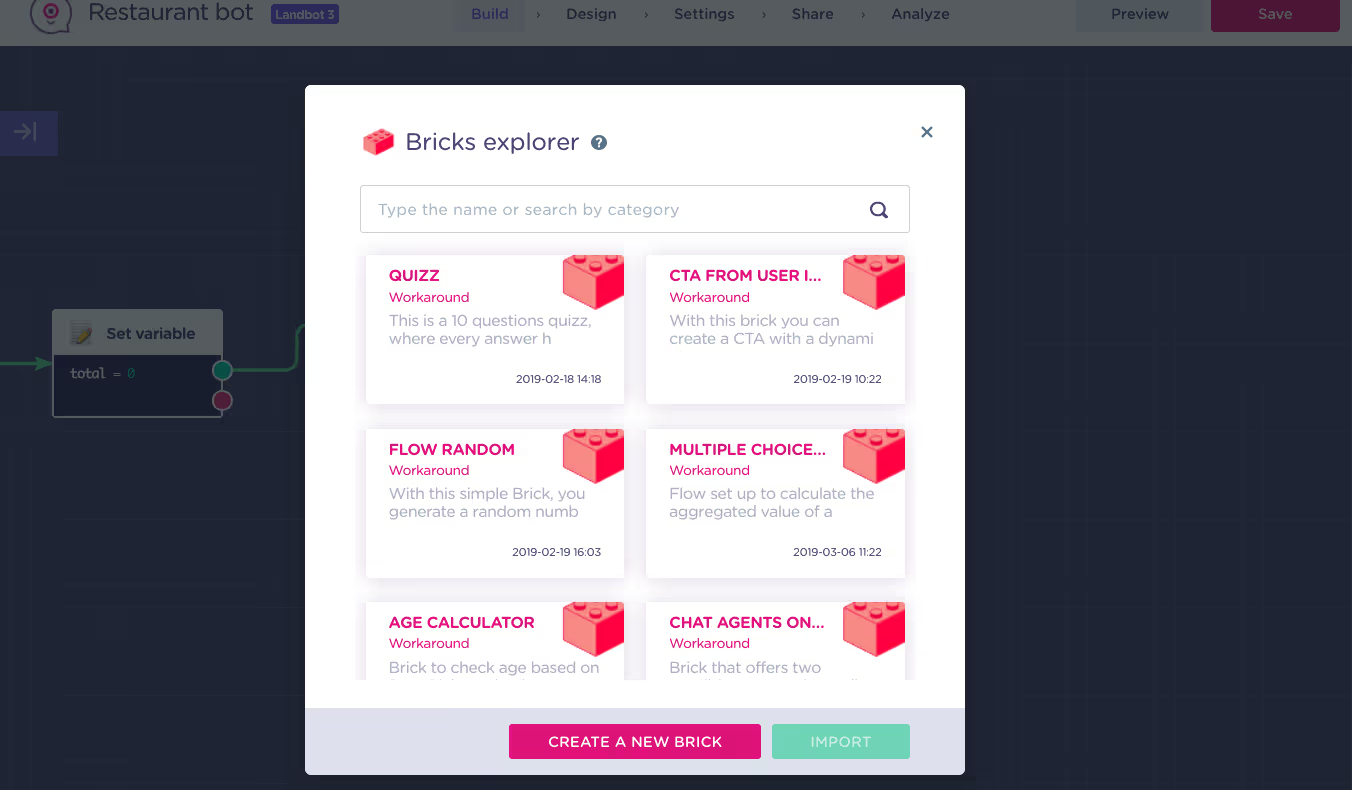
Drag an arrow from your first category and search the pop-up features menu for the “Bricks” option.

Once you click to select it, another popup window will give you an option to choose a brick template from the library or create your own brick:
Bricks are, in essence, builder interfaces within the builder interface. They allow you to group several blocks – a part of the flow – into a single brick. This way, you can keep your chatbot conversation flow clean, organized, and easy to manage.
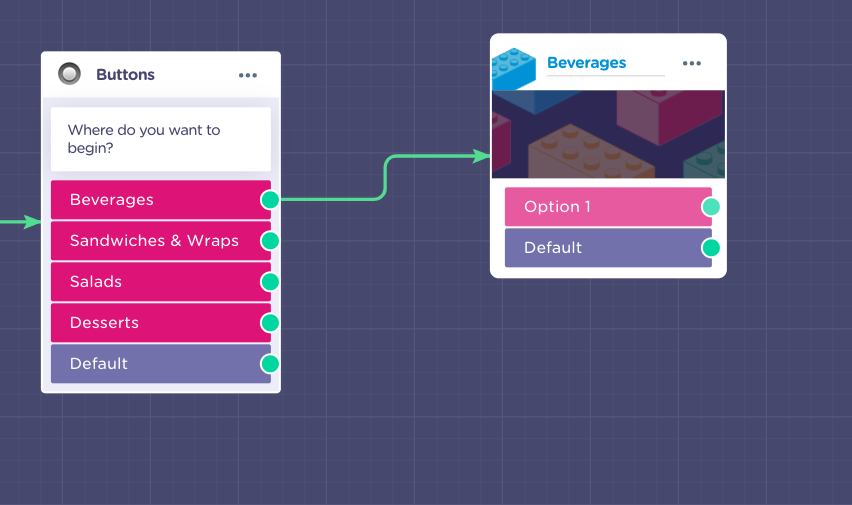
After clicking “CREATE A NEW BRICK” a new brick will materialize in your flow. When it does, be sure to rename it appropriately so it makes sense within the flow. For example. I named the brick “Beverages” as it will be storing the beverages menu:
Next, hover over the brick to bring out the edit button and click it to get in.

Inside the brick is an interface very similar to that of the main builder with a few subtle differences:
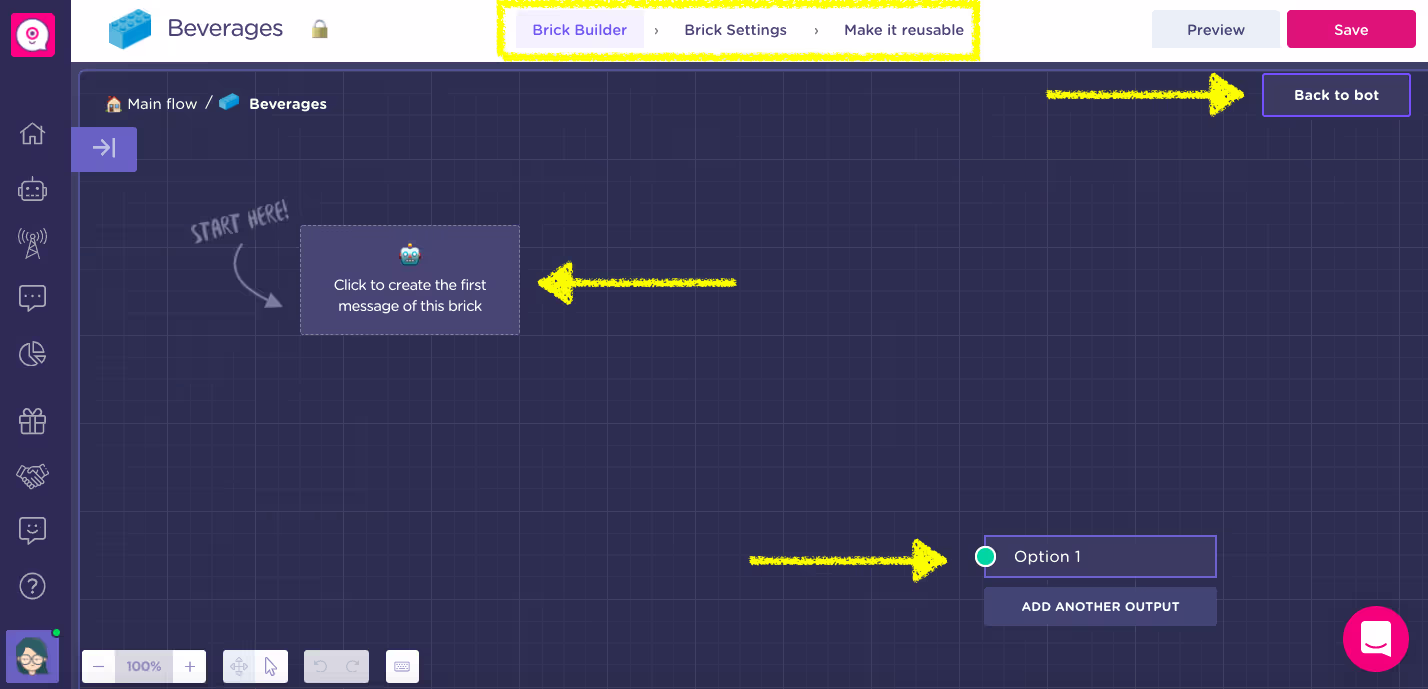
- You have the freedom to choose any type of block as the first block/message of the brick.
- There is one default output option, however, you can design for as many outputs as you want (the outputs in this instance act like buttons in a Buttons block)
- “Back to bot” option in the upper right corner which takes you back to the main flow
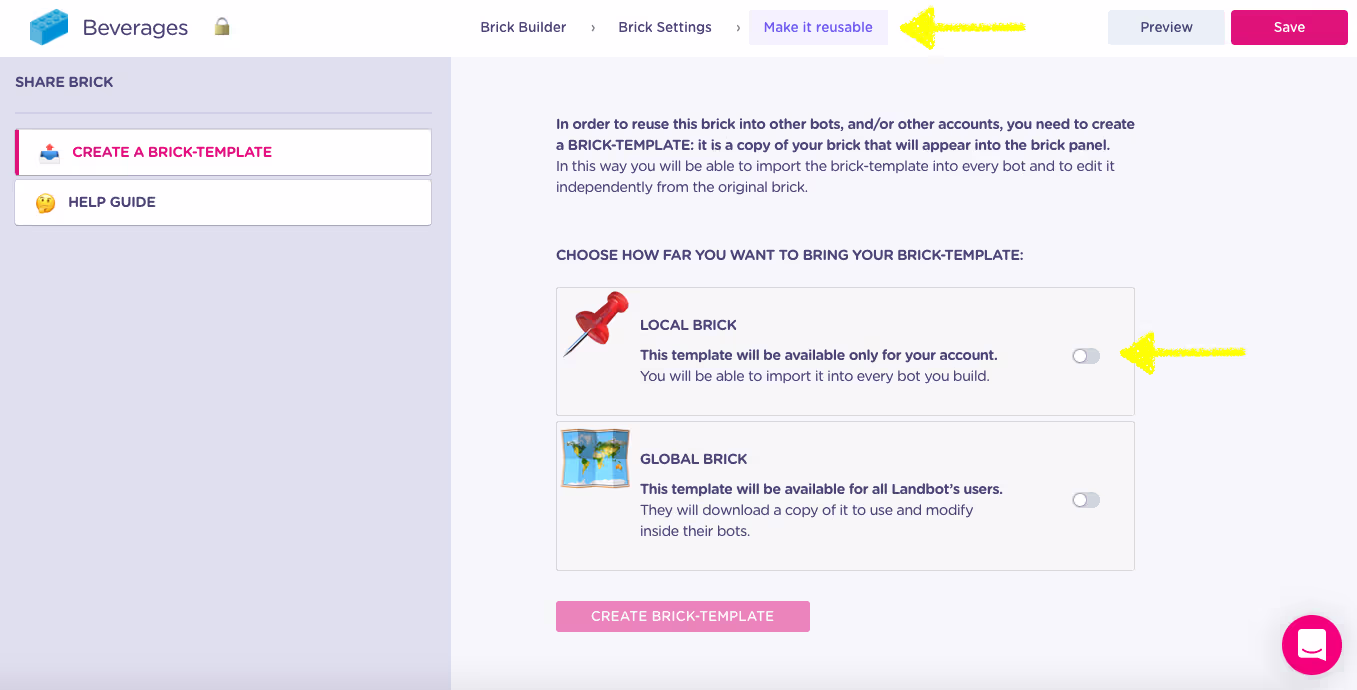
- The header menu is different offering option of modifying “Brick Settings” and “Make it Reusable”
NOTE: The “Make it Reusable” option is what makes things interesting. You can save this brick and add it as a template to your person brick library. That means, for example, the next time you are building a different version of your restaurant chatbot, you don’t need to build the beverage menu from scratch but simply import the template from the brick library!
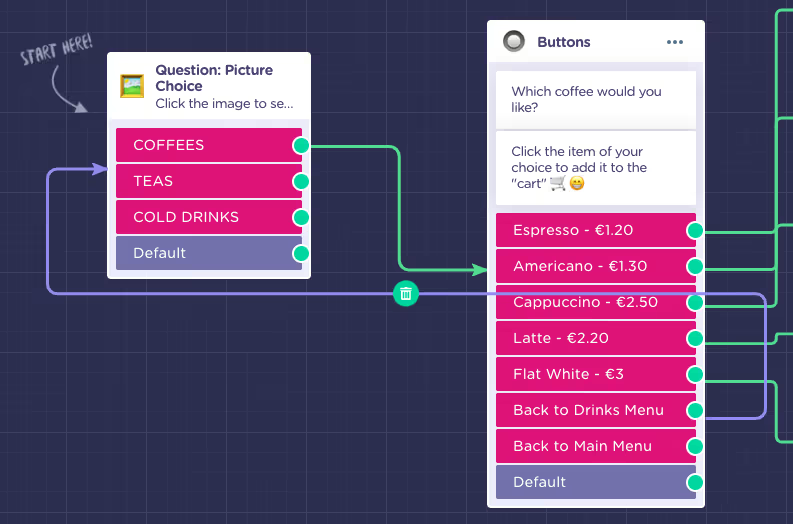
For the first block in the “Beverages” brick, choose “Picture Choice”. This conversational app element is pretty fun as it displays options in a visual carousel:
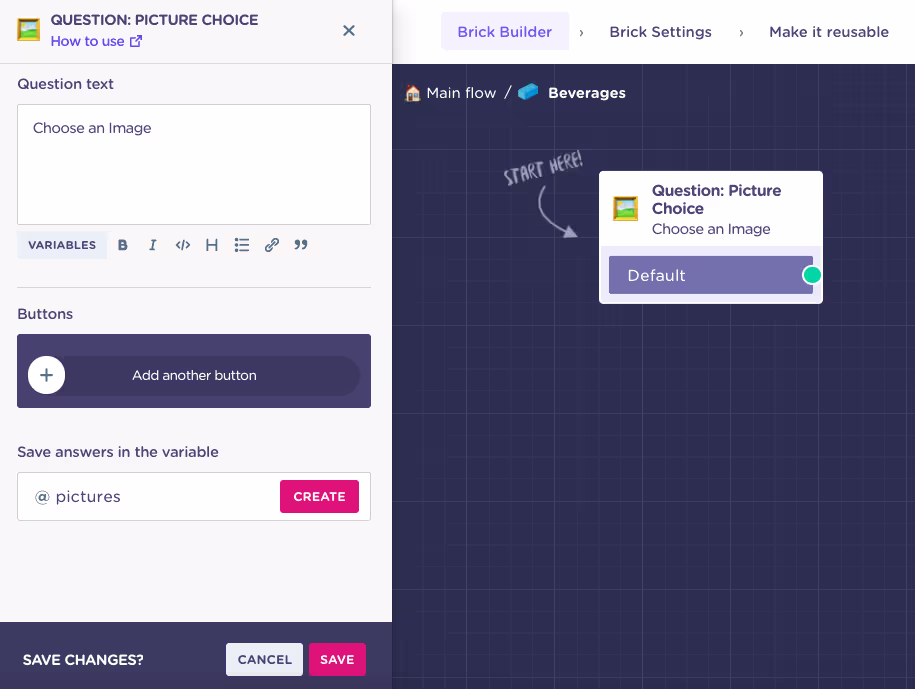
All you need to do here is define the Question Text you want the bot to say the customer and input the options and corresponding images.
To add choices, click the plus sign next to “Add another button” and more features will popup. Then:
- Define the text of each button
- Associate an image with each button (Upload it from your PC or use a URL)
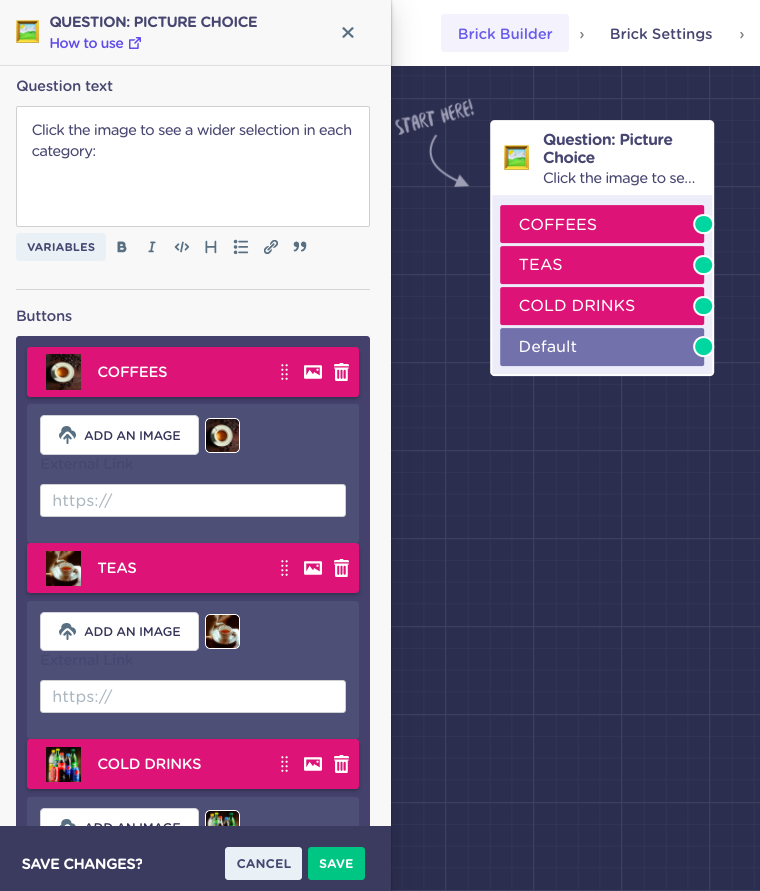
After you are done, click SAVE.
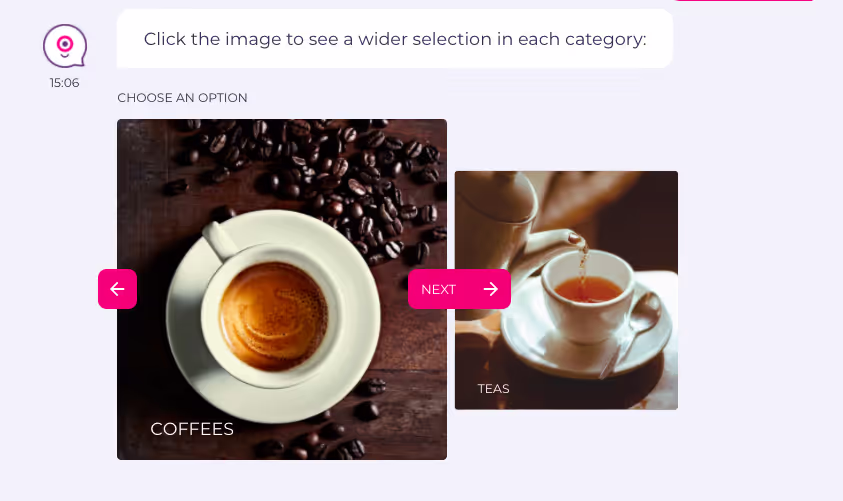
On the front end, the picture choice will show as follows:
Next, draw an arrow from your first drinks groups and created another Buttons block to provide a list of all coffees and their prices:
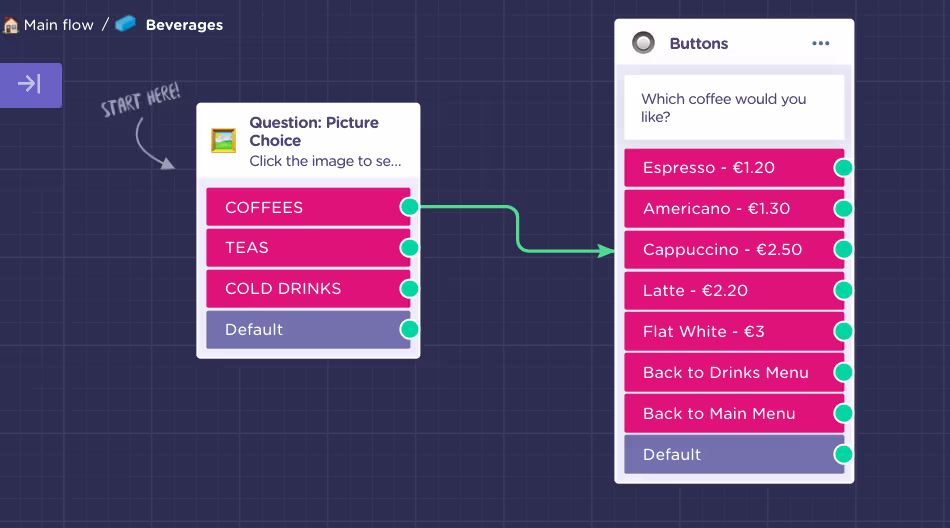
However, I want my menu to look as attractive as possible to encourage purchases, so I will enrich my buttons with some images.
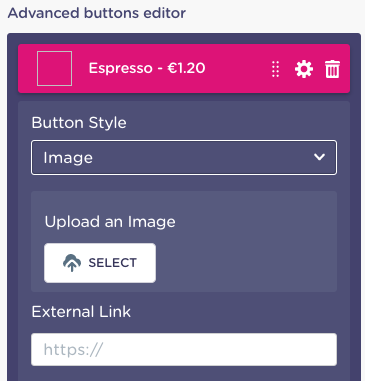
To do that, click on the three dots in the upper right corner of the Buttons block. The block’s advanced editor will appear on the left:

- Click on the “Settings” icon on the button you want to edit
- Set “Button Style” to “Image”
- Upload or add URL with the desired image
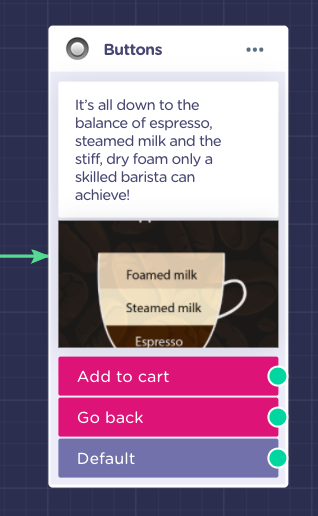
Unlike the carousel in “Picture Choice” block, the images here will display above their respective buttons allowing customers to contemplate all choices at once:

NOTE: Notice my coffee meu includes options to go back to the category menu or back to the main menu. This gives the customer a free hand to explore and move around the menu without commitment until they are ready to make a choice.
Now, here I made a choice to add the item to the cart directly upon clicking since it’s a drink order and there is not much to explain.
However, when you are designing our food menu, you might want to add an extra step. For instance “Click on the option to learn more about, you can always come back here and change your mind!”
That extra information step could look like this, giving the customer option to confirm the selection or go back:
Essentially, this is all you need to know about creating a menu.
Keep going with the set up until you put together each category and items within that category.
If a friendly MENU CHATBOT is all you want, this is it for you! Make sure there are no dead ends in the conversation and the user can always get back to the main menu for more exploring… and done. You’ve got yourself a conversational menu that protects your customers and employees alike while making menu browsing on mobile feel natural!
6. Add Items to Cart
Now it’s time to learn how to add the items to a virtual “cart” and sum the prices of the individual prices to create a total.
Drag an arrow from the menu item you want to “add to cart” and select “Formulas” block from the features menu.
Formulas block allows you to make all kinds of calculations and processes similar to those you can do in Excel or Google Spreadsheets inside the Landbot builder.
This block will help us create the fictional “cart” in the form of a variable and insert the selected item inside that cart.

Turn your attention to the editor bar on the left. First, we need to define the output AKA the result the bot will be left with after it passes through this block.

Name the variable. I chose the word “cart” but you can choose whatever works for you. What is really important is to set the format of the variable to “Array”.
In the programming language (don’t get scared), array is a data structure consisting of a collection of elements… basically a list of things 🙄. This format ensures that when the customer adds more than one item to the cart, they are stored under a single variable but are still distinguishable elements.
Once you create your variable move on to the next step, the formula itself.
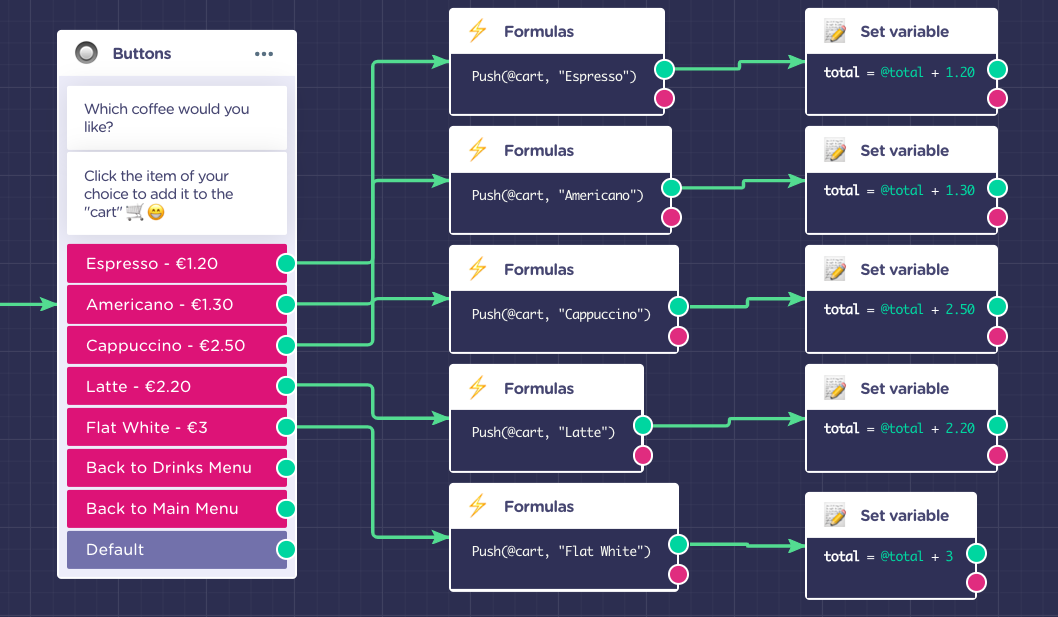
In this instance we will use the “Push” formula which basically adds an element/value to the end of an array:
Push(@cart, “Espresso”)
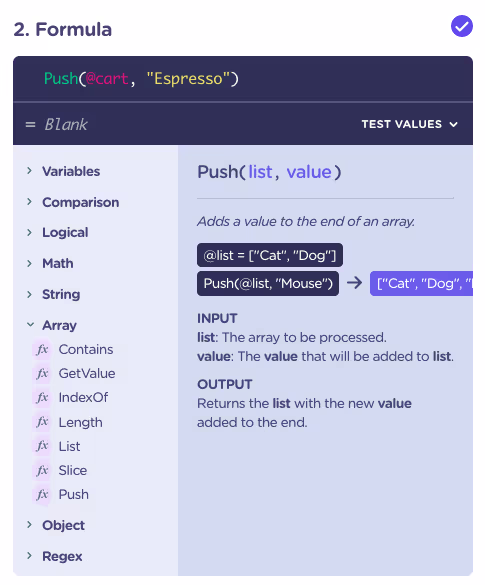
NOTE: If you are ever unsure about what a certain formula can do, just find it in the cheat sheet below the formulas field.
In other words, we are pushing the selected product “Espresso” into our virtual @cart.
Repeat the process for each product, in each section of your menu:

The next step?
We need to ensure our bot can calculate the price of the purchase.
7. Calculate Total
Remember how we set up a @total variable with a 0 value at the beginning of the flow?
Well, now is the time to make that total grow!
Draw an arrow from the green output of the Formulas block and create a new “Set Variable” block:
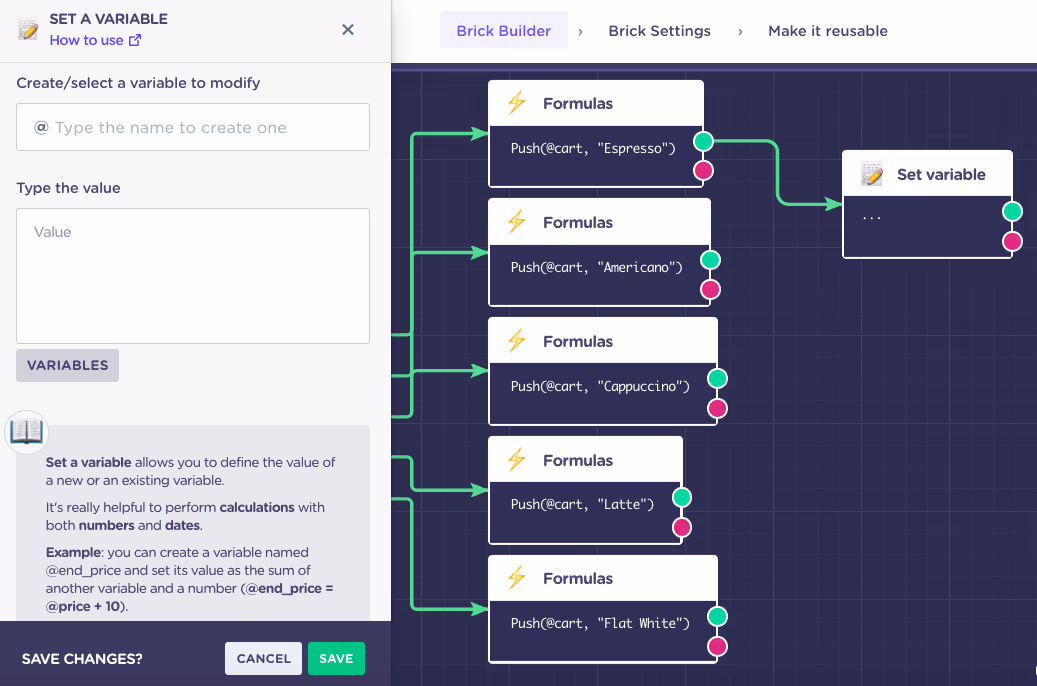
The variable to modify will be @total as before. However, this time, we will activate the calculation function and perform as sum:
@total + “price of the product”
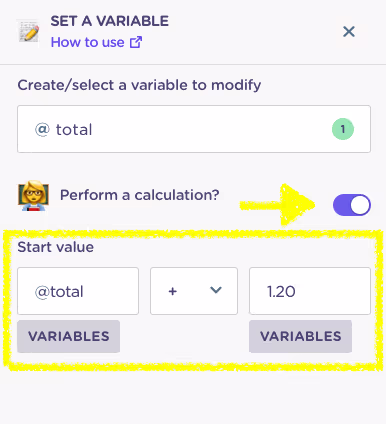
This way, @total starts with a value of 0 but grows every single time a customer adds another item to the cart.
To wrap up the brick, “link the “Back to drinks Menu” button to lead back to the main drinks menu:
As for the “Back to Main Menu” option… Turn your attention to that brick output field as that is our connection back to the main flow. As a default there is one output but we will create a second one and name them as follows:
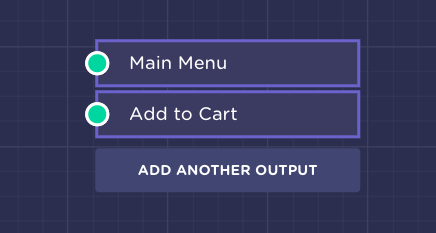
Link the “Back to Main Menu” button with the “Main Menu” output and link all of the product orders to the “Add to Cart” output:
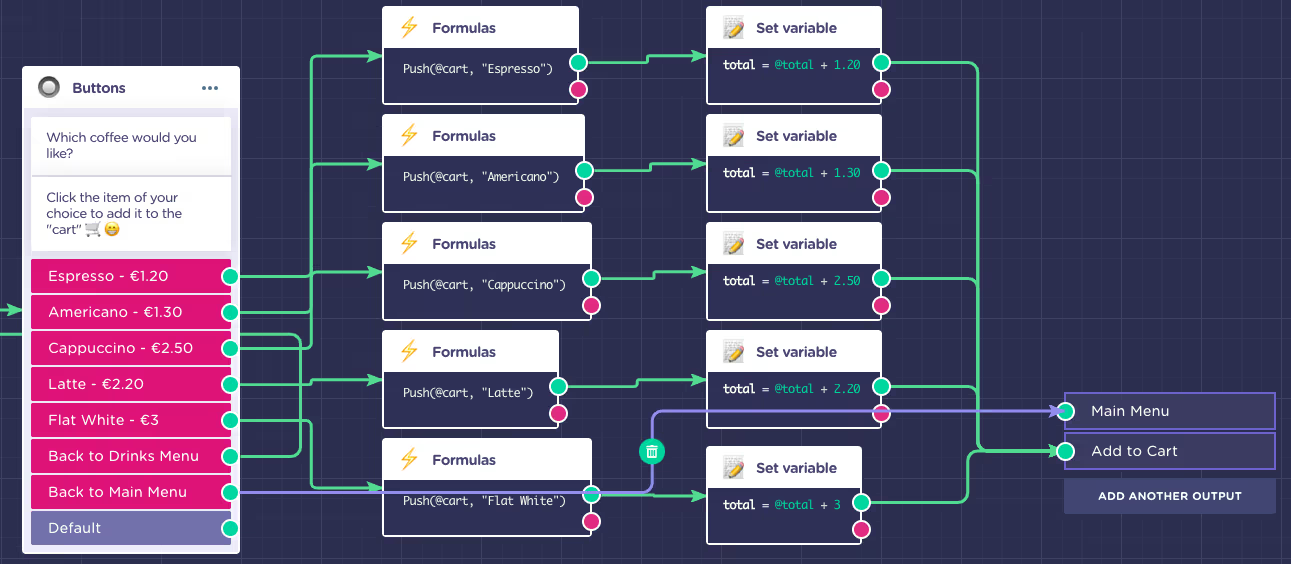
After you develop each category, the anatomy of the brick will look much like this:
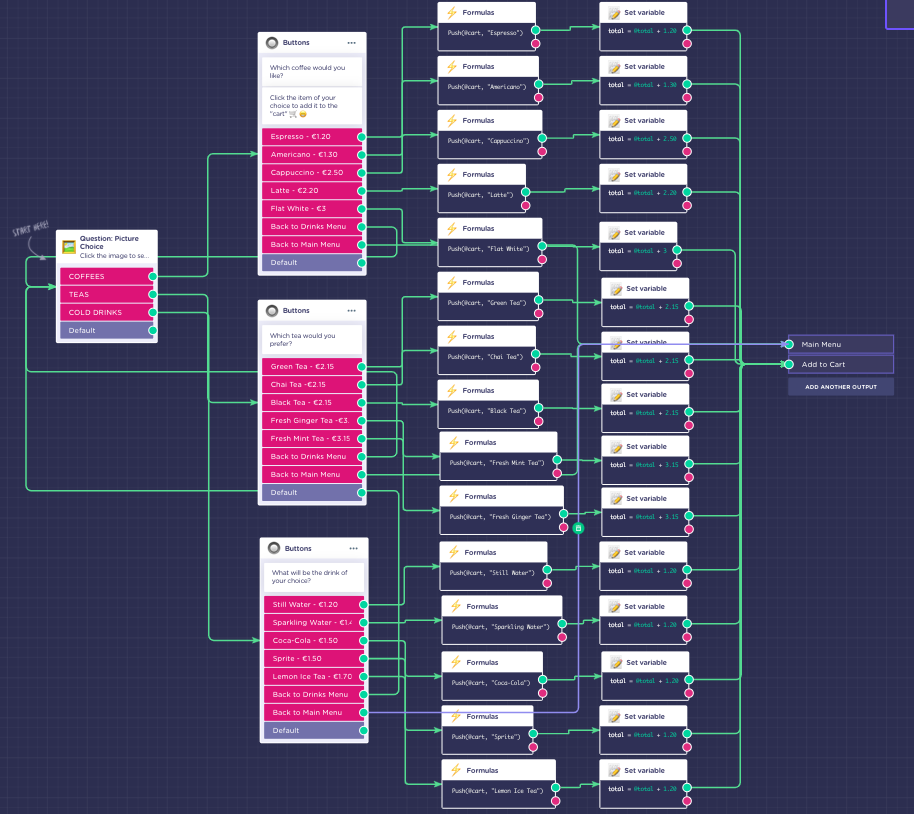
Though the initial menu setup might take some time, remember you are building a brick which can be saved to your library as a reusable block. Hence, you only have to do it once.
Remember to SAVE your brick before you exit to the main flow!
8. Place Order (In-House)
After you are done designing your menu, direct all your “Main Menu” brick outputs back to the buttons block featuring the main manu. But, for the “Add to cart” output create a new buttons block with these options:
- Continue browsing the menu – which leads back to the main menu
- Place your order – which will lead us to the checkout brick
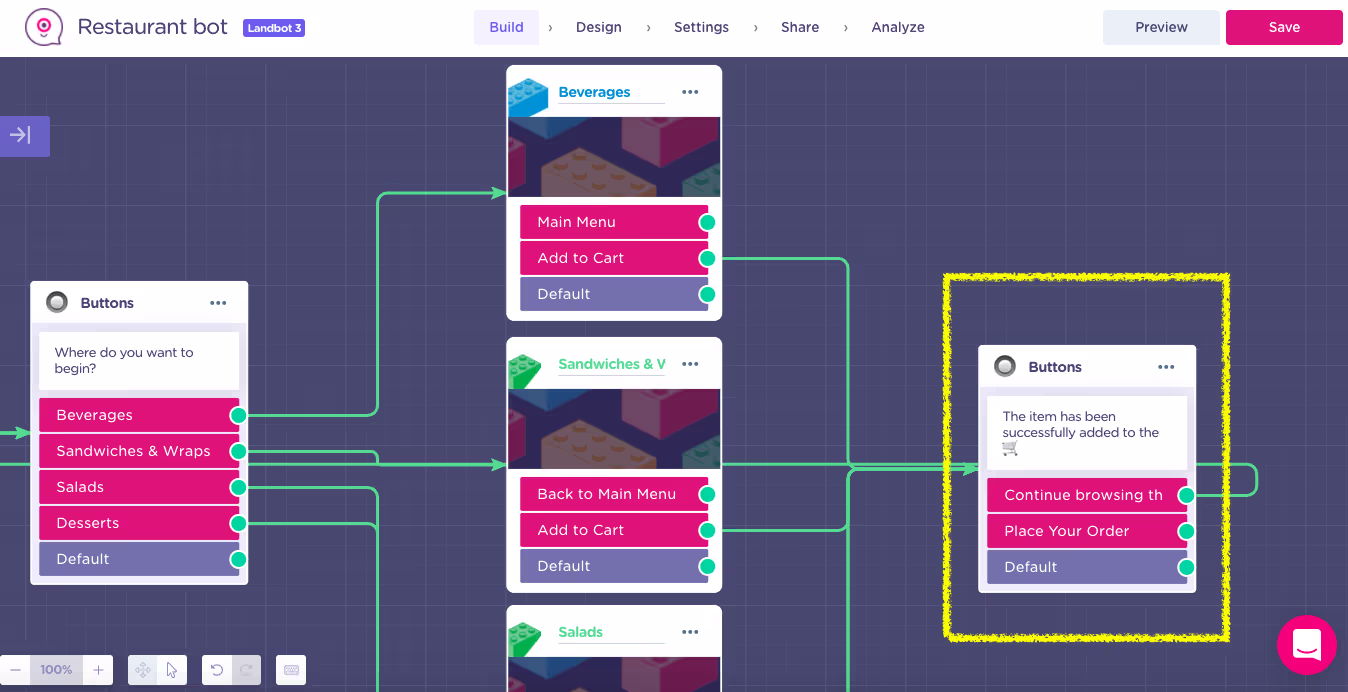
Draw an arrow from the “Place and order” button and select to create a new brick.
Rename the brick “Place Order”, “Checkout” or something along those lines and enter it for editing.
Your first step when processing the order will be to
- break down the @cart contents in @array format into a string format
- “slice off” the first default value of the @cart array which is 0 (none)
This step is mainly to make the cart contents user friendly.
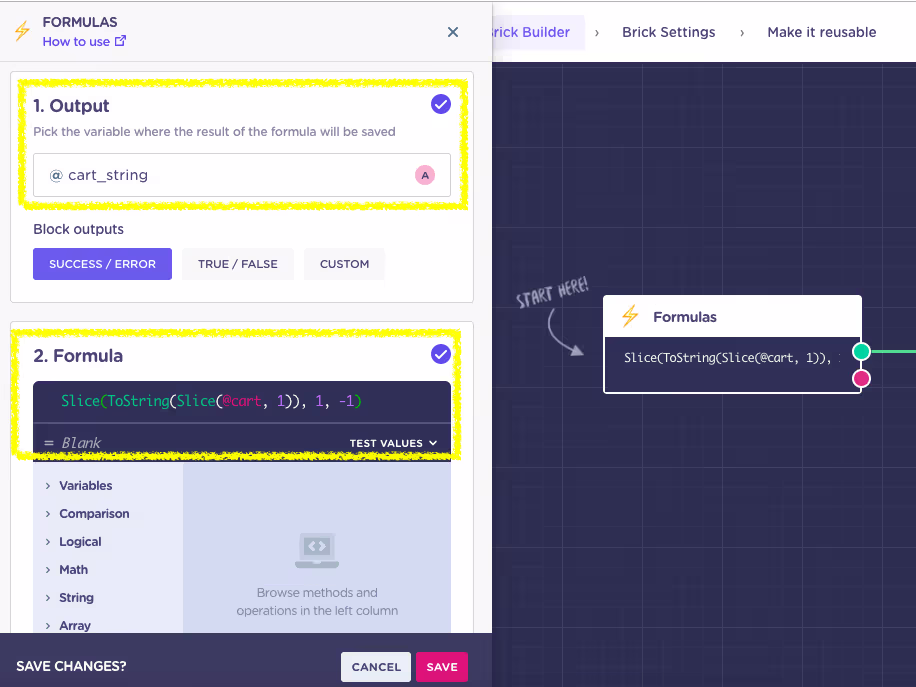
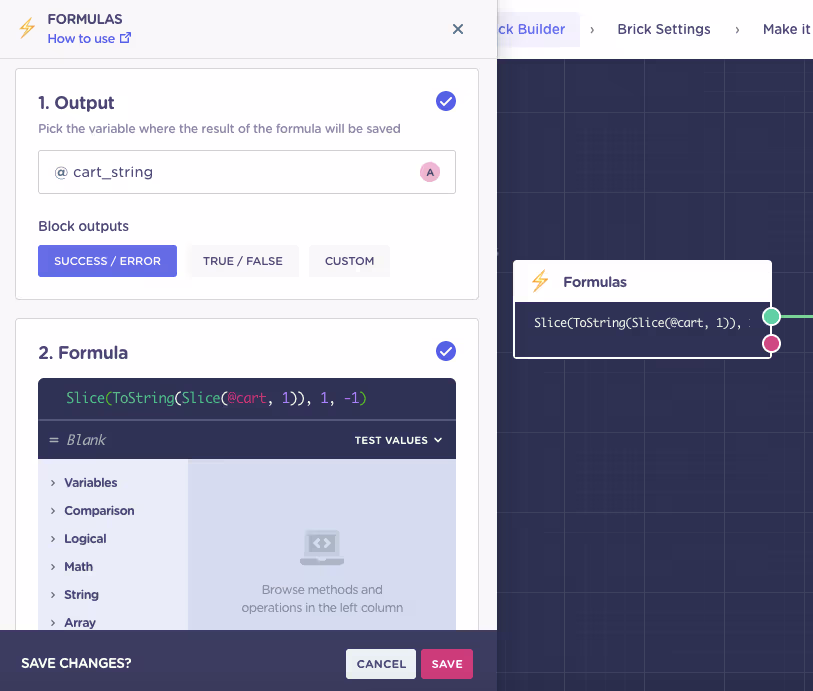
So, create a Formulas block to kick off the flow inside the brick, set the output to @cart_string and type the formula as follows:
Slice(ToString(Slice(@cart, 1)), 1, -1)
Naturally, if you are using a different name for your @cart variable you need to substitute it with the name you are using.
Next, set up a simple Buttons block recapping the order and displaying the total:

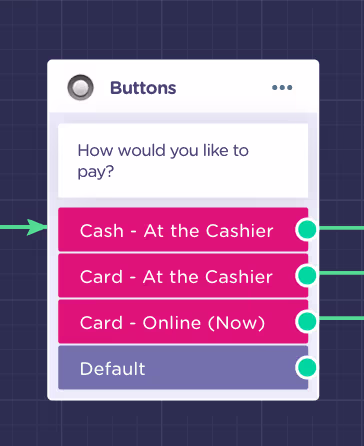
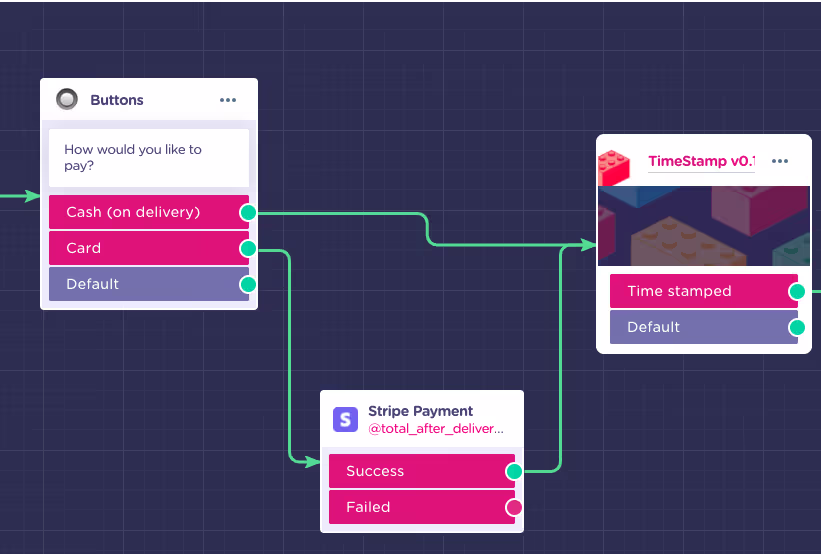
After the customer finally clicks “Place Order” it’s time to offer them payment options. Since this is the in-house order placement scenario, I decided to provide the following:
NOTE: Click on the three dots in the upper right corner of the Buttons block to open the advanced button editor and create a variable to save the customers choice (@payment_pref in string format).
The customer can indicate whether they want to pay cash or by cart at the cashier (or with the waiter or simply pay online within the conversation. Though, you are free to include the payment options you see fit. Even if you don’t think conversational online payment is for you, giving your staff information about payment preference can be useful in a sense that:
- It saves them time of a back-and-forth to find out how the customer wants to pay
- It gives them time to prepare if they need to handle cash which is notoriously one of the “dirtiest” items passing from person to person.
If you do include the online payment, how does it happen?
In Landbot, it’s a question of a simple Stripe integration. Just drag an arrow out of the Online payment option and select “Stripe” from the features menu:
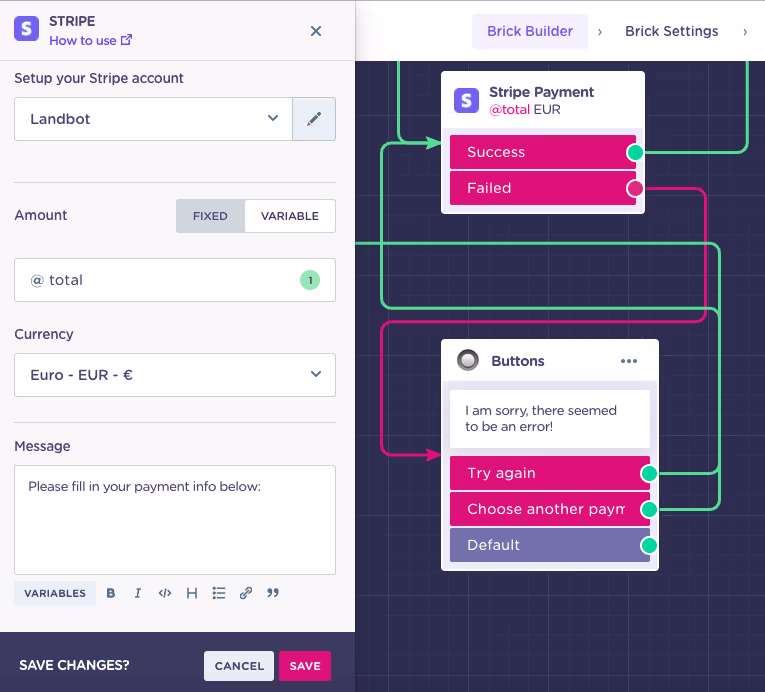
Firstly, you need to connect your Stripe account with Landbot. Next, set the “Amount” to “VARIABLE” and indicate which variable will represent the amount. In our case that will be @total. To finalize, set the currency of the operation and define the message the bot will pass to the customer.
You’ll notice, that the Stripe block has two outputs:
- Success
- Failed
This is to account for situations when there might be a problem with the payment. So, in case the payment fails, I gave the customer the option to try again or choose another method of payment.
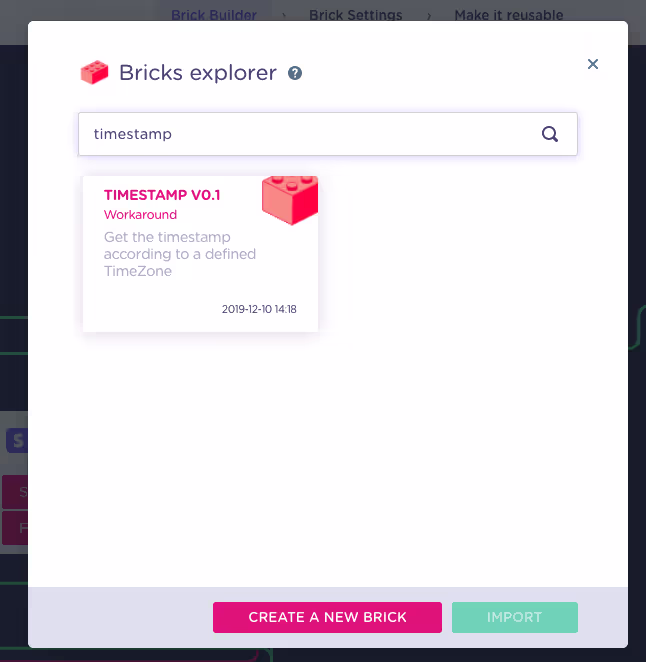
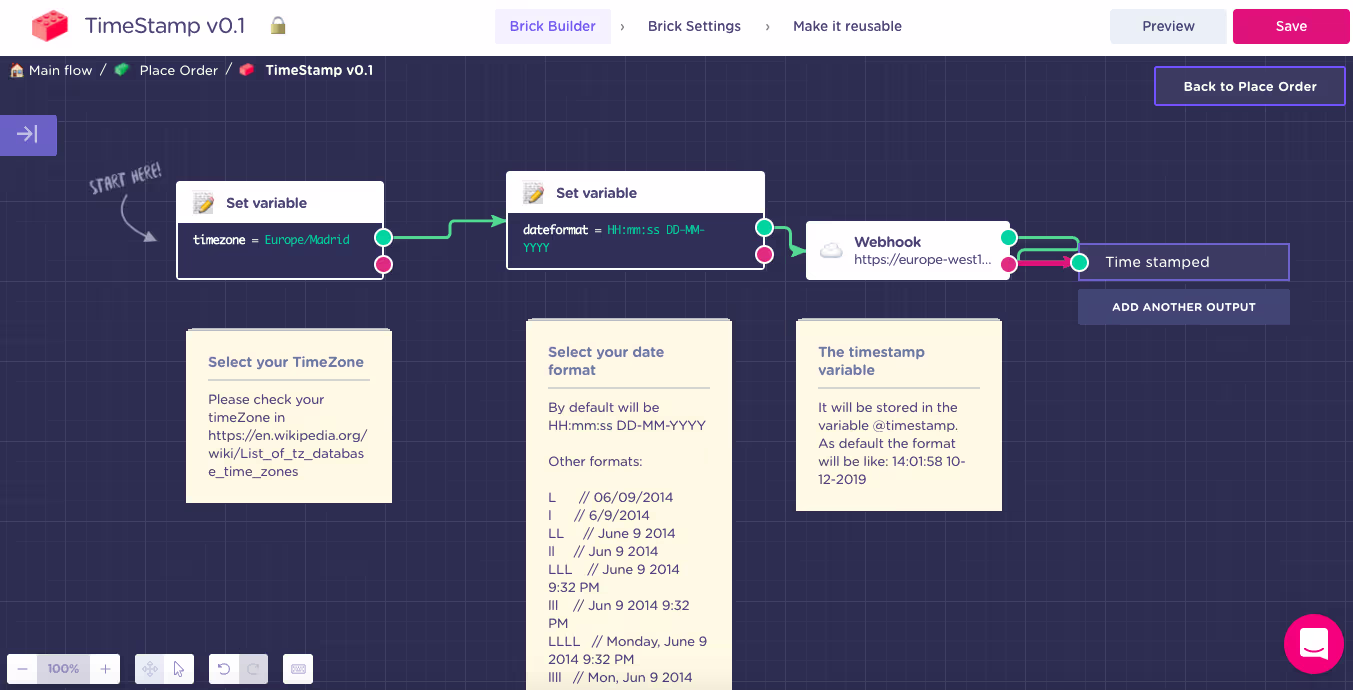
Before uploading the order to the system, you can use a predesigned brick to assign a timestamp to each order:

To retrieve the brick, draw an arrow from any of the payment options (once the brick exists connect the rest of them as well) and select the “Bricks” feature from the menu. However, this time, instead of clicking to create a new one, use the search but to retrieve TimeStamp brick:
Once you get inside the brick, the flow is already there along instructions of adjusting to your personal needs:
Save changes and exit the brick.
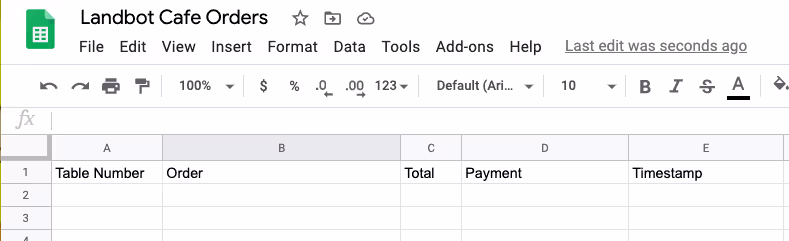
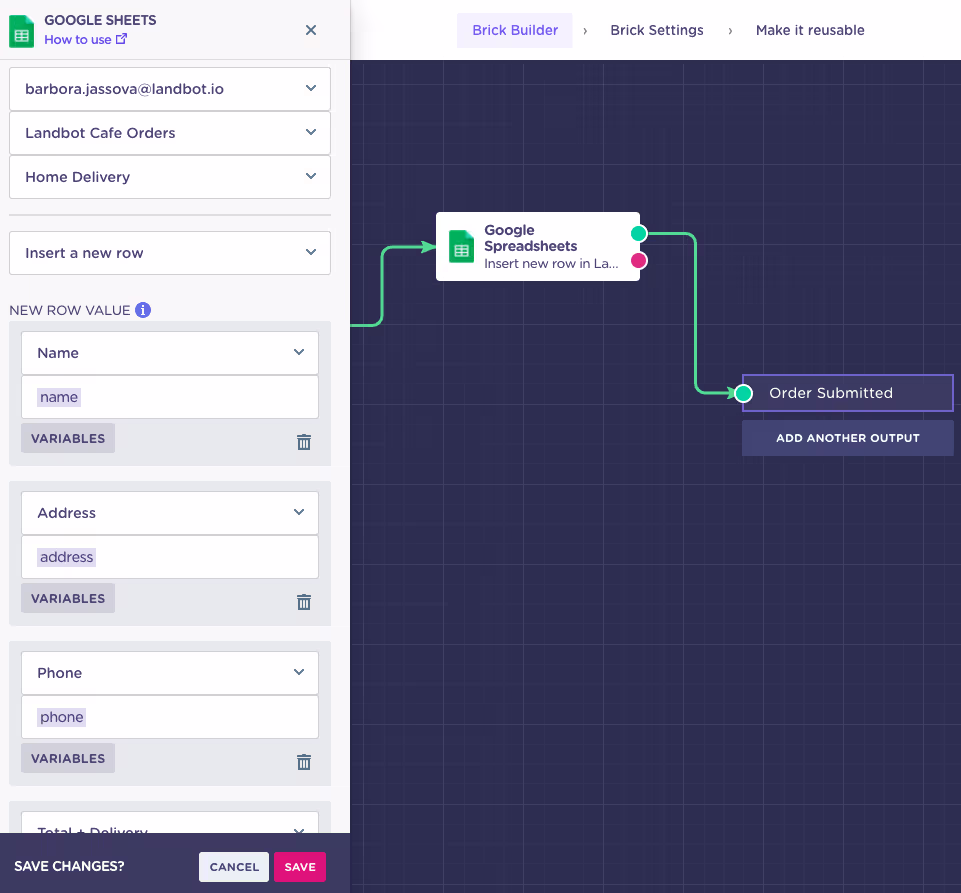
Now it’s time to export all the data to our database. While it’s possible to connect Landbot to any system using API, the easiest, quickest, and most accessible way to set up data export is with Google Sheets integration.
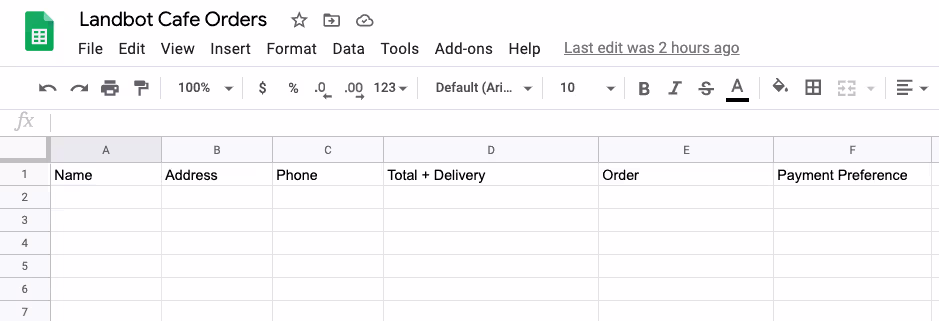
Naturally, first, you need to create a designated spreadsheet in your Google Drive:
Then you can proceed to connect your Google account with Landbot and associate the integration with a particular:
- Spreadsheet
- Sheet within the spreadsheet
Next, comes the indication of what action you want to perform.
Landbot offers three main processes you can carry out using this integration:
- Insert new data
- Upgrade existing data
- Retrieve data
Since we are uploading new data, choose the first option.
Last but not least, it’s time to associate the names of the individual columns in the spreadsheet with the variables which information you want to store under them:

Now, all that’s left is to wrap up the conversation!
9. Place Order (Home Delivery)
The home delivery “place an order” flow is very similar to the in-house version except for a few changes.
As in the restaurant scenario, start the flow with a formula to transform cart contents into a more user friendly format:
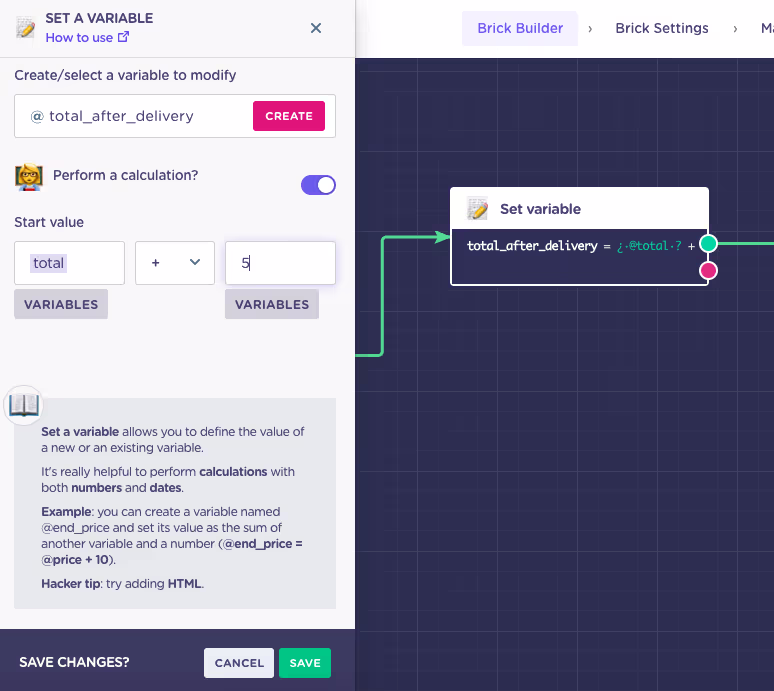
The next step will enable you to impose a delivery charge. Use the same “Set Variable” block as when calculating the total but create a new variable @total_after_delivery and sum the order total with whatever is your delivery charge:
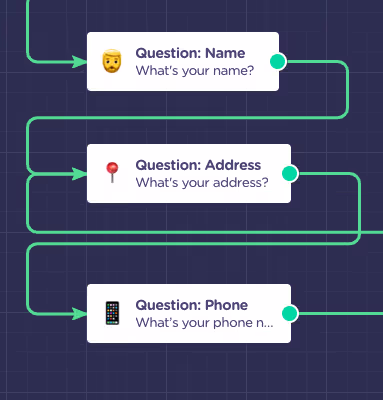
Next, it’s time to ask a few questions crucial to the delivery:
- Name
- Address
- Phone number
Before you finish the conversation though, let your customer revise the information once more using the Buttons block.
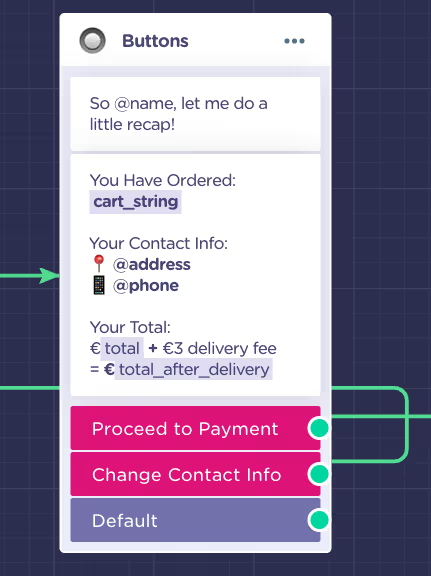
Link the “Change contact info” button back to the “address” question so the customer has the chance to update either the address or the number. If you feel like it, you can also create separate buttons to change the number and the address to avoid having to re-enter both when only one needs changing.
Next comes the payment option block. This time, I opted for “Cash on Delivery” or “Card” online:
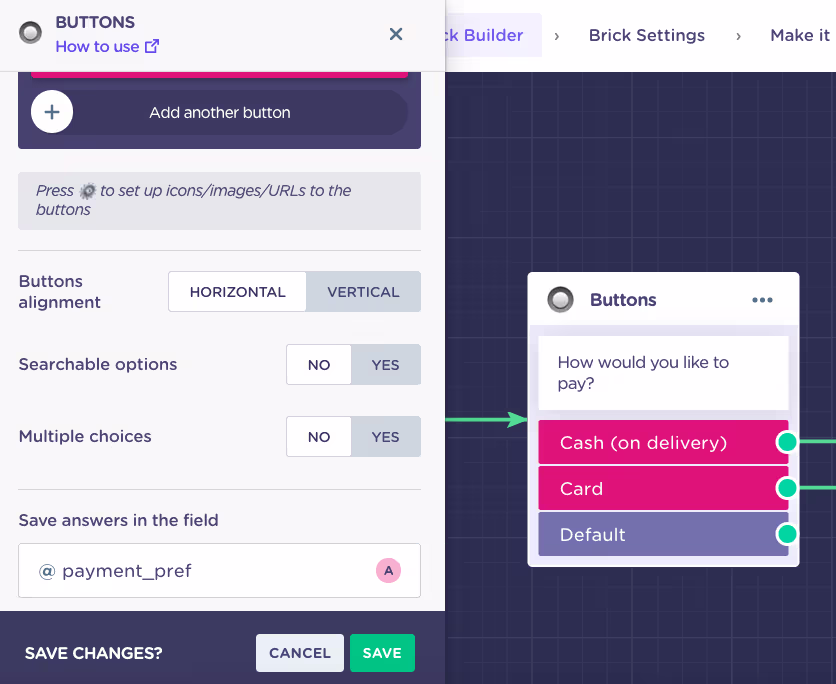
Do make sure to update the variable for this block answer to @payment_pref (click three dots in the upper right corner to open the advanced editor). And, insert the Stripe integration and order timestamp brick following the same flow structure as the “in-house” scenario:
All that is left to do is upload the order to your sheet so you can process the order.
To keep home deliveries apart from the in-house orders, I created a new sheet inside the same spreadsheet with adjusted column names to accommodate for the additional data required:
Once again, integrate the Google spreadsheet following the same steps as in the “in-house” order scenario:
Save the changes in the brick and return to the main flow.
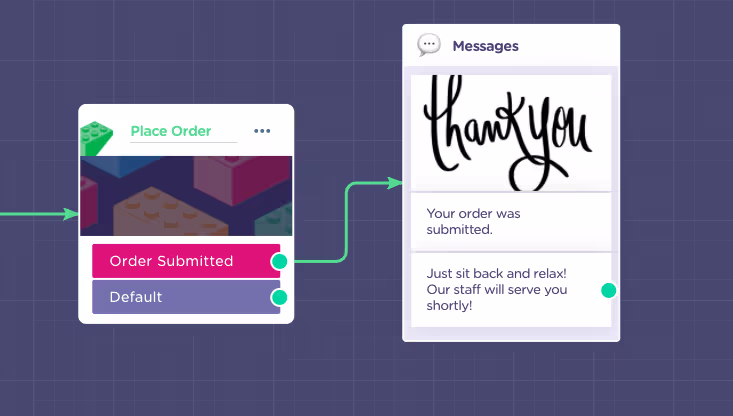
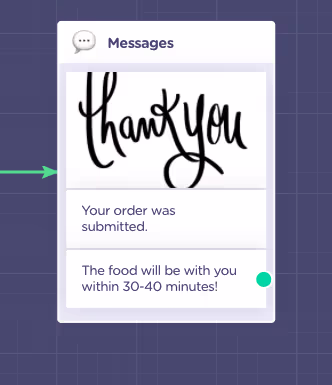
When you get there, don’t forget to put together a suitable thank you/goodbye message:
10. Create Persistent Menu
In order to give customers the freedom to clean the slate and have a “doover” or place an order in any moment during the conversation.
There is a way to make this happen and it’s called the “Persistent Menu” block. It’s no rocket science. In essence, the block creates permanent buttons in the header of your chatbot.
This block is a bit different since, in the same way as the Welcome message, it acts as the first point of access. Click on the purple arrow on the left side of the interface to open the advanced feature menu and search for “Persistent Menu”. Click to insert into your canvas:
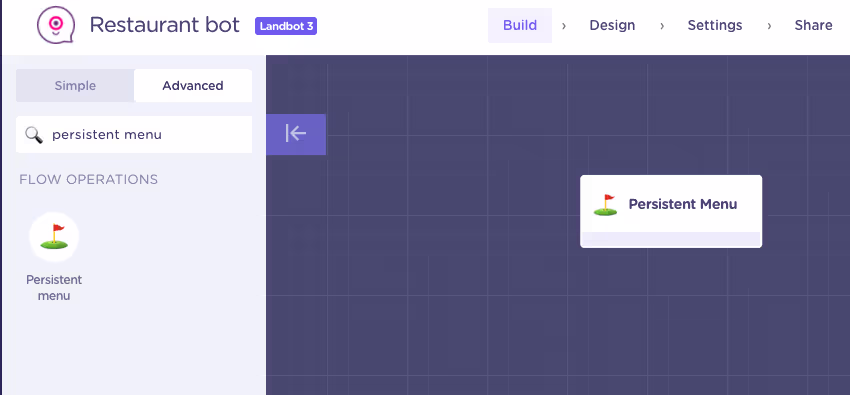
Next, simply define the buttons you want to feature in the header menu:
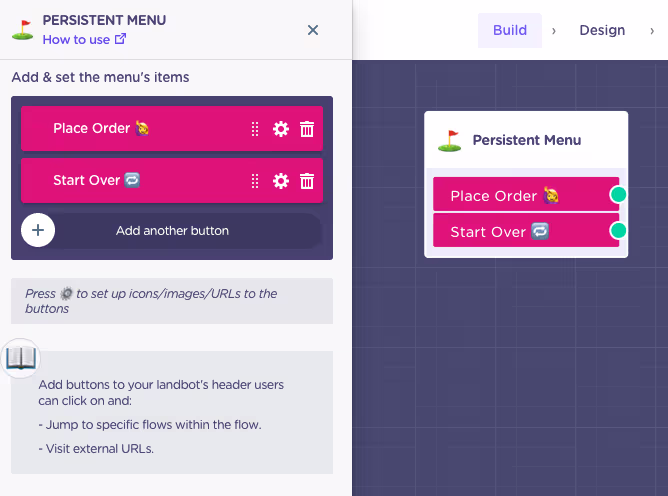
Naturally, we’ll be linking the “Place Order” button with the “Place Order” brick and the “Start Over” button with the “Main Menu” at the start of the conversation.
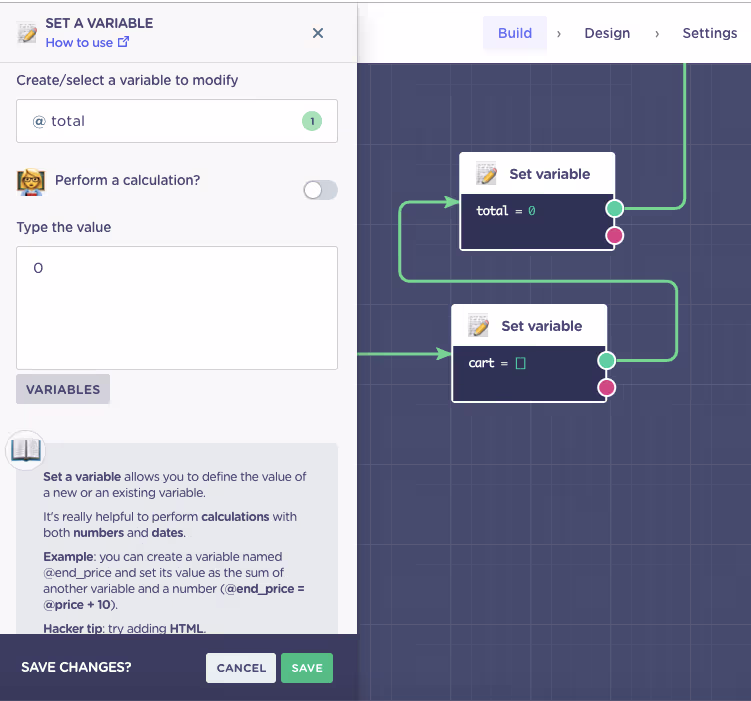
While the first connection can be done in a drag of an arrow from the button to the brick. The second “do-over” option requires a little intervention in the form of two “Set Variable” blocks:
In the first instance, using the block will help you set the value of the @cart back to “empty” or “none” using square brackets:

In the second instance, you will use it to set the @total back to 0
That is it!
The anatomy of your bot is working like clockwork… now it’s time to give it a facelift!
11. Personalize Your Chatbot Design
Click “Design” on the navigation bar in the header.
The design section is extremely easy to use, allowing you to see any changes you apply to the bot’s design in real-time.
You can either customize the colors, fonts & icons of your restaurant chatbot to match your businesses exactly:
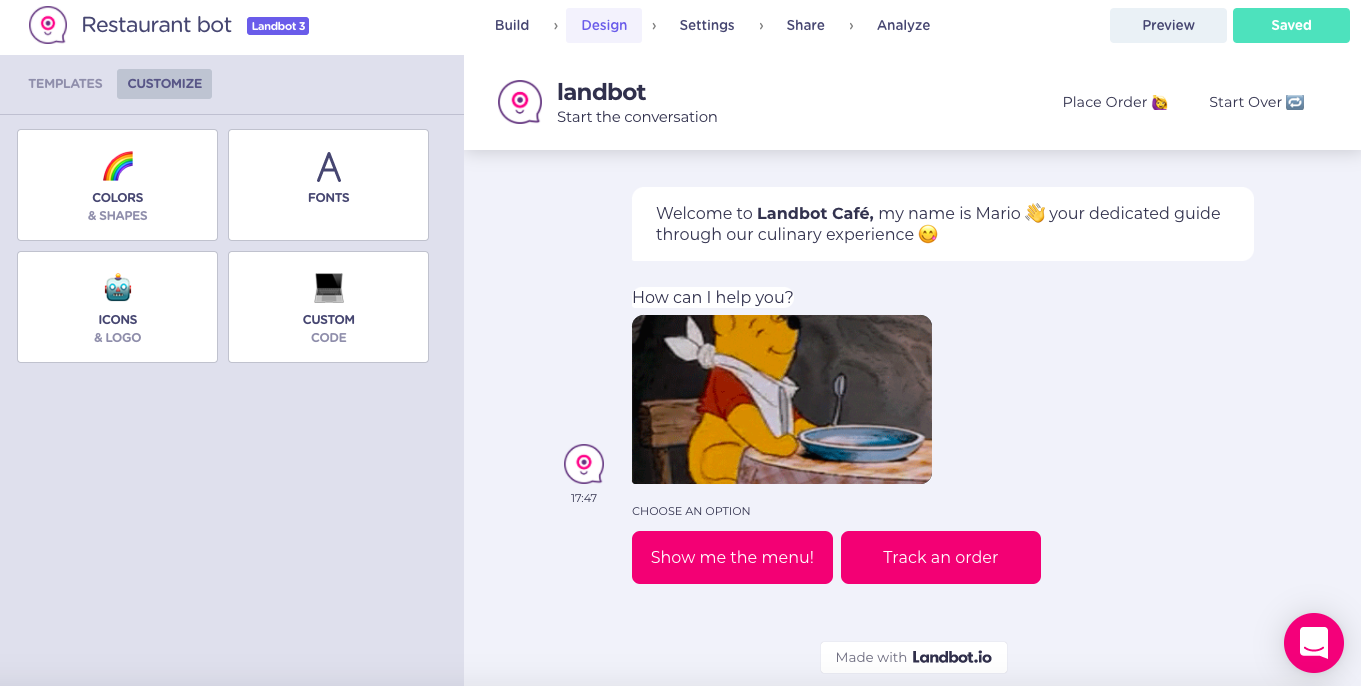
Or simply use one of the many stylish templates available in the design template library:

12. Set Up Hidden Fields
Hidden fields allow you to “hide” certain information in the URL of your bot.
So, in an instance when, for example, a customer accesses your in-house manu chatbot by scanning a QR code that QR code can correspond to a URL that includes the table number information.
To arrange hidden fields in Landbot, go to the “Settings” section in the header navigation bar and select “Hidden Fields” in the left-side menu:
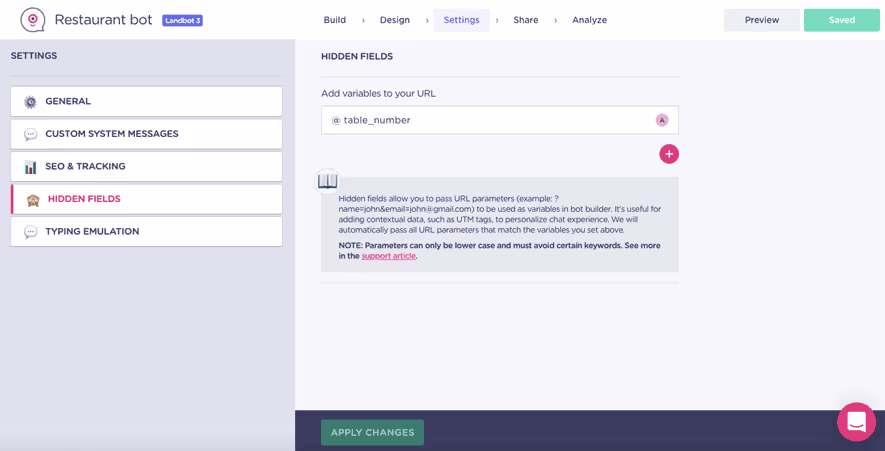
Here you can indicate which variable you want to store the bot’s URL.
In practice it will look as follows:
YOUR_BOT_URL?table_number=12
Hence, when the time comes for the bot to export the information to the Google sheet, the chatbot will know the table number even if the user didn’t submit this info manually.
Can You Do More?
Of course, you can! This tutorial only scrapes the well of possibilities you can achieve with Landbot builder without having to come anywhere near code!
The best part of it is… whether own a small coffee shop, a food truck, restaurant or a whole chain of eateries, you are able to put together a smart food ordering bot that can:
- Showcase your menu in a fun, interactive and visual attractive that feel natural to the mobile interface
- Prevent people from crowding the bar or serving area and, instead, allow them to take their seat and make their order in peace
- Help keep social distancing and hygiene protocols in place even during busy periods
- Encourage user engagement, improve overall customer experience and perhaps even spur some social media coverage
Deploying a restaurant chatbot with Landbot can be done within an hour… even if you decide to build a more complex one with customer support function or food recommendation services, you can go from concept to launch in a matter of days…
So, are you ready to give it a try?


.avif)
%20(1).png)
.avif)