


.svg)
Please note that 'Variables' are now called 'Fields' in Landbot's platform.
A CRM is a true powerhouse when it comes to marketing, in particular lead generation and lead nurturing.
It enhances collaboration and information exchange between marketing and sales, allows you to optimize data collection and storage, provides leads’ detailed journeys, and helps you identify the best qualified leads and what actions to perform in order to convert them.
When implemented correctly, the ROI of a CRM system can exceed 245% and boost conversion rates by as much as 300%. If you pair that with the conversational benefits of a chatbot — which we will look at below — you’re in the right place.
Speaking of CRM, a few weeks back, we launched our brand new Hubspot integration; now it’s time to see what you can use it for!
Since one of the main use cases of the chatbot / CRM combo is lead generation, let’s see how you can create a lead generation campaign using Landbot and HubSpot.
But first…
Why Should You Use a Chatbot for Lead Generation?
A lead generation chatbot is a rising star when it comes to identifying potential clients, sparking their interest in your business, and nurturing your relationship with them.
But why are they a better option?
The main reason is that they’re conversational, which on its own is already a much more engaging experience than what the typical conversion process on many websites offers. Typically, there’s a CTA button, you click on it and fill out a form asking for your name, contact details and other information like job position or company name. It’s not very fun, if you ask me.
Chatbots, on the other hand, turn this into a two-way street. Rule-based chatbots, in particular, are great at asking questions, and then following the most suitable path based on what the person replies. They also store their answers given in real-time.
What’s more, chatbots are not confined to your website. You can deploy them on messaging apps such as WhatsApp and Facebook Messenger, too, increasing their reach.
So, not only do chatbots make the whole process more engaging for the prospective customer, but they also allow your Sales Team to step in as soon as the lead comes in, thanks to their data storing capabilities.
Step-by-Step Landbot/Hubspot Lead Generation Campaign
Now that we’re reminded of the benefits of using chatbots for lead generation, let’s dive in!
A lot of lead generation actions consist of prospects leaving their information in exchange for a piece of gated content, such as a white paper or industry-specific report. But, since the Holiday Season is under way, I thought we’d make this a bit more fun by creating a lead generation website chatbot that engages with Landbot visitors and offers them a template to build a Secret Santa bot for their next office holiday get-together. In return for their contact details, of course. 😉
Step 1: Define Your Goal
The first thing we need to do is define is our campaign’s and chatbot’s goal.
Since we’re talking about a lead generation campaign, the goal is clear — to generate leads!
In this case, we’d be aiming to turn website visitors into leads. And the way we’re doing that is by having a chatbot pop up, engage in conversation with them, and offer them something seasonally appropriate — a Secret Santa bot — after asking them for any relevant information we’d want to gather.
Once that is clear, we can go ahead and establish the specific task we want the chatbot to perform together with our CRM — Hubspot. In this case, thanks to the integration, we would collect and record all the information gathered by the chatbot conversations directly in Hubspot, since the conversations are stored and synched in real-time.
Step 2: Define Your Audience
We have decided that the goal of this campaign is to turn website visitors into leads. However, at this step, we can be more specific.
Do we want to start a conversation with ALL website visitors on the Landbot homepage, or do we want to place the chatbot on a specific page, like the Integrations page, or trigger it as soon as the visitor performs a certain action?
For this campaign, since we’re not exchanging a piece of gated content for their contact information, plus it’s Holiday-themed, we can go ahead and have the chatbot talk to as many people as possible (the conversation can start with a friendly Holiday greeting.) So our audience is anyone who visits the Landbot website.
Step 3: Build Your Chatbot
Now, to the fun part!
With the campaign’s goal and audience in mind, it’s time to build our chatbot.
If you’re already familiar with Landbot’s no-code builder, you know how easy it is to use, and how quickly you can build and deploy a chatbot.
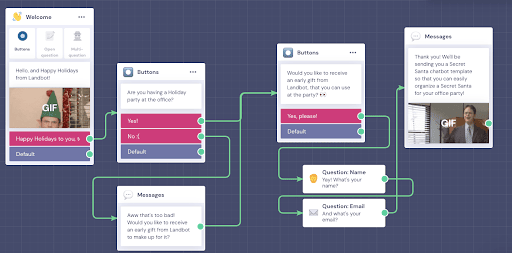
In this case, we’d build a very simple flow with a greeting, maybe add in a Holiday-themed question or two, and then ask website visitors to fill in their contact information. Something like this:
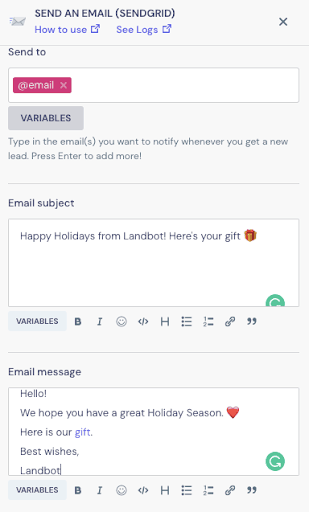
At the end of the conversation flow, we’d need to add a “Send an email” block so that the prospects receive their early gift from us. In that block, we can type in the email subject and the text to be sent:
In case you’re new to Landbot, don’t worry! You can watch this video to learn more:
Or read this article for a complete website chatbot building tutorial.
Step 4: Integrate it with HubSpot
After we’re finished building our chatbot flow, we can finally integrate it with HubSpot.
In the builder, you’ll find the HubSpot chatbot integration block in the side menu, or you can add it by dragging the green arrow out of your last chatbot block and pulling it from the pop-up list.

Then, you need to setup your account. Once that’s done, the HubSpot integration block will show you the action options you can choose from:
- Create data;
- Update data;
- Get data.
For this lead generation campaign, we’d select “Create data”, since we want to create the new contacts on Hubspot that the chatbot has collected.
Then, under each of these actions, you can select other, more specific actions:
- New Contact;
- New Company;
- New Deal;
- New Ticket.
In our case, we’d choose “New Contact.”

Each of these actions comes pre-populated with the more relevant variables to the specific action. For instance, “New Contact” automatically displays the “First Name,” “Last Name,” and “Email” variables.
Since, in our flow, we only asked for name and email address, we wouldn’t need to add any more fields, but that option is always there.
And that would be it!
Adding the HubSpot integration to your chatbot is this easy, but if you’re looking for more information on it, this is the place to go.
Step 5: Launch and Follow-Up
The final step is to launch our chatbot!
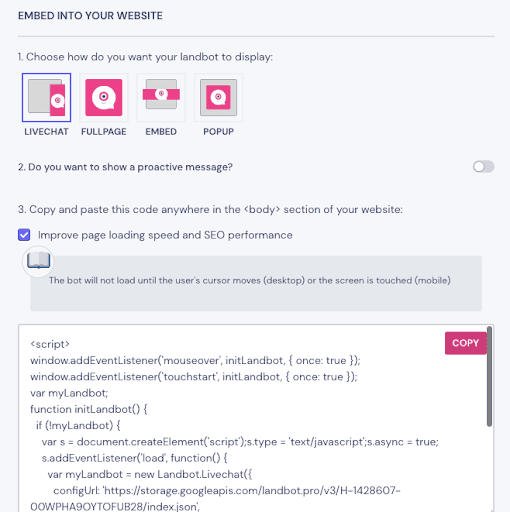
All we have to do is save any changes missing and click “Publish.” Then we need to go to the “Share” section, select how we want our chatbot to be displayed on our website, and copy and paste the code into its <body> section.
This is what this step looks like:
Once that’s done, the chatbot is live and ready to greet all our website visitors and (hopefully) turn them into leads.
All that’s left then is to check your new leads on HubSpot and start contacting them!
Conclusion
This is just one example of how you can use your Landbot / HubSpot integration for lead generation, but there are many other ways.
Whatever use case you pick, you can be sure that it’s an easy, low-cost strategy that helps you make the best of your CRM.
What to get started? Just sign up with Landbot (if you haven’t already) and try your HubSpot chatbot integration for free today!
P.S. We really do have a Secret Santa chatbot template that you can use, for free. Check out Secret Santa chatbot template here, or find it in our templates page.
%20(1).avif)


.avif)
.avif)
.avif)
%20(1).png)
.avif)