


.svg)
Please note that 'Variables' are now called 'Fields' in Landbot's platform.
Webinar registration chatbot is the first stage in your webinar conversion funnel. To keep attendees aware and interested, pass the baton to the webinar engagement bot.
Indeed, acquiring signups isn’t the most difficult task when it comes to webinar marketing. The tough part involves keeping your registrants interested and engaged and actually getting them to attend.
In other words, letting communication die down after registration isn’t really an option.
You need to keep the idea of your webinar alive without coming across as too pushy. The best way to achieve that is to give attendees an option to engage on their own terms.
Therefore, in this tutorial, I will show how to optimize one of our pre-designed templates to boost pre- and during-webinar engagement as presented in our Ultimate Webinar Marketing Playbook.
What is a Webinar Engagement Bot?
A webinar engagement bot is a conversational software that enables webinar attendees to submit questions or vote on already submitted questions to be answered during the webinar Q&A session. You can launch the bot prior to the webinar to build hype as well as keep it active during the webinar to allow more questions to come in. It can operate on the web, WhatsApp, Facebook Messenger, or other messaging app channels.
Why Use a Webinar Engagement Chatbot?
There are several reasons not to stop the involvement of chatbots in your webinar marketing strategy just yet…
☝️ Chatbot Engagement
Bots are famous for encouraging more engagement than forms, landing pages, or other passive forms of communication. They encourage interaction and leave control in the hands of the user.
☝️ Audience Overview
Using the webinar engagement chatbot allows you to get a good idea of what your audience is interested in before the webinar takes place. Thus, if you see a certain type of question already trending, you have time to adjust your webinar agenda to make the experience as valuable as possible.
☝️ Personalization
Chatbot conversations engage your audience in a personal way allowing them to dictate their own user experience. In other words, your engagement bot can serve a variety of purposes. While its main focus will be to collect and vote for questions, you can also sneak in options to get in touch or find out more about your product.
How to Build a Webinar Engagement Bot: No-Code Tutorial
Now it’s finally time to show you how to create a webinar engagement bot quickly and efficiently using a carefully pre-designed webinar engagement flow template in the Landbot chatbot platform.
So, without further ado, let’s get to it!
1. Sign Up or Access Dashboard
NOTE: If you don’t have a Landbot account yet, you need to sign up. It’s free (no credit card info required) and it comes with a 5-day free trial.
On the Landbot dashboard, click the “Build a Chatbot” button in the upper right corner.
Next, select the channel for your bot – in this case the web.
The interface will automatically redirect you to the templates library.
Turn your attention to the templates section and locate the one called “Webinar Engagement”.
If you want to get an idea of the customer experience, click on the eye icon to see and interact with the bot in a preview mode.
Click “Use This” to begin
2. Familiarize Yourself with the Template
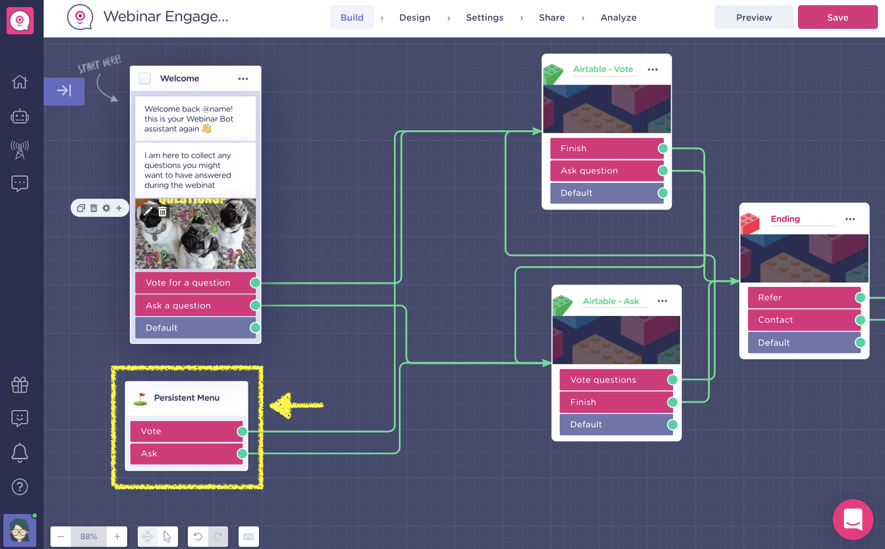
After you land inside the builder, take time to gain an overview of the template you will be customizing.
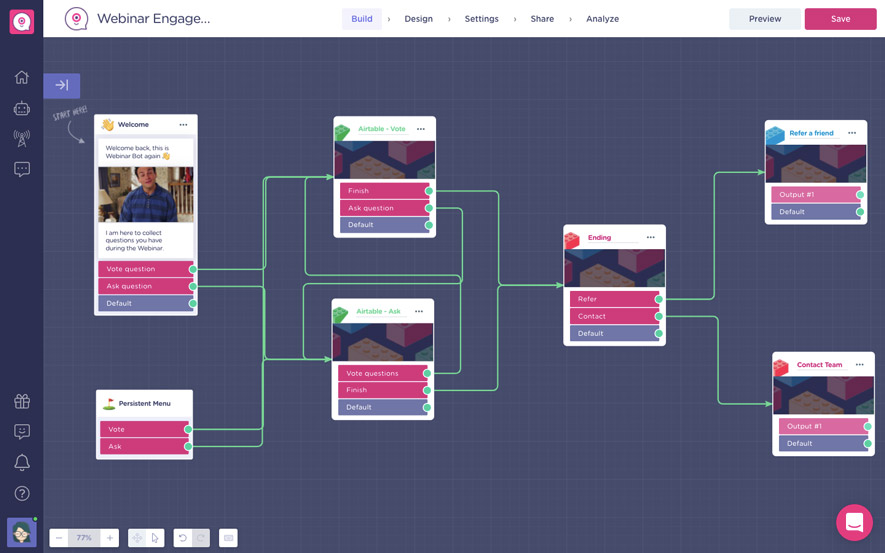
The webinar engagement bot template is organized into bricks (clusters) for better oversight and management.
The main flow splits into two main paths right at the beginning:
- Airtable – Vote
- Airtable – Ask
Though the bricks are still interconnected meaning after you pass through one you still have an option to visit the other.
The flow then unified in the Ending brick where the user can abandon the flow or choose one of the two options also present in the webinar registration bot:
- Refer a Friend
- Contact Team
Last but not least, there is one independent block called “Persistent Menu” which makes the option to ask or vote for a question permanently available in the header of the bot.
3. Customize Your Welcome Message
The first step towards customization is very simple.
Simply personalize the pre-set welcome block to reflect your brand tone and webinar scenario.
All in all, the welcome message can be as long or short or as laid back or formal as you wish. It can include a gif, image, video, or even downloadable content. It really depends on what kind of engagement you want to achieve as well as what you believe will be most enticing for your target audience.
In general, though, your engagement bot should not be much different (in terms of design, tone, and personality) from your registration bot. You want to carry the rapport established in the registration process forward.
However, the information that cannot miss in the webinar engagement bot’s welcome message is its purpose. It must be clear right from the start what the bot is there to do for the user.
4. Airtable – Ask a Question
Hover your mouse over the “Airtable – Ask” brick and when the edit button appears click to enter.
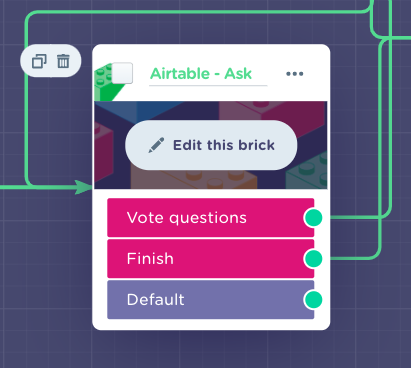
Once in, you will be able to see the anatomy of the brick:
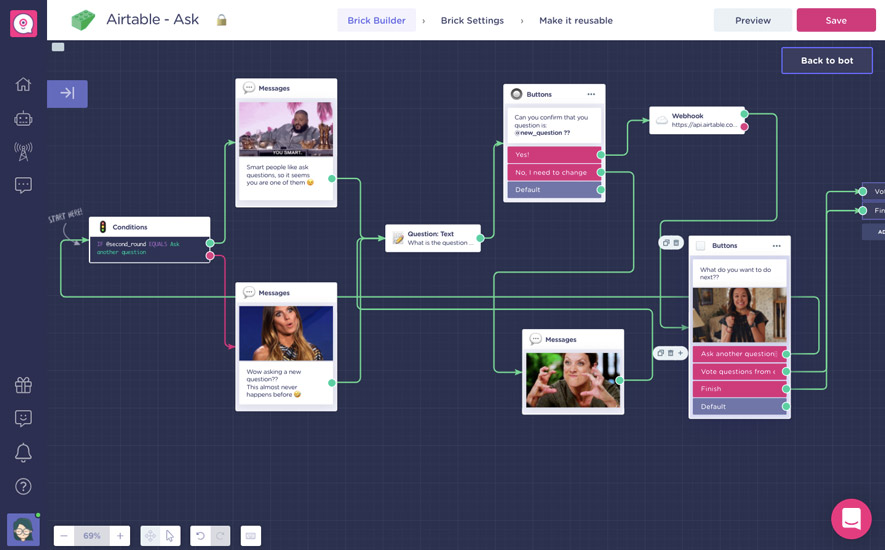
- Conditions Block
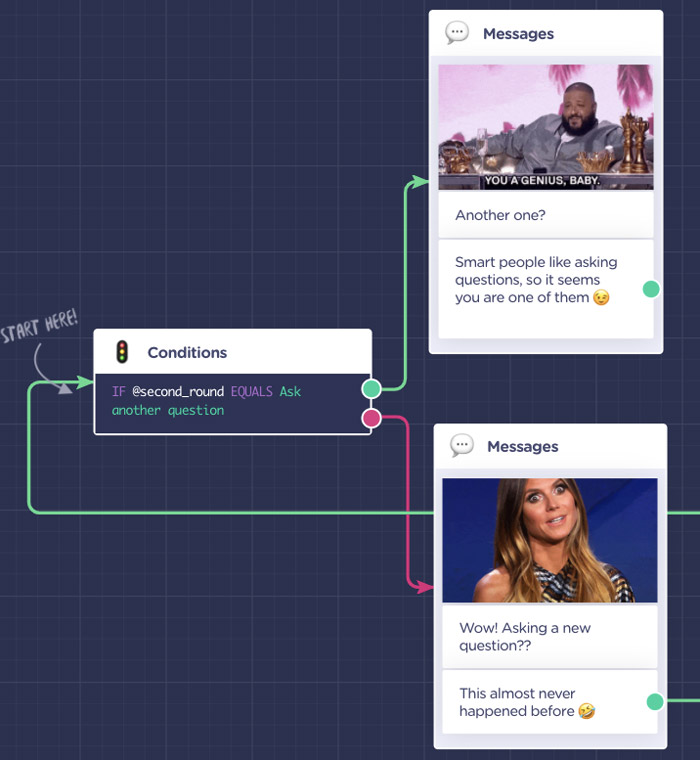
You will notice that this flow kicks off with a Conditions block.
The reason behind this? The flow is set up to offer the option to ask another question after submitting the first one.
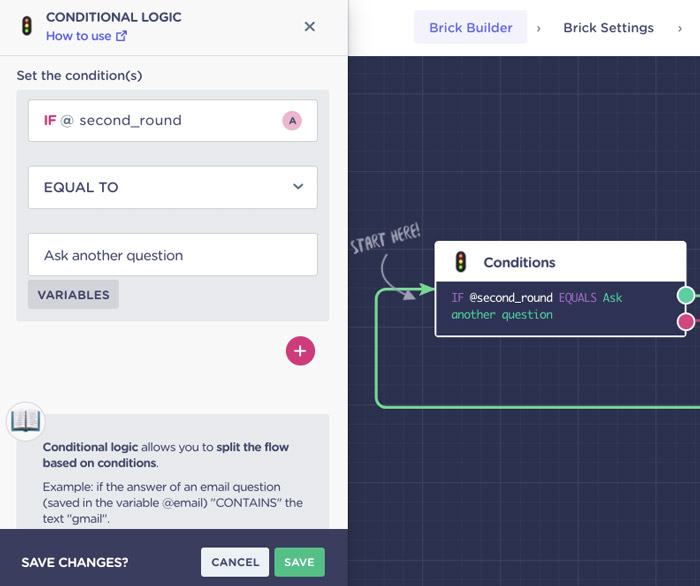
This condition enables the bot to split the “first-timers” from those who decided to submit more than one question.
Hence, if the condition is not met, the variable @second_round doesn’t equal to “Ask Another Question” the bot will direct the user via the “FALSE” (pink) output designed for cases when this is the users first round.
If, however, the condition is true, the users are directed through the “TRUE” (green) output which flow is adjusted for users who decided to ask another question:
Naturally, you are free to customize the copies and visuals used in these blocks to suit your bot style and tone.
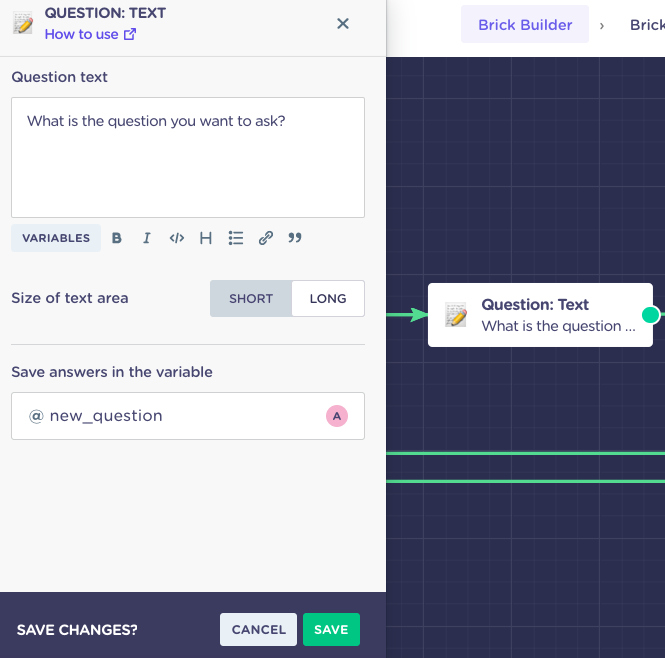
- Question Text Block
After this, comes the time to let the attendee submit his or her question saving it under a variable @new_question:
After the question that asks for user questions block comes a Buttons block.
Here, the bot gives the person a chance to confirm or change the question in case they made a mistake or changed their mind:
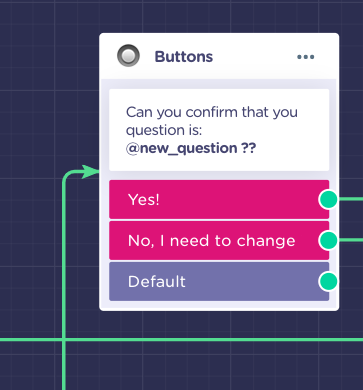
If the user selects “No, I need to change it”, the webinar engagement bot redirects them back to the question submission block.
However, if everything is in order, the question will be uploaded to Airtable, a sophisticated spreadsheet mechanism.
It’s time to set up our first webhook!
- Set Up Airtable Webhook
Though truth be told, most of the setup process is complete, all you need to do is connect your Airtable account and sheet.
Before anything else, you must create a dedicated spreadsheet (or as Airtable calls it “a base”) on Airtable:

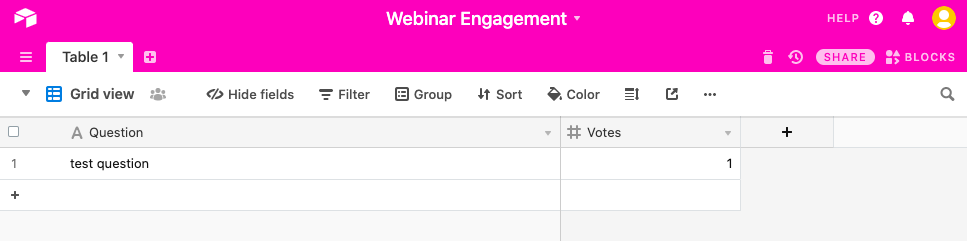
Crete fields for:
- Question (Format: Text)
- Votes (Format: Numeric)
Now you are ready to set up the webhook.
Go back to the builder and click on the “Webhook” block to open the advanced editing field on the left
First of all, you need to configure the URL in the URL & Method field.

The structure of this URL should be structured as follows:
https://api.airtable.com/v0/<app_id>/<nameofthebase>
To obtain this URL, go to your Airtable base, click “Help” in the upper right corner, and select API Documentation.
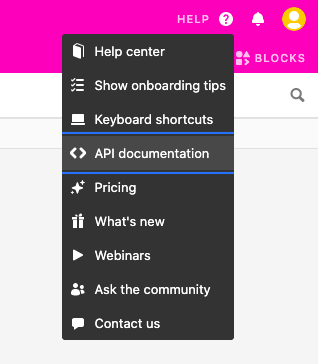
A new tab will load.
Click “AUTHENTICATION” in the navigation menu and copy the URL under “EXAMPLE USING BEARER TOKEN (RECOMMENDED)”
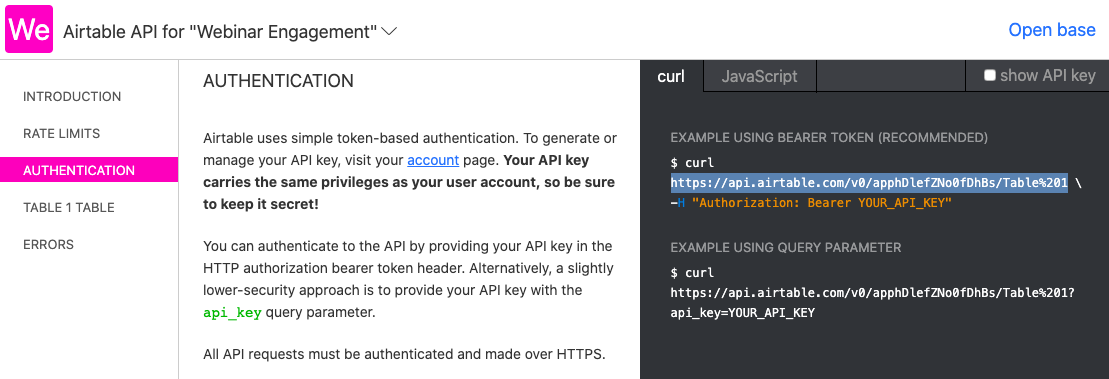
In this sample case that would be:
https://api.airtable.com/v0/apphDlefZNo0fDhBs/Table%201
- <app_id> equals apphDlefZNo0fDhBs
- <nameofthebase> equals Table%201 (as based on the name of the Airtable sheet we created)
Copy-paste the URL into the URL & Method Field and move on to the next step.
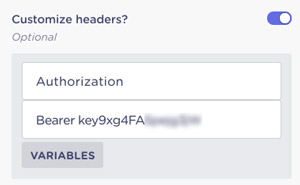
Focus your attention on the following section: “Customize headers?”
Here, you need to obtain your Airtable API Key.
To do that, go back to the Airtable API Documentation page. Tick the “Show the API Key” box in the and your API key will appear:
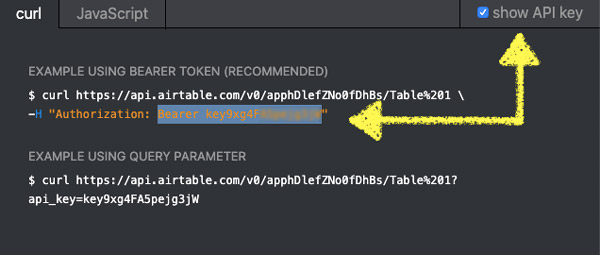
Copy the key and paste it into the appropriate section in Landbot builder:
To proceed, scroll down to the “Customize body?” section.
The information we want to send to Airtable is already prepared for you in the necessary format. Therefore, there is no need to make any adjustments.
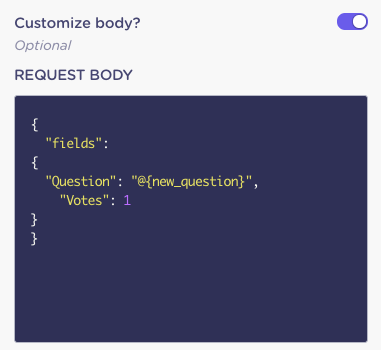
Notice that the user “Question” column in the sheet is to be updated with the @new_question variable representing the newly submitted question.
On the other hand, the “Votes” column reflects a numeric value of 1 instead of a variable. This way, when a new question comes in, it automatically gets one vote representing the vote of its creator.
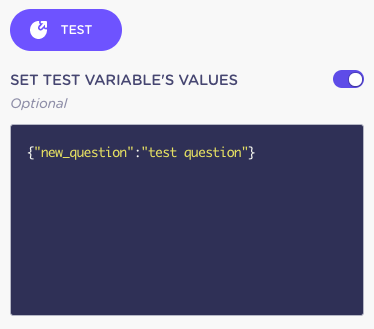
- Test Airtable Webhook
When you scroll down, you’ll see a big purple TEST button and under it, some test variable values to help you test the setup.
So, go ahead and click that button!
If your connection is correct, the test response will return with a 200 status and updated data:
Or, you can just check your Airtable base to see if the data went through!
Save the changes you made in the webhook and move on to the next and last block in this brick.
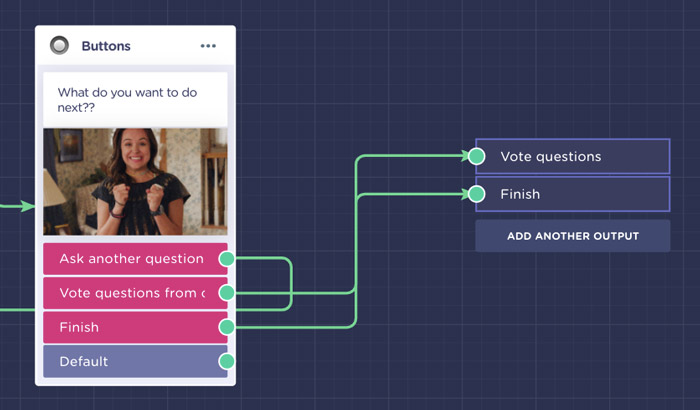
The last block offers the user three choices:
- Ask another question (a button that leads back to the very first “Conditions” block)
- Vote for a question from other users (a button that leads to the other path in the flow)
- Finish (a button that moves the conversation to the next stage – the “Ending” brick)
Here you are free to adjust the copies as you see fit. When done, exit the brick and go back to the main flow.
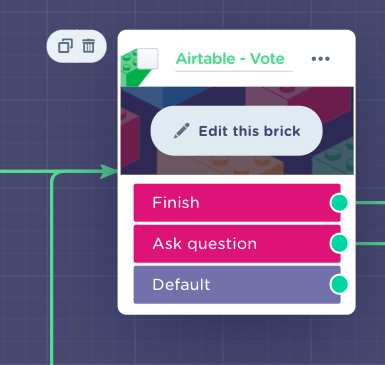
5. Airtable – Vote for a Question
Now, hover over the “Airtable – Vote” brick and click to enter.
As in the previous brick, before getting down to business, take your time to familiarize yourself with the flow.
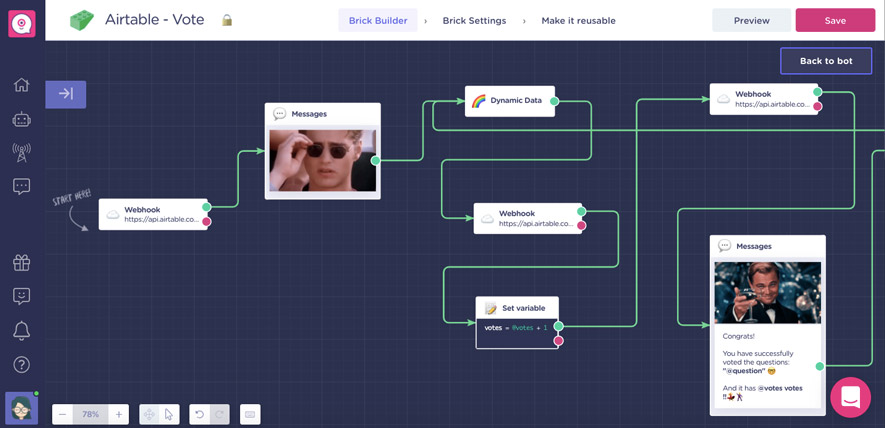
As you can see, this brick starts with a webhook… an Airtable webhook.
Why?
Well, if someone wants to vote on the questions submitted by others, you first need to download them from your base!
- Retrieve Question ID from Airtable
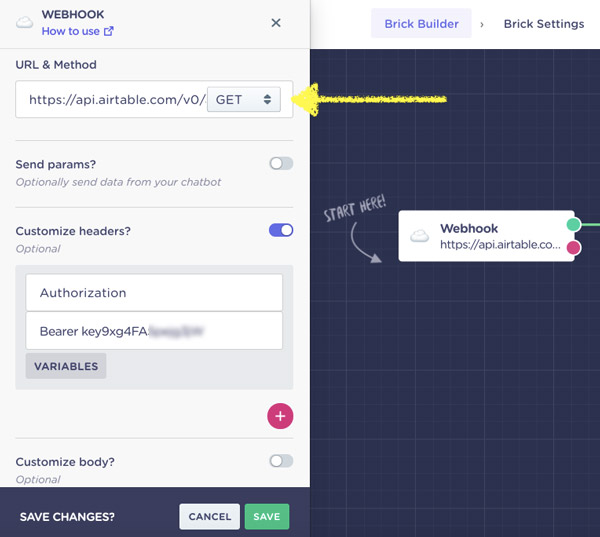
Click on the webhook to open the editing section.
To customize the URL & Method section and the “Customize Header?” field follow the same process as in the previous brick. The only difference in the set up is the action that is now set to “GET” instead of “POST” since we will be retrieving data from Airtable not sending it.
Once again, the test values are pre-set so just press the TEST button to see if the connection is working properly.
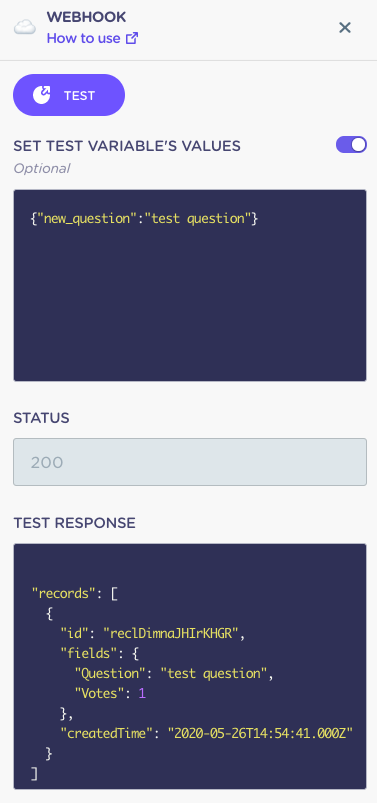
If all is OK, you will see the 200 response status.
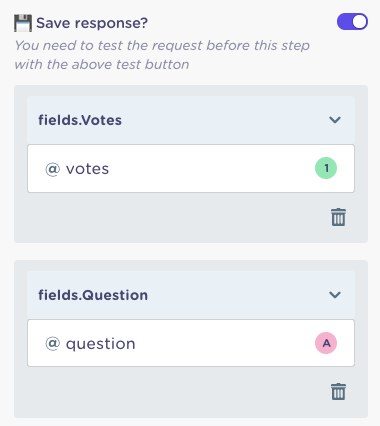
Next, scroll through the end of the webhook editing area to the “Save Response” section.
There is no need to change anything, though it’s important to note you will be saving the data downloaded from Airtable under @arrayquestion variable in an array format.
SAVE the changes and turn your attention to the “Dynamic Data” block.
- Configure Dynamic Data Block
Click the block to open the editor.
Dynamic Data block allows you to adjust the options displayed to the user in real-time based on the latest updates in the database:
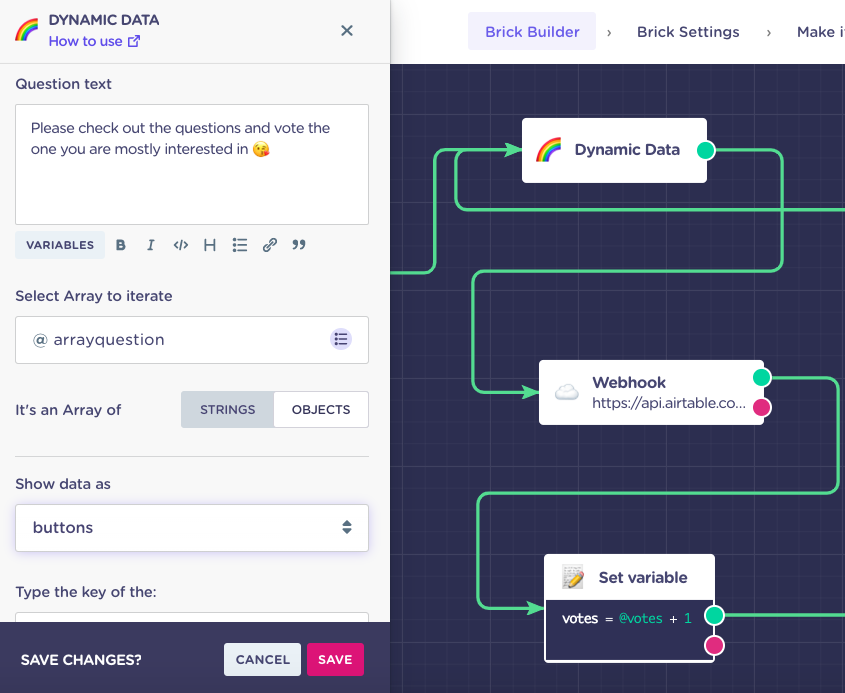
Although the block might look a bit complex, you don’t need to do much here.
Naturally, you can adjust the copy in the “Question Text” field as you like.
“Select the array to iterate” is a section where you indicate the information you want to import and display in this question. It’s already set to @arrayquestion to retrieve and show all the questions you have collected so far.
Leave the “It’s an Array of” secession set to “OBJECTS” as is.
Now, in “Show data as” offers a little wiggle room.
Generally, you can decide to show the questions as:
- Buttons
- Cards (images)
- Autocomplete
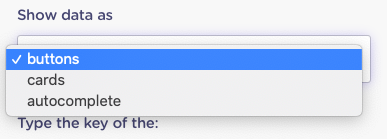
NOTE: Cards option, in this case, is out of the question as you have no images to associate with the questions. This setup is usually leveraged in eCommerce to show product live feed.
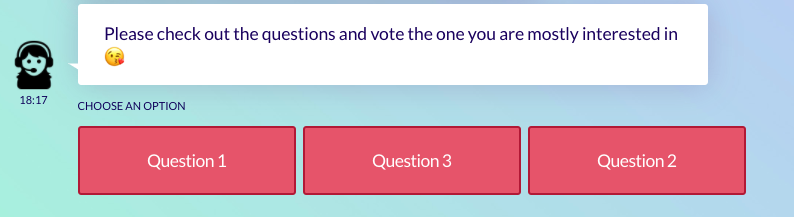
However, you can choose whether to show the submitted questions as buttons or in the form of autocomplete. Which one you choose really depends on the number of questions you are expecting. You don’t want to end up with the bot displaying 50 buttons at ones. So, if the expected volume is quite high, opt for the autocomplete options. This way the users can simply click to start typing and a list of all questions will appear in an autocomplete fashion.
Buttons:
Autocomplete:
After the user has voted, we need to update that vote to Airtable.
- Retrieve Specific Question & Its Votes from Airtable to Process an Update
To do that, first, we need to retrieve the question and its number of votes from Airtable and then send back the updated result.
SAVE the changes in Dynamic Data block and move on to edit the following webhook.
There once again repeat the setup for the URL and API Key. However, this time, make a small addition to the URL by adding @id_question variable to it:
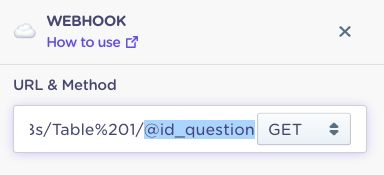
Click TEST.
After the test is successful, check the test results and take note of the automatically assigned Airtable “id” of the question (row) as we will need it later.
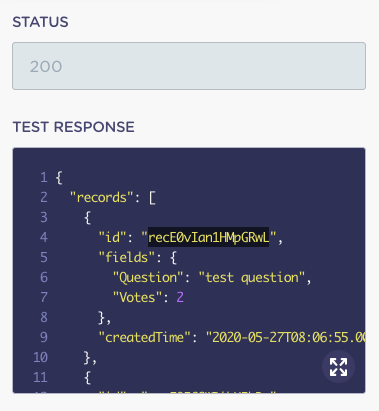
When you scroll down to the response section, you will see we are bringing back the @question and @vote data.
- Perform Calculation with “Set a Variable” Block
Now that we have that, it’s time for the calculation of the votes which is performed by the “Set Variable” block.
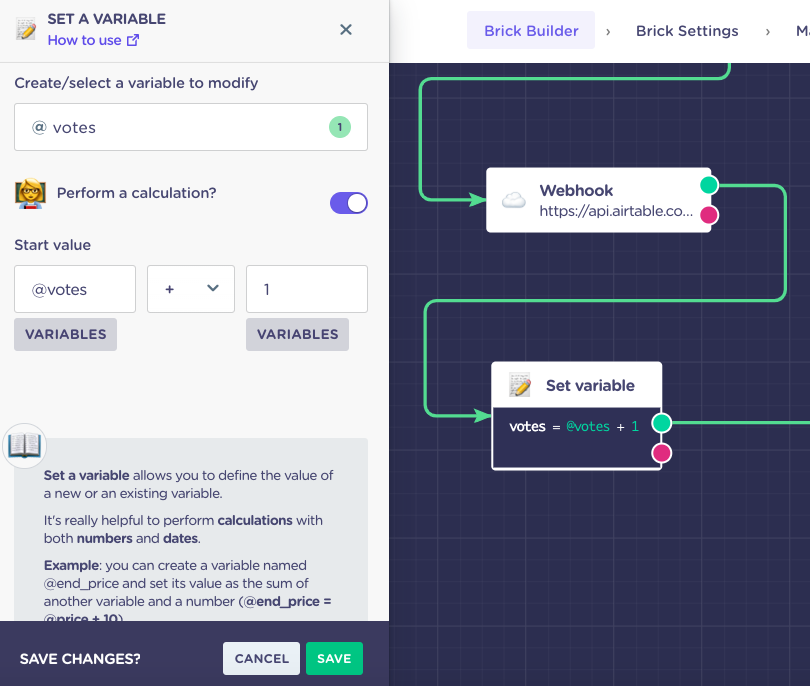
No changes are needed here but it’s always good to check how it works! Basically, the block performs a calculator summing @vote which is the current vote value of the question with +1 (the newest vote).
After the calculation is performed, the bot is ready to update the new data to Airtable.
- Update Airtable Data with New Vote
Click the block to open the webhook editor and repeat the setup of the URL and API Key of the previous webhook with URL including @id_question.
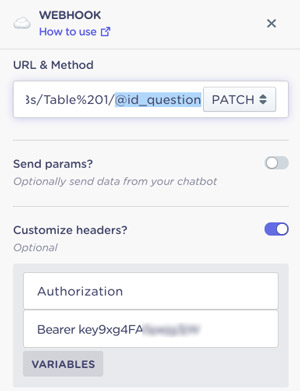
Notice the action is now set to “PATCH”; We will be “patching” the new number of votes over the old one.
Now, before you click “TEST”, you need to make one small adjustment. Go to the “Set test Variable Values” and update the “id_question” to equal to the ID generated in the previous webhook. If you don’t do that the test won’t work as the ID in the template does not correspond to your spreadsheets.

If all is in order, the test response will appear as follows:
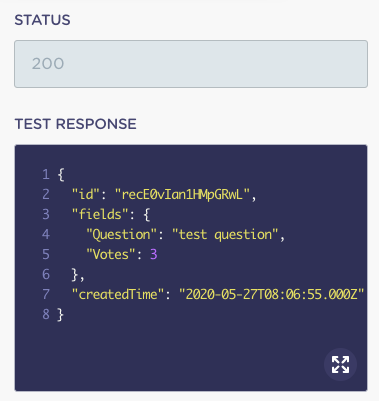
You can also check if the votes number updates in your Airtable sheet.
- Customize the Rest of the Block
The following block simply summarizes the user’s action revealing how many votes the question has so far. If you don’t want to adjust the copy or the gif, simply move on to the next block.
To conclude, the “Airtable – Ask” brick wraps up with two Buttons blocks:
- The first one offering the option to vote for another question
- The second one offering the user to finish or ask their own question

Once again, if you are happy with the copy, simply exit the brick to move on.
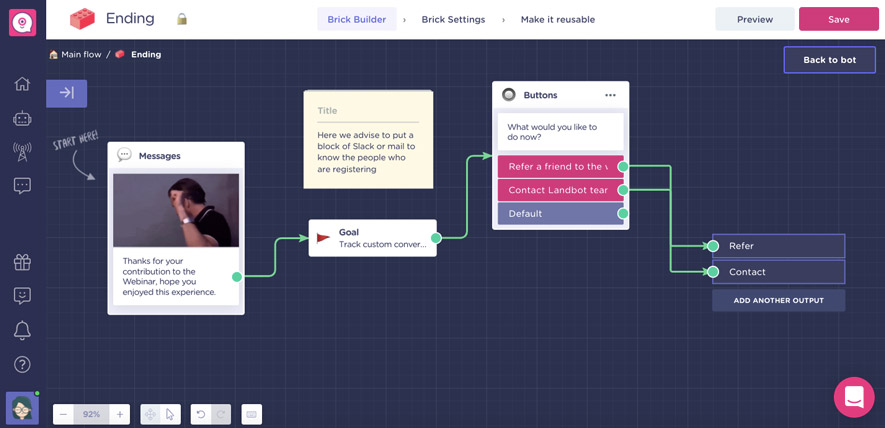
6. The Ending – Say Thanks
The “Ending” brick layout is very simple. It consists of:
- Message block thanking the user for his or her contribution
- Goal block to track everyone who reaches this stage of the conversation (visible in Landbot built-in analytics) as this is the main conversion point for the webinar engagement bot
- Buttons block to introduce further choice to refer a friend or contact Landbot team
Including the “refer a friend” option as in the registration bot, helps to encourage referrals even after the registration is complete. Since you can deploy the engagement bot before the webinar, the simplicity of it increases the likeliness of your webinar being shared.
Once again offering the option to contact your team demonstrates your openness to communicate as well as makes it easier for the users to reach their goal should they want to speak to your team directly.
However, if you don’t want to include these options simply delete the block and add a “Goodbye” block instead.
After you are done, exit the brick to return to the main flow.
7. Refer a Friend
Enter to edit the “Refer a Fried” brick.
This brick is composed of a single block. Thus, it doesn’t truly need to be a brick, it’s been designed this way to make the template more self-explanatory and easy to follow.
That solitary block inside is the “GoodBye” block almost identical to the one in the webinar registration chatbot.
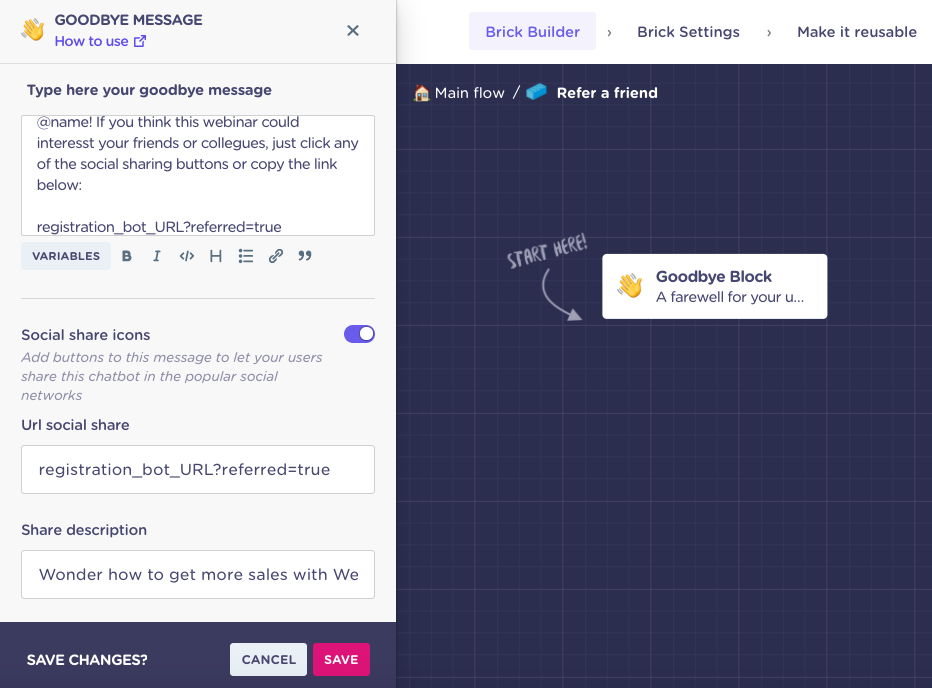
What do you need to do to optimize it?
- Customize the copy of the goodbye message to fit your brand tone and webinar scenario
- Change the link in the goodbye message with the link of your webinar registration bot followed ?referred=true for tracking
- Change the link in the “URL social share” section with the registration bot URL followed by ?referred=true for tracking
- Personalize your default “Share Description” which is the message that will appear on social media when your bot is shared.
Save all the changes and move on to the next brick.
8. Contact Team
The second option offered by our “Ending” brick was contacting the team.
If you previously created the webinar registration bot you already know what awaits you here. Though, first-timers should take time and gain a general understanding of the flow before starting to customize it.
While the flow inside this brick is quite rich, it’s not hard to get a hang of it and adjust it to your needs.
The first block offers the user to identify one of three reasons for contacting:
- Buy our product or service
- Work for us
- PR & Media Coverage
Now these options are not universal. So, if they don’t apply to your particular use case, be sure to delete some or add different ones.
In this template, you will see that the options “Work for us” and “PR & Media Coverage” lead to message blocks offering up contact email addresses so the users can get in touch with the appropriate department/person without being passed around.
On the other hand, the “Buy our Product or Service” option proceeds to ask the user for a bit more information. Next, it presents the prospect with an option to:
- schedule a call
- be transferred to a live agent
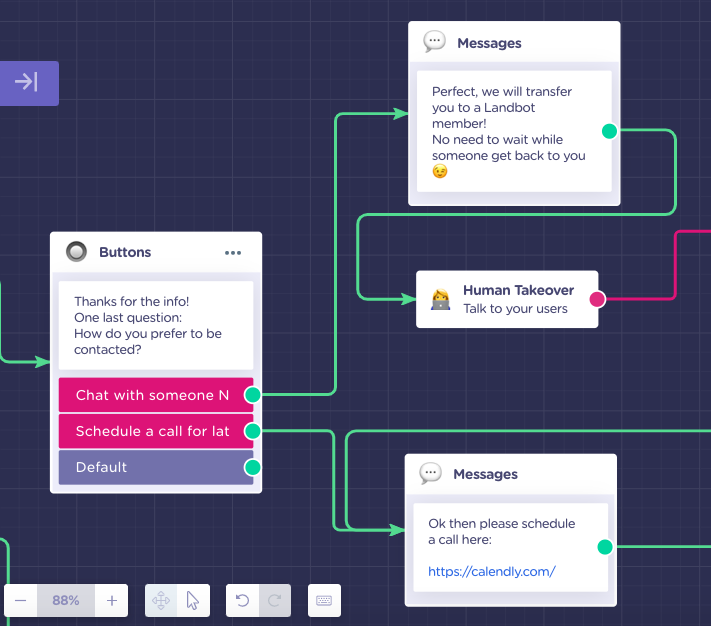
When it comes to the “Schedule a Call” option, in the message block following it, remember to update the link to that of your or your team’s personal calendar!
“Chat Now” option leads to a fun feature called “Human Takeover” enabling your agents to jump into the conversation and transform it to a live chat.
The setup of the bot-to-human-handoff with Landbot is almost ridiculously easy.
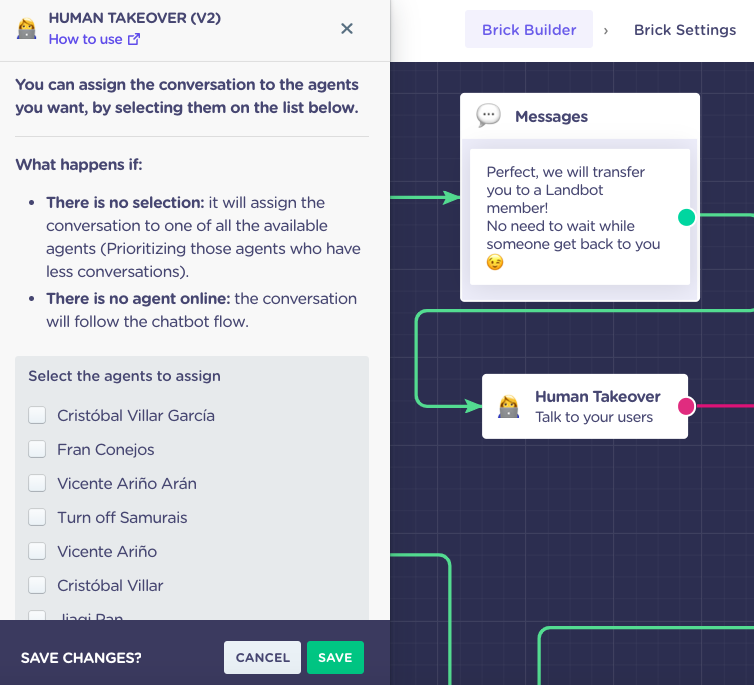
You literally just need to connect the block to the rest of the flow. And, since this is a template, that has already been done for you.
All that is left is for you to decide whether you want to assign this takeover to specific agents or leave it on default. If you don’t assign it to anybody the bot will automatically push the request to the person with the least amount of conversations in their queue.
The Human Takeover block provides a PINK output. You can use it to propose an alternative path in case none of your agents are available.
The webinar engagement bot template then offers the user a chance to:
- schedule a call
- wait to be contacted
The brick wraps things up with a simple Goodbye block which you can customize to your liking.
9. Persistent Menu
Last but not least, we have the somewhat strange “Persistent Menu” block present in the main flow.
As you can see it behaves a little like an alternative welcome block connecting to the main feed. To explain it quite plainly, this block allows you to include a permanent button menu in the header of the bot.
It’s particularly useful in this case as the user might come back several times to vote for or submit a new question at which point they can go straight to businesses by clicking the buttons in the header.
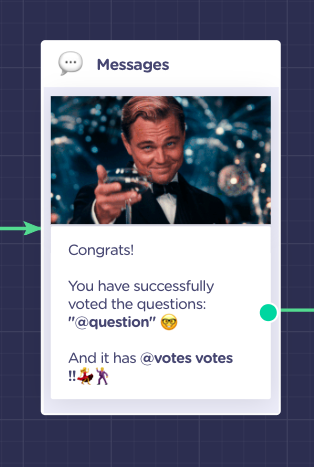
This is how the block manifests on the front end:
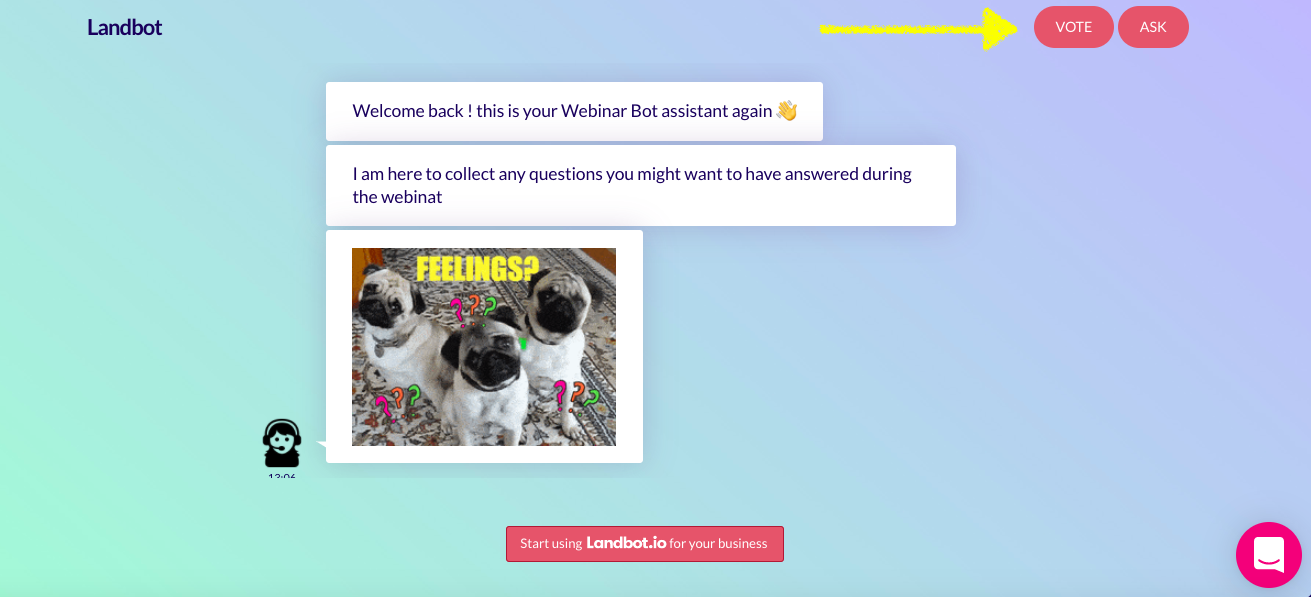
There is nothing much to edit here besides the text of the buttons. Hence, if you are OK, save the changes and proceed to customize the bot design and other settings!
What’s Next?
Now your webinar engagement bot is actually ready to drive engagement and in doing so promote your webinar content.
As you engage registrants you are also likely to encourage further lead generation as you keep the idea of your webinar alive and increase the chance of sharing and referrals to compliment your social media marketing efforts.
Keep this bot active before and during the webinar.
Once it’s over, it’s time to build the next and last chatbot of this series, the webinar conversion bot!


.avif)
%20(1).png)
.avif)