


.svg)
Please note that 'Variables' are now called 'Fields' in Landbot's platform.
If you have mastered building a basic survey bot or are simply looking for more sophisticated tips and tricks, this is a tutorial for you! You see, just because Landbot, and advanced chatbot platform, is easy to use it doesn’t mean you can only achieve simple things. The variety of no-code features allows for an equal variety of sophisticated and smart solutions.
To give you an example, I will show you how to set up an Airtable webhook in a conversational survey that adjusts the flow to customer responses in real-time.
Check the video for the sneak-peak into the final result:
So, in this survey, we asked our customers which Landbot features they use in their bot building and then rate those features.
I. Set Up Airtable
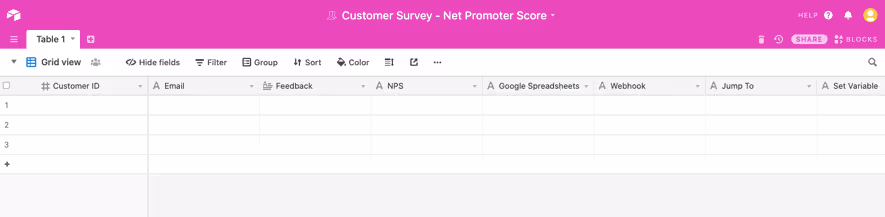
Create a new sheet in Airtable to store your survey data.
II. Define Your Questions
In essence, this survey will only contain 4 questions:
- “Which features have you used to build your bots?” – Buttons (Multiple Choice)
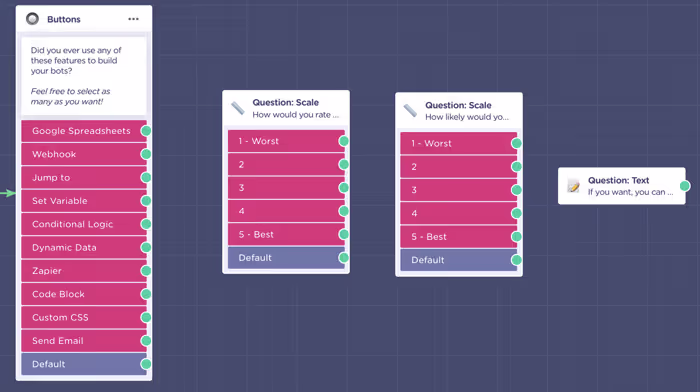
- “How would you rate the “feature”?” – Scale (1-5)
- “Would you recommend Landbot to a friend or colleague?” – Scale (1-5)
- “Please share your feedback about any of the mentioned features:” – Text Block (Free Input)
When setting up your Buttons block, ensure you enable “Multiple Choice” and establish a variable to save the answer.
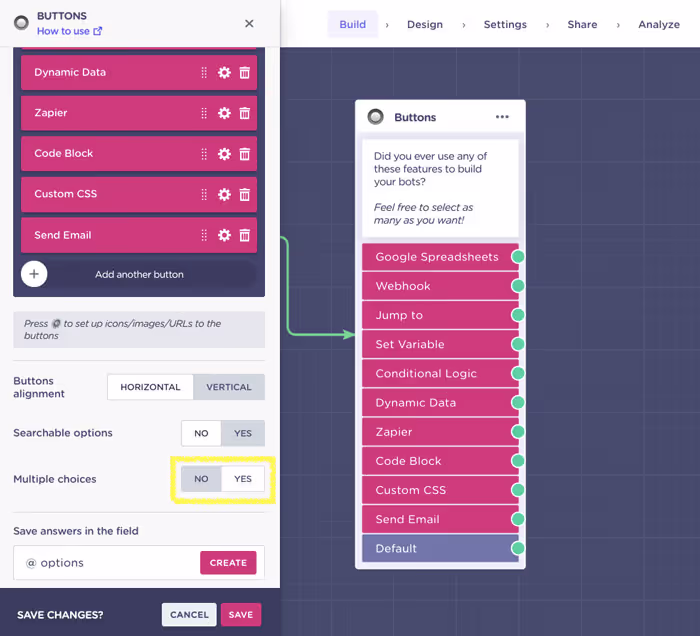
In fact, make sure each of your questions has a designated variable to save the user’s answer.
The variables we created are:
@features – to represent selected features in the multiple-choice
@feature_rating – to represent user rating of the selected features
@nps – to present the probability of the client recommending our products
@feedback – to represent the free input question
Now we need to ensure that:
- The bot asks for the rating of the user-selected features before continuing to the next question
- The collected data updates in Airtable
III. Airtable Webhook Integration
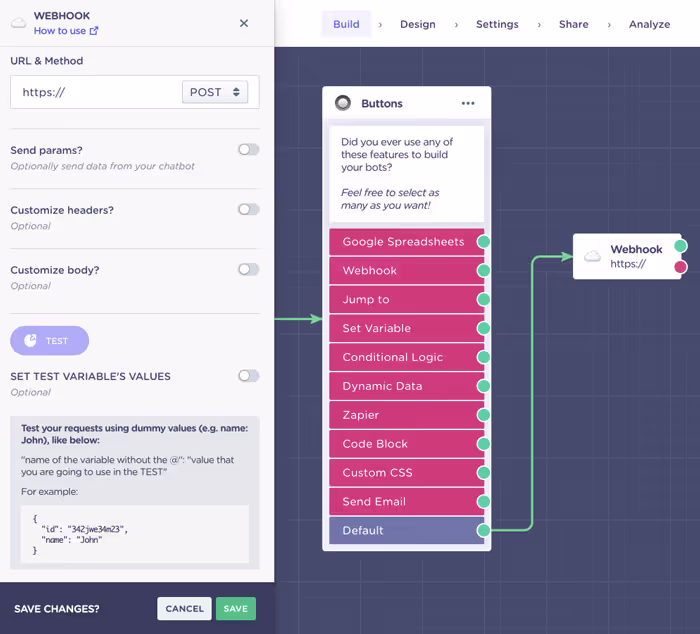
To create the Airtable webhook, draw an arrow from the multiple-choice question block and select “Webhooks” option from the features menu:
You must get the App ID in Airtable to build the Webhook’s URL.
The structure of it should look like the following:
https://api.airtable.com/v0/<app_id>/<nameofthebase>
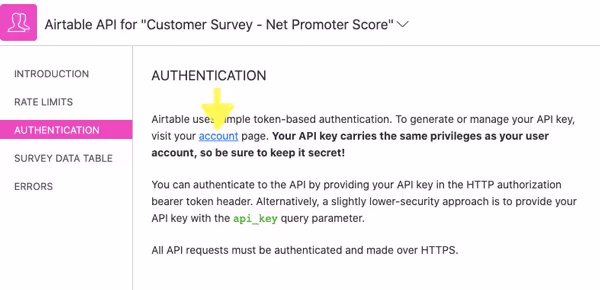
To obtain this URL, go to Airtable, click Help in the upper right corner and then select API Documentation.
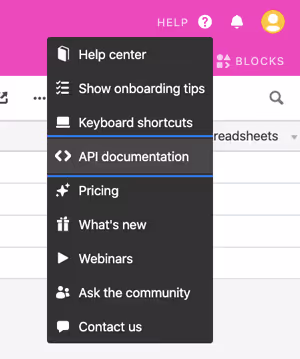
A new page will load. Select “AUTHENTICATION” and copy the URL under “EXAMPLE USING BEARER TOKEN (RECOMMENDED)”
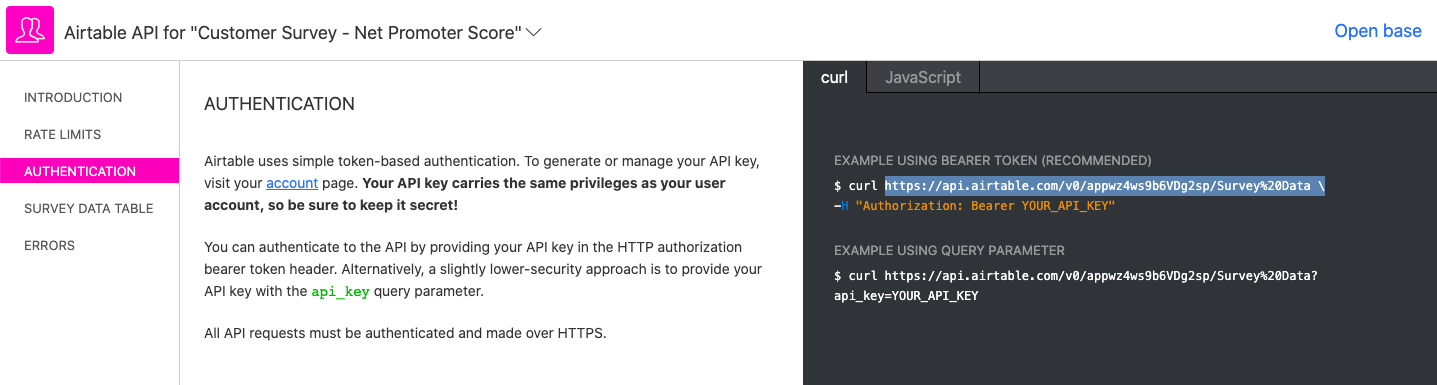
In our case that would be:
https://api.airtable.com/v0/appwz4ws9b6VDg2sp/Survey%20Data
- <app_id> equals appwz4ws9b6VDg2sp
- <nameofthebase> equals Survey%20Data (as based on the name of the Airtable sheet we created)
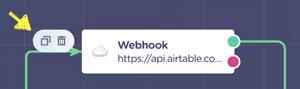
This is how it will look in the Webhook block:
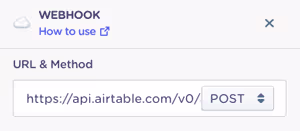
Note: Keep the Webhook action on POST in this setup as at this stage we will be sending the user answer to the Airtable.
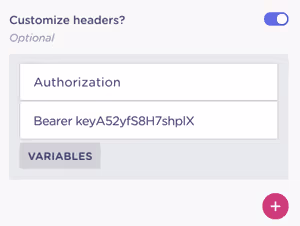
Next, active the “Customize Headers” section:
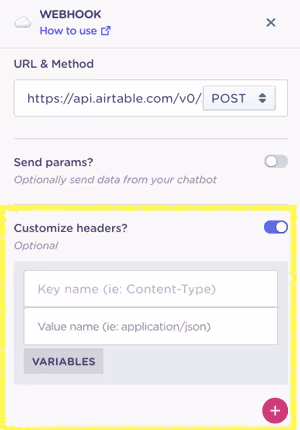
For the webhook to work, you need to obtain an authorization in the form of the API key.
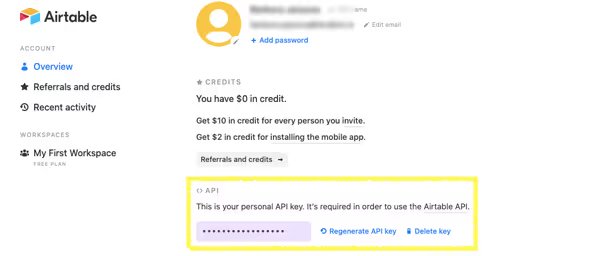
If this is the first time you are setting up an Airtable webhook with your account you will need to generate your API key first:
- Click “account” in the Authentication documentation
- When a new page with your account information opens, click to generate the API Key
Now, if you reload your API Documentation page you will see a “Show API Key” box in the upper right corner:
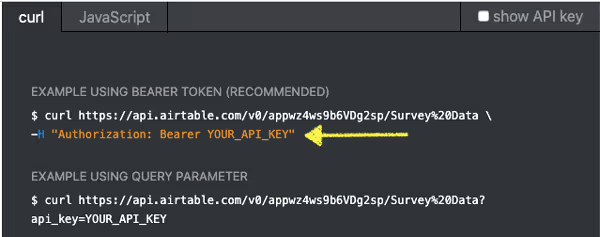
Tick the box and the API key will appear in the place of YOUR_API_KEY”
Please copy the Key for from “Bearer” until the end of the text.
In the Webhook block, type “Authorization” in the first field of the header and paste the key in the second section:
Click the + sign to create another header field and fill it in as follows:
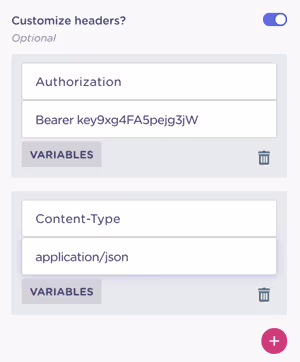
This header field lets Airtable know in which format it will receive the data (application/json).
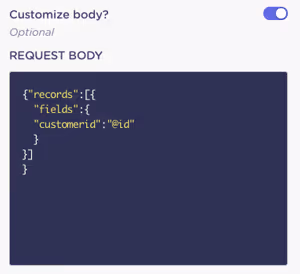
Next, move on to optimize the “Body” section of the webhook.
At this point in our survey example, we want to create a record with one value.
For the field “Customer ID” we want to send the variable @id.
This is how this information will look in JSON:
{"records":[{
"fields":{
"customerid":"@id"
}
}]
}
Now it’s time to check if our setup has been correct using the test section.
To do so we need to build a “body” and give a test value to the variable @id.
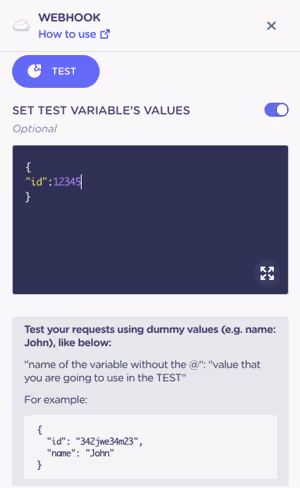
Above, you can see I am testing the webhook by giving the @id variable value “12345”
{
"id":12345
}
When all is set up, press the TEST button.
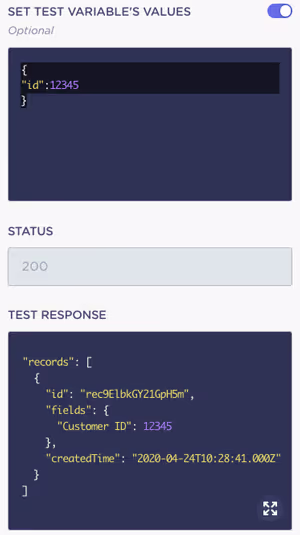
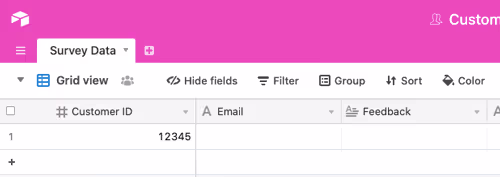
In our case, the test status is 200 and according to the test response, it seems a new record was created successfully. To be sure just check your Airtable sheet.
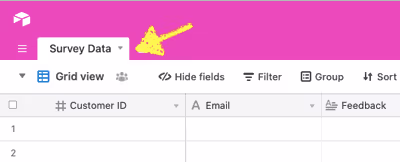
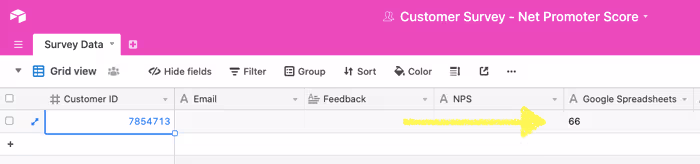
The test should have created a new row with the test customer ID:
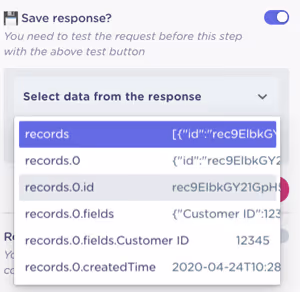
Now that the test was successful move on to the last section of the webhook – Save Response.
This section will capture the values from the response for later use.
POST action in webhook, let’s us create a new row (record) in Airtable. When it’s done, it automatically generates an Aritable ID, this will be the number we will use as a reference to update these rows later.
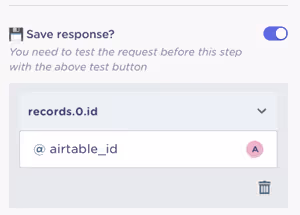
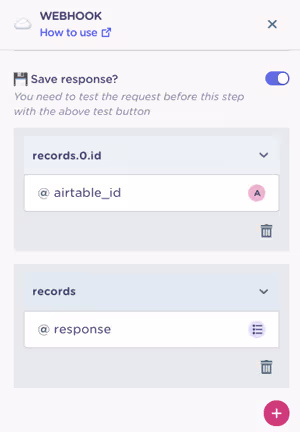
So, in the “Seve Response” section we will save the records.0.id under a new variable @airtable_id:
The final set up will look as follows:
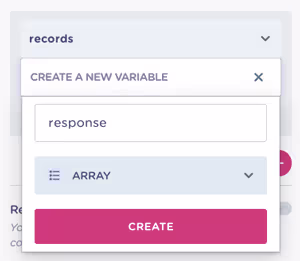
Next, continue to create another response. This time select “records” and associate it with a new variable in an array format.
An “array” is a programming term but don’t let that put you off. It describes a data structure, which stores “a collection of elements of the same data type”.
Simply put, it’s a collection of variables of the same type, much like the collection of feature choices our customers will select in the multiple-choice block.
Note: “Records” must be in the array format in order for the bot to work (Visit our knowledge base for more information).
Once both your responses are set up, click SAVE to guard the configuration of your webhook:
You did it!
IV. Process Selected Features
Now, that we have created a record of a new customer on our Airtable sheet, we need to process their feature selection.
Given the question is a multiple-choice, the user can select all, some or just one of the options.
We want to ensure that the bot asks them to rate only those features they said they had used previously.
For that, we need to use the Landbot feature called “Formulas”.
Formulas in Landbot are much like formulas in an Excel spreadsheet or Google sheets, they allow you to make simple or advanced calculations with the bot without coding.
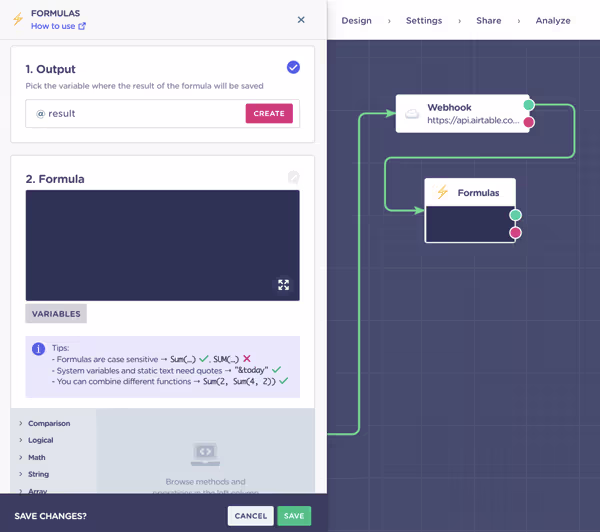
Draw an arrow from your Webhook block and select Formulas block from the Menu.
The Formulas block has two main sections:
- Output – the variable under which you want to save the result of the formula
- Formula – the part where you define the action/calculation to be carried out
So what do we need to do first?
When a user picks several different options the @feature variable value includes commas. E.g., Google Sheets, Webhook, Jump to, Code Block
Hence, our first point of order will be using the commas as separator indicators and use them to help us separate the individual features under @features variable using formulas.
To achieve this we will use:
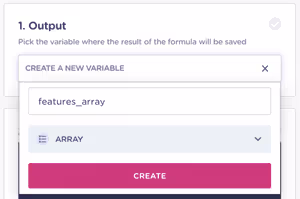
- an output variable in the form of an array
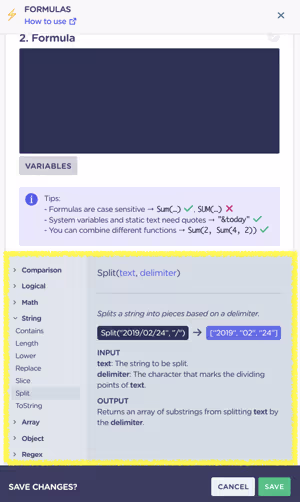
- the “Split” formula which you can retrieve from a cheatsheet in the bottom section of the Formulas settings bar:
First, create a new variable so save this operation in an array format:
Next, configure the formula.
Example in the cheat sheet shows the following setup with a specific data point (the date)
- Split(“2019/02/24”, “/”)
In the example, the “/” is the separator indicator and the elements to be separated are the number.
We want to split whatever is stored under the @features variable and our separation indicator is a comma. Hence, our formula will look like this:
Split(@features,", ")
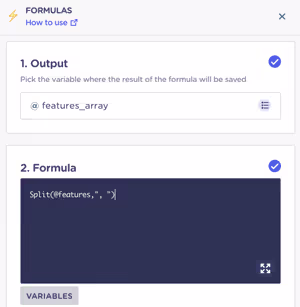
Click save and let’s move on.
Now that the features are separated and stored in an array, we need to count how many the customer actually chose.
So we will use the Array Length formula (vid cheat-sheet) to count the number of elements in the previous formula output.
Length(@features_array)
The setup will look as follows:
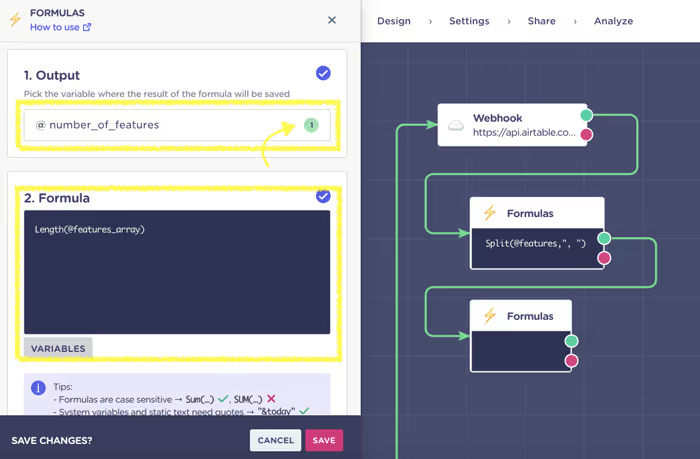
Make sure you choose the right variable format (NUMBER) for the @number_of_features variable.
Now that we have separated and established a way to determine the number of selected features, we need to create a counter that will calculate if the bot asks the rating about all the features the user picked.
For instance, if the user selects two features the bot will know to ask for the rating two times and then continue to the next question.
V. Set up Index to Enable Counter Function
The first step to take is setting up a new variable that will act as a base value.
Draw an arrow from your last formula and select the “Set a Variable” block. Here, create a new numeric variable called @index and set its value at 0.
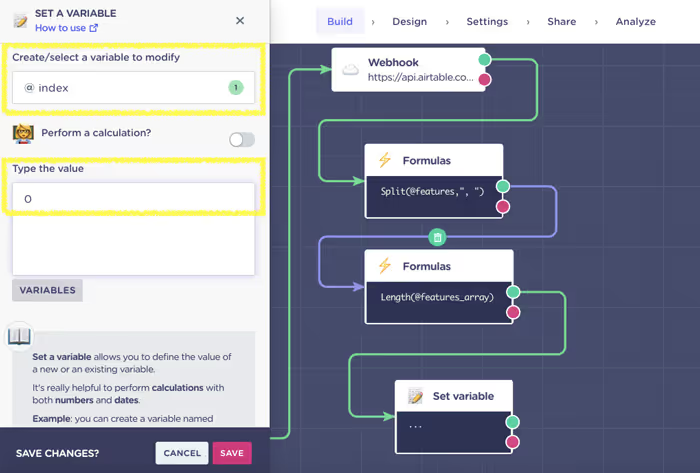
Click SAVE and create another Formulas block.
This Formula will tell the bot which of the features under @features_array variable it should ask about.
In an array, each of the features selected by the user has its position, e.g., Google Spreadsheets = 1, etc.
We will use the Array GetValue formula and @index variable to “retrieve” the right feature from the array and ask about it.
GetValue(@features_array, @index)
Set up your block as follows:
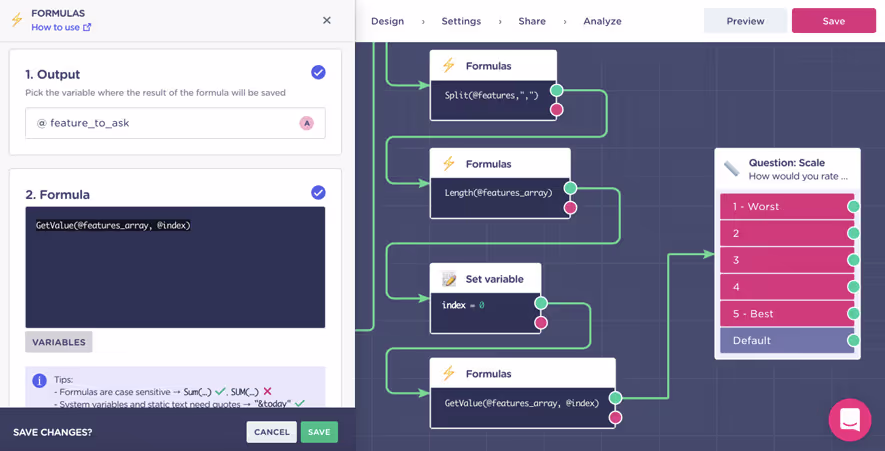
In essence, this formula will retrieve the feature from the array (collection of features) based on the value of the @index.
The starting value of @index is 0 but it will update each time the bot passes through the feature rating question.
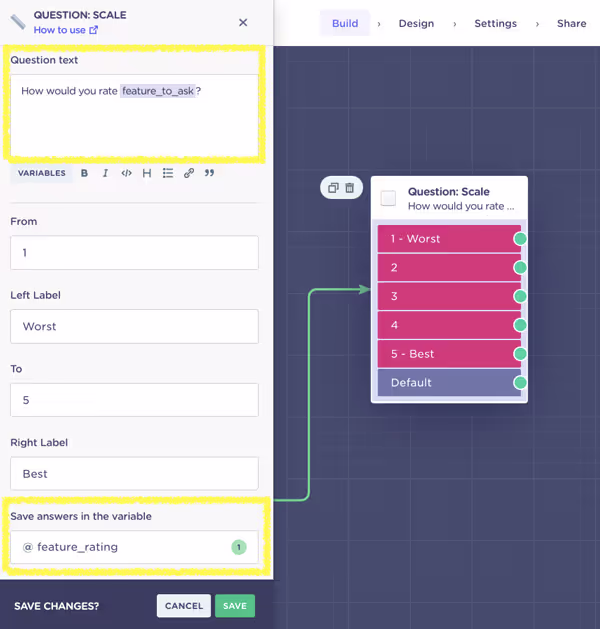
VI. Export Rating Data to Airtable
Connect your sequence to the Feature rating question “Scale” block we set up at the start.
Here, instead of including a specific feature in the question, use our last formula output variable @feature_to_ask.
And create a variable to save the user’s response.
After the customer submits their rating, you need to get this data to the Airtable sheet.
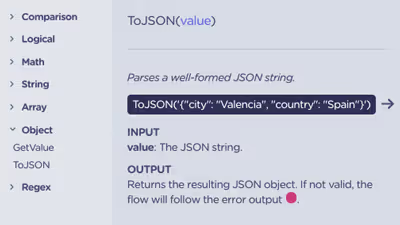
But before you send them there through the webhook, we need to transfer the format from array to JSON (once again using a formula).
Remember, when we were setting up the webhook, we defined that our data will be sent in “application/JSON” – well, that’s why we need to get this done.
Luckily there is a dedicated formula that takes care of putting data into JSON format – human-readable text to store and transmit data objects.
So, the data we want to send into the Airtable spreadsheet is the feature for which the bot requested rating and the rating itself. This translates into two variables:
- @feature_to_ask
@feature_rating
Draw a green arrow from the rating block and create a Formulas block and check the cheat sheet for the formula:
Our formula, since we are using variables and not hard data, will look as follows:
ToJSON('{"@{feature_to_ask}":"@{feature_rating}"}')
It basically pairs the feature with the selected rating.
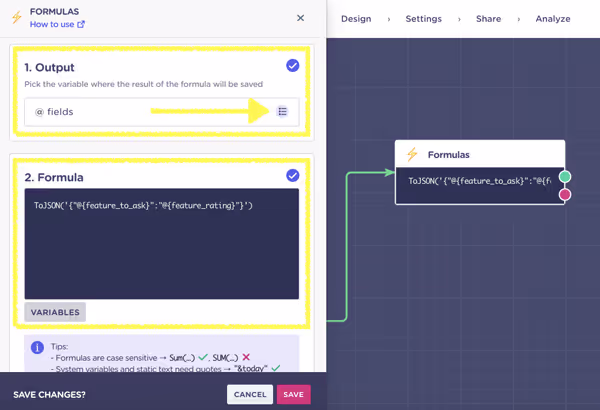
Before moving on, set up the output variable in the array format. I decided to call it @fields since this information will be updating the Airtable fields.
Now it’s time for another Airtable webhook. But don’t worry, you don’t have to go through the whole thing again. Just create a copy of the webhook you already set up and let’s make some adjustments to it.
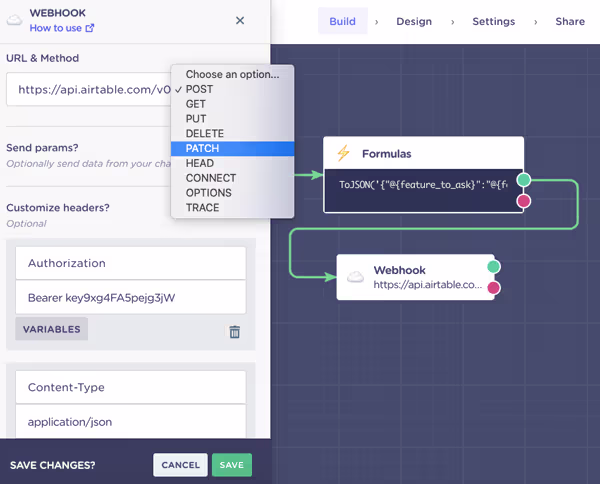
The first adjustment to make is changing the webhook action from POST to PATCH.
It’s because this time we will not be POSTING new information to create a new row but PATCHING information into an existing row.
Next, you need to update the webhook URL with the @airtable_id variable so the webhook knows which row to update. Simply add your variable to the existing webhook URL:
https://api.airtable.com/v0/appwz4ws9b6VDg2sp/Survey%20Data/@aritable_id
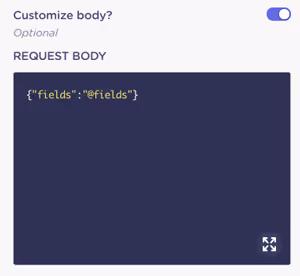
Since this time we are updating the fields, not the customer ID, scroll down and update your “Request Body” to:
{"fields":"@fields"}
To run a test, you need an actual Airtable ID.
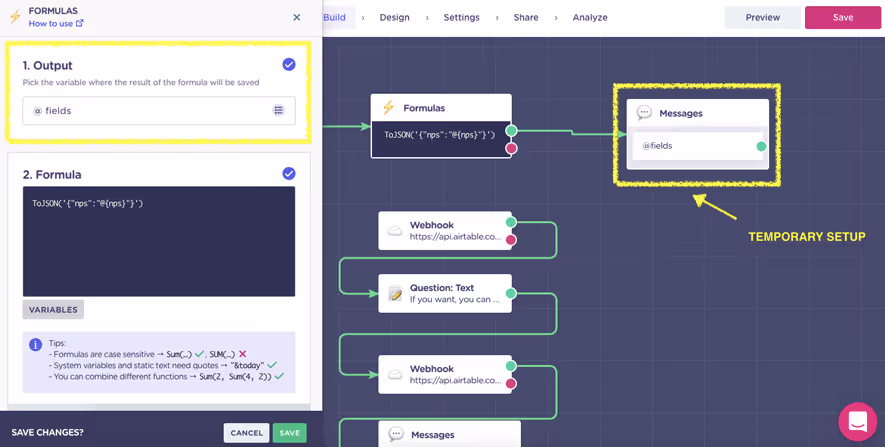
There is a simple trick to obtaining it. Go back to your first Airtable webhook, delete the existing flow for a moment and link the webhook to a message block with @airtable_id variable
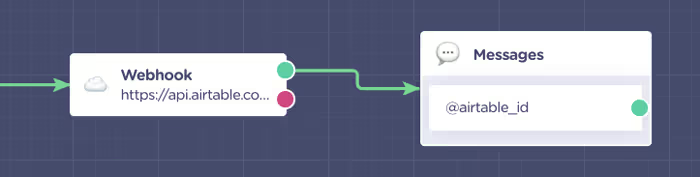
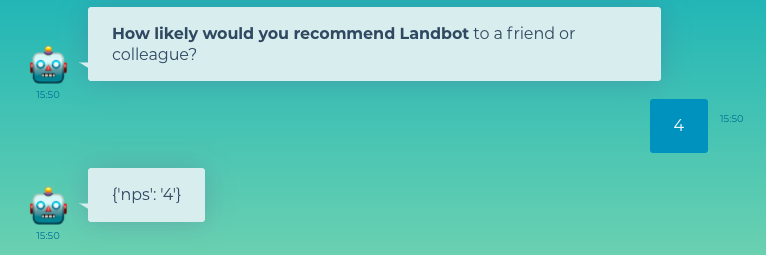
Go to preview and follow the bot flow. When the bot gets to the webhook, it will give you back the ID you need test your PATCH webhook:

Now if you check your Airtable, these will be a new row but the ID will have transformed into a numerical form – hence the reason you can’t just copy the ID from Airtable directly:

So copy the ID from the chat and let’s go!
ATTENTION: Do not forget to delete the message block and connect the webhook back to the original flow!
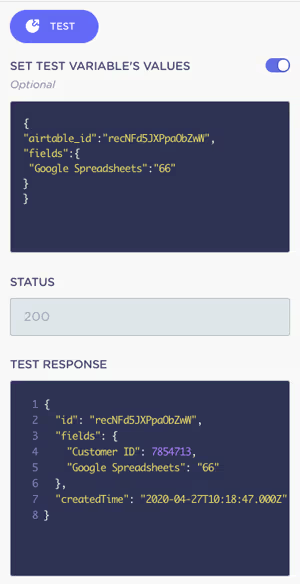
Go back to your second webhook and enter the ID – recNFd5JXPpaObZwW – into the sequence to test variable values:
{
"airtable_id":"recNFd5JXPpaObZwW",
"fields":{
"Google Spreadsheets":"66"
}
}
Click TEST!
We can see that our set up was successful as we got 200 status and the customer record has been updated:
Once again, if you check the spreadsheet, you will see the row updated with the correct information.
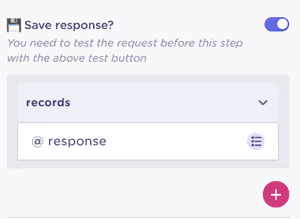
Now all is left is setting up the “Save Response” section. This time, quite simply, reuse the @response variable in an array format.
VII. Enable Counter
Drawing an arrow from your newly setup PATCH webhook, create a “Set a Variable” block. We are going to modify our @index variable by performing a calculation.
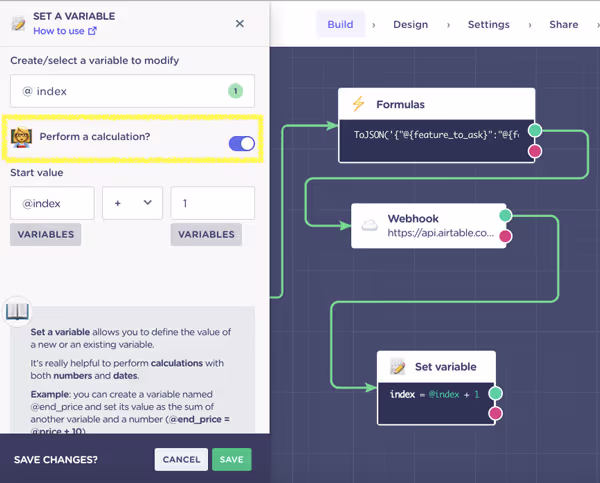
So, @index will start with a 0 value, but every time it passes through the feature rating block its value will increase by 1.
This will allow us to match the number of times the bot asks the user to rate a feature with the number of features the user selected.
Hence, now that we have a counter in place, we need a conditional block!
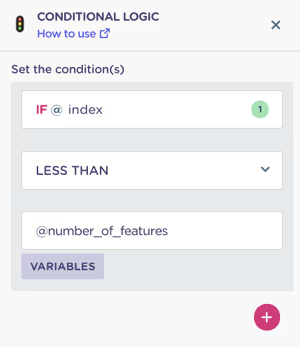
Our condition will be:
IF @index IS LESS THAN @number_of_features THEN
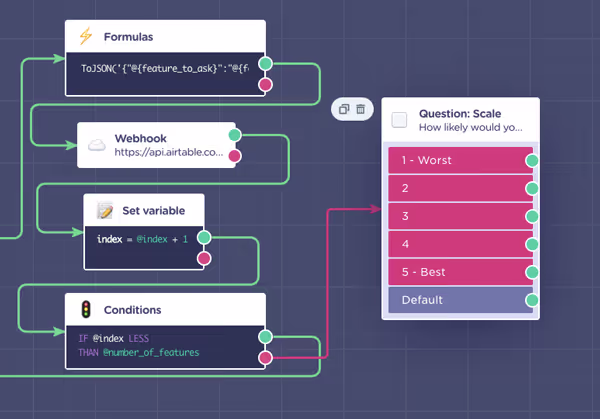
Now if it’s TRUE and @index really is LESS then @number_of_features the user selected, draw an arrow from the green output, and connect it with the “GetValue” formula that precedes the rating question.
This time, since the value of @index has changed, the formula will retrieve the feature from the array that corresponds to the index number.
For instance, imagine a feature array with these selections:
[‘Google Spreadsheets’, ‘ Jump to’, ‘ Dynamic Data’, ‘ Code Block’, ‘ Custom CSS’]
After having the “length” variable to count the number of features, each of them corresponds to a number:
- Google Spreadsheets – 0
- Jump to – 1
- Dynamic Data – 2
- Code Block – 3
- Custom CSS – 4
The GetValue formula tells us which of the values to retrieve as with each passing loop the value of @index increases… until it reaches the number when @index WILL NOT BE LESS THAN @number_of_features.
Then the bot will follow the PINK output to the next question:
VIII. Set up the Rest of the Questions
Now the hardest part is behind you… All you need to do is repeat this for every following question:
- Use to ToJSON formula to convert the data into the right format
- Copy the Airtable “PATCH” webhook to upload the data (no changes necessary)
For instance, for the question about recommending Landbot to a friend our set up would look like this:
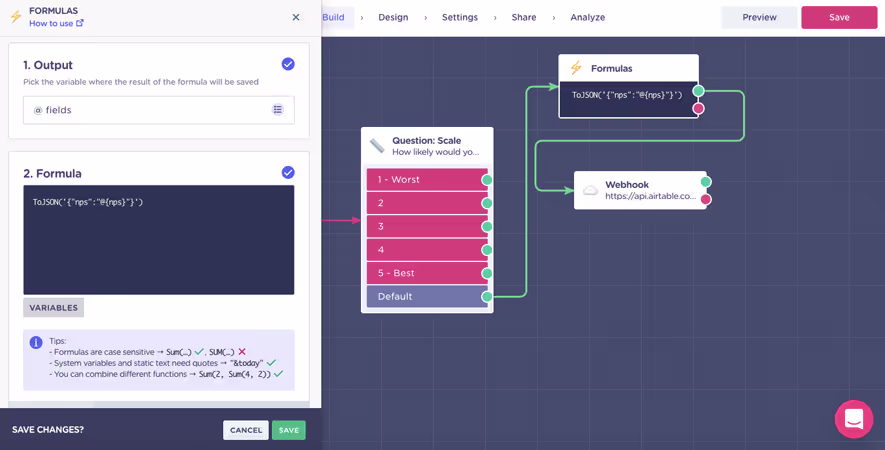
The Formula set up will be the same and the output variable will be once again @fields. So, all you need to do is update the data inside the JSON to the variable you used to save the user’s answer.
As for the “Airtable” PATCH webhook, just copy the last one you set up and connect it to the flow. Still, always TEST the webhook to ensure everything is working correctly
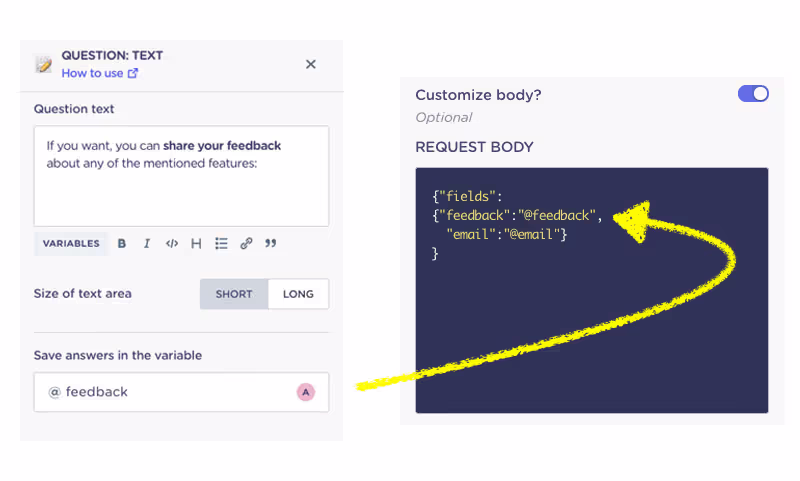
The last of our four question blocks was a simple TEXT block asking for free user input. Since the answer is just plain text, you don’t need to use the “ToJSON” formula to format it and just go ahead straight to the webhook.
However! Make sure to update the “REQUEST BODY” of your copy of the PATCH webhook. We saved our free answer under @feedback instead of @fields.
And there you have it!
A clever chatbot survey:
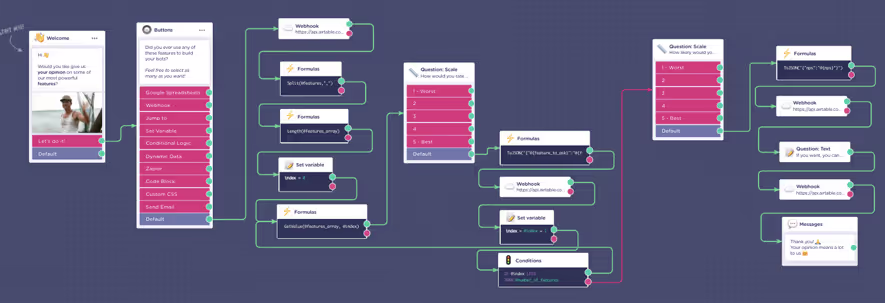
Yes, the process is a bit longer and more complex but once you get a hang of it, it really isn’t much harder than setting up the simple flow.
IX. Troubleshooting
Setting up a number of format-sensitive fields does increase the margin for error.
If your bot is not working, and you are not sure why there is a simple way to find the culprit that’s causing the problem.
With formulas, you are dealing with a lot of “operational” @variables which content you don’t get to see in your spreadsheet or CRM. Visualizing them helps to catch the inconsistencies or errors. To see the contents of one of these “hidden” variables interrupt your flow just for a moment.
Draw a green arrow from the formulas, webhooks, or another block which variable you want to examine and select the “Send a Message” block. Inside, insert the variable in question.
See example below:
Click SAVE and complete a test conversation.
Next, go to SHARE ➡ Share with a Link ➡ Click to open the bot link in a new tab and go through the conversation. You will see the variable appear in the message and so be able to spot wrong formatting or error reports.
Good luck!


.avif)
%20(1).png)
.avif)


%20(1).png)


